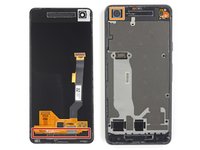
주요 콘텐츠로 건너뛰기

Google Pixel 2 Back Camera Lens Replacement

보관된 가이드
해당 안내서는 단지 역사적인 목적으로 보관됩니다. 최신 버전 안내서를 사용하여 수리 하십시오.

필요한 것

  1. Google Pixel 2 Back Camera Lens Replacement, Opening Procedure: 1 단계, 이미지 1/2 Google Pixel 2 Back Camera Lens Replacement, Opening Procedure: 1 단계, 이미지 2/2
    • If your display glass is cracked, keep further breakage contained and prevent bodily harm during your repair by taping the glass. This also makes a smooth surface allowing the suction cup to bond.

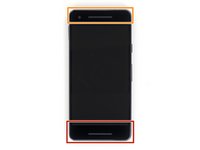
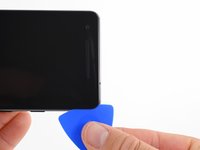
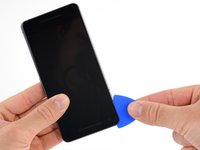
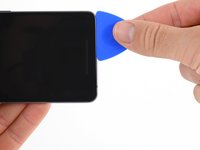
    • Apply a suction cup as close to the volume button edge of the phone as you can while avoiding the curved edge.

    • The suction cup will not make a good seal on the curved portion of the glass.

  2. Google Pixel 2 Back Camera Lens Replacement: 2 단계, 이미지 1/3 Google Pixel 2 Back Camera Lens Replacement: 2 단계, 이미지 2/3 Google Pixel 2 Back Camera Lens Replacement: 2 단계, 이미지 3/3
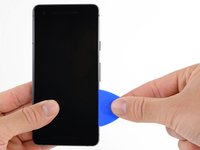
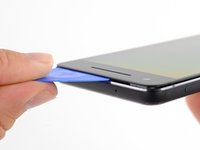
    • Pull up on the suction cup with firm, constant pressure and insert an opening pick between the front panel and rear case.

    • Do not insert the pick deeper than 1.5 mm, or you risk damaging the OLED panel.

    • This requires a significant amount of force and patience. If you have trouble, rock the suction cup and screen to weaken the adhesive, or apply heat with an iOpener, heat gun, or hair dryer.

    • The display panel is fragile. If you plan to re-use your display, take care to insert your tool only as far as necessary to separate the adhesive. Inserting the tool any further can damage the OLED panel under the glass.

  3. Google Pixel 2 Back Camera Lens Replacement: 3 단계, 이미지 1/2 Google Pixel 2 Back Camera Lens Replacement: 3 단계, 이미지 2/2
    • In the following steps, extra caution is required in certain areas to avoid damage to the phone:

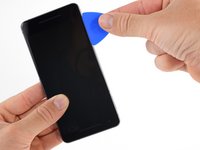
    • Do not insert the pick more than 9 mm into the bottom edge of the phone. If the pick contacts the folded portion of the OLED panel it can damage the display.

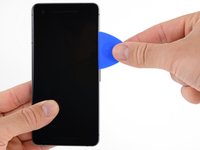
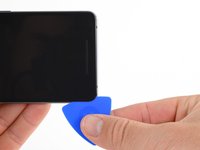
    • Only make very shallow cuts in the upper left corner, prying deeply can damage the front-facing camera.

    • Inserting an opening tool deeper than 1.5 mm into the sides of the device, or 9 mm into the top and bottom can permanently damage the display.

  4. Google Pixel 2 Back Camera Lens Replacement: 4 단계, 이미지 1/2 Google Pixel 2 Back Camera Lens Replacement: 4 단계, 이미지 2/2
    • In the following steps, use the flat of the opening pick, rather than a corner, to cut here. This will help prevent inserting the pick too deeply.

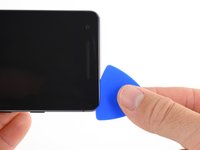
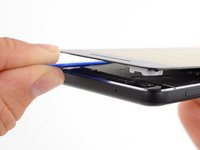
    • Slide the opening pick up the right side of the phone to separate the display adhesive.

    • Take extra care with the side bezels, which are only 1.5 mm deep.

  5. Google Pixel 2 Back Camera Lens Replacement: 5 단계, 이미지 1/3 Google Pixel 2 Back Camera Lens Replacement: 5 단계, 이미지 2/3 Google Pixel 2 Back Camera Lens Replacement: 5 단계, 이미지 3/3
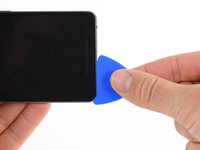
    • Slide the opening pick around the upper-right corner and along the top edge of the phone.

    • There's a mesh covering the earpiece speaker on the top edge of the screen. If you don’t have a replacement mesh, take care not to damage or lose this component.

  6. Google Pixel 2 Back Camera Lens Replacement: 6 단계, 이미지 1/3 Google Pixel 2 Back Camera Lens Replacement: 6 단계, 이미지 2/3 Google Pixel 2 Back Camera Lens Replacement: 6 단계, 이미지 3/3
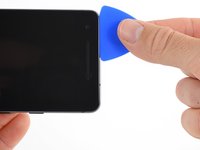
    • Slide the pick around the upper-left corner of the phone and down the left edge of the phone.

  7. Google Pixel 2 Back Camera Lens Replacement: 7 단계, 이미지 1/3 Google Pixel 2 Back Camera Lens Replacement: 7 단계, 이미지 2/3 Google Pixel 2 Back Camera Lens Replacement: 7 단계, 이미지 3/3
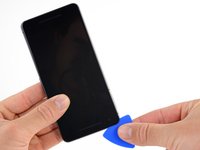
    • Slide the pick around the bottom-left corner and along the bottom of the phone. Keep pick at a slight angle away from the screen to avoid damage to the OLED corners.

    • Take extra care not to insert the opening pick more than 9 mm to avoid damaging the OLED panel.

  8. Google Pixel 2 Back Camera Lens Replacement: 8 단계, 이미지 1/2 Google Pixel 2 Back Camera Lens Replacement: 8 단계, 이미지 2/2
    • Reinsert the pick at the top edge of the phone and gently pry up the display.

    • If the display doesn't readily lift, do some extra prying to separate the last of the adhesive. The adhesive near the upper speaker is thicker than other places.

    • Don't try to fully separate the display yet, as a fragile ribbon cable still connects it to the phone's motherboard.

  9. Google Pixel 2 Back Camera Lens Replacement: 9 단계, 이미지 1/2 Google Pixel 2 Back Camera Lens Replacement: 9 단계, 이미지 2/2
    이 단계에 사용된 도구:
    Magnetic Project Mat
    $19.95
    구매
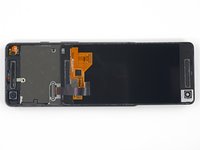
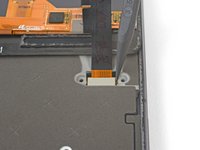
    • Carefully lay the display down on top of the rear case as shown, making sure not to crease or tear the display ribbon cable.

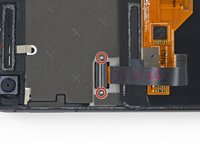
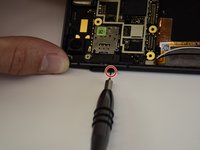
    • Remove the two 4.0 mm T5 Torx screws securing the display cable bracket.

    • Throughout this repair, keep track of each screw and make sure it goes back exactly where it came from.

  10. Google Pixel 2 Back Camera Lens Replacement: 10 단계, 이미지 1/1
    • Remove the display cable bracket.

  11. Google Pixel 2 Back Camera Lens Replacement: 11 단계, 이미지 1/2 Google Pixel 2 Back Camera Lens Replacement: 11 단계, 이미지 2/2
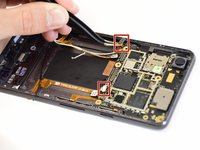
    • Use the point of a spudger to lift the display cable connector up and out of its socket on the motherboard.

    • Avoid touching the motherboard with the tip of your spudger. The components surrounding the socket are fragile.

    • To re-attach press connectors like this one, carefully align and press down on one side until it clicks into place, then repeat on the other side. Do not press down on the middle. If the connector is misaligned, the pins can bend, causing permanent damage.

    • If any part of your screen doesn't respond to touch after your repair re-seat this connector, making sure it clicks fully into place and that there's no dust or other obstruction in the socket.

    • During reassembly, pause here and replace the adhesive around the edges of the display.

  12. Google Pixel 2 Back Camera Lens Replacement, Battery: 12 단계, 이미지 1/2 Google Pixel 2 Back Camera Lens Replacement, Battery: 12 단계, 이미지 2/2
    • Use the flat end of a spudger to disconnect the charging assembly connector.

  13. Google Pixel 2 Back Camera Lens Replacement: 13 단계, 이미지 1/1
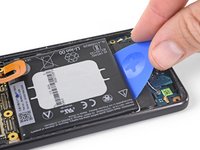
    • Fill a plastic dropper or syringe with high concentration isopropyl alcohol and apply a few drops of alcohol under each corner of the battery. Give the alcohol a minute to weaken the battery adhesive.

    • Alternatively, apply a heated iOpener to the back of the phone over the battery for at least two minutes. Reheat and reapply the iOpener as needed until the battery adhesive is sufficiently weakened.

  14. Google Pixel 2 Back Camera Lens Replacement: 14 단계, 이미지 1/2 Google Pixel 2 Back Camera Lens Replacement: 14 단계, 이미지 2/2
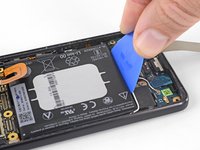
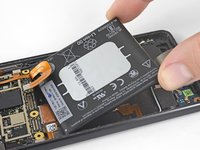
    • Hold the charging assembly cable out of the way and insert an opening pick along the bottom edge of the battery.

    • Apply steady, even pressure to slowly lever the battery up and out of the phone.

    • Only pry from the center of the battery to avoid damaging the delicate ribbon cables beneath either side of the battery.

    • Try your best not to deform the battery during this process. Soft-shell lithium-ion batteries can leak dangerous chemicals, catch fire, or even explode if damaged. Do not use excessive force or pry at the battery with metal tools.

    • If you are having trouble, apply some more alcohol under the battery and try again.

  15. Google Pixel 2 Back Camera Lens Replacement: 15 단계, 이미지 1/2 Google Pixel 2 Back Camera Lens Replacement: 15 단계, 이미지 2/2
    이 단계에 사용된 도구:
    Tesa 61395 Tape
    $5.99
    구매
    • Remove the battery.

    • Do not reuse the battery after it has been removed, as doing so is a potential safety hazard. Replace it with a new battery.

    • To install a new battery:

    • Use a spudger to scrape away any remaining adhesive from the phone, and clean the glued areas with isopropyl alcohol and a lint-free cloth.

    • Secure the new battery with pre-cut adhesive or double-sided adhesive tape. In order to position it correctly, apply the new adhesive into the phone, not directly onto the battery. The adhesive should not touch any of the cables under the battery.

    • Press the battery firmly into place for 20-30 seconds.

  16. Google Pixel 2 Back Camera Lens Replacement, Motherboard: 16 단계, 이미지 1/2 Google Pixel 2 Back Camera Lens Replacement, Motherboard: 16 단계, 이미지 2/2
    • use the flat end of a spudger to disconnect the charging assembly connector from the motherboard.

  17. Google Pixel 2 Back Camera Lens Replacement: 17 단계, 이미지 1/3 Google Pixel 2 Back Camera Lens Replacement: 17 단계, 이미지 2/3 Google Pixel 2 Back Camera Lens Replacement: 17 단계, 이미지 3/3
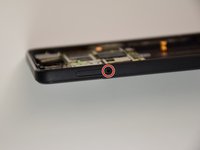
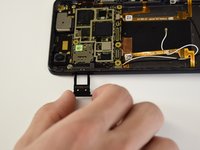
    • Insert a paperclip or SIM eject tool into the small hole on the left side of the phone and push until the SIM card tray pops out.

    • Remove the SIM card tray.

  18. Google Pixel 2 Back Camera Lens Replacement: 18 단계, 이미지 1/1
    • Remove the two 2.5 mm PH00 screws.

  19. Google Pixel 2 Back Camera Lens Replacement: 19 단계, 이미지 1/3 Google Pixel 2 Back Camera Lens Replacement: 19 단계, 이미지 2/3 Google Pixel 2 Back Camera Lens Replacement: 19 단계, 이미지 3/3
    • Disconnect two connectors at the bottom edge of the motherboard.

  20. Google Pixel 2 Back Camera Lens Replacement: 20 단계, 이미지 1/2 Google Pixel 2 Back Camera Lens Replacement: 20 단계, 이미지 2/2
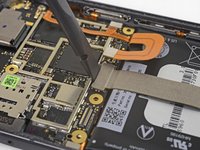
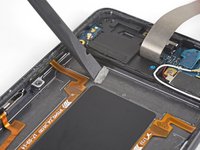
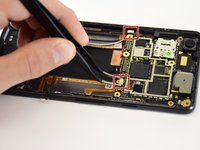
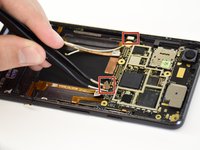
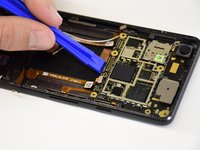
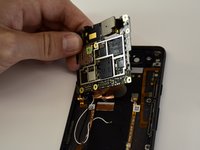
    • Pry up the motherboard using a plastic opening tool.

    • Remove the motherboard.

  21. Google Pixel 2 Back Camera Lens Replacement: 21 단계, 이미지 1/3 Google Pixel 2 Back Camera Lens Replacement: 21 단계, 이미지 2/3 Google Pixel 2 Back Camera Lens Replacement: 21 단계, 이미지 3/3
    • Flip the motherboard over.

    • Disconnect the fingerprint sensor cable.

    • The motherboard is now completely detached from the phone.

  22. Google Pixel 2 Back Camera Lens Replacement, Back Camera Lens: 22 단계, 이미지 1/1
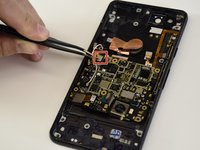
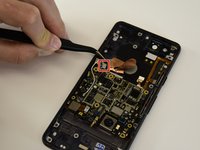
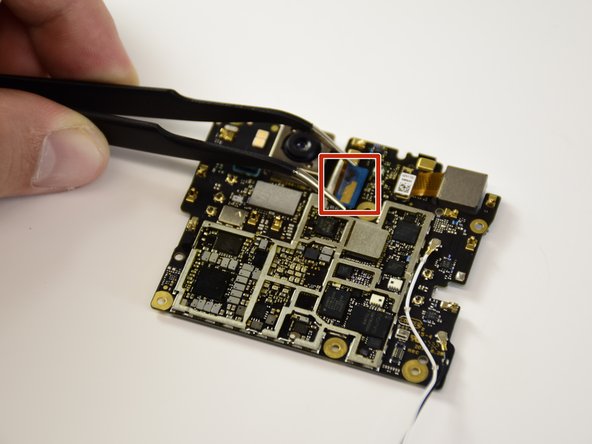
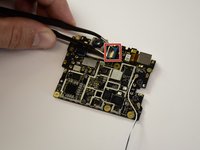
    • Flip the motherboard over to access the camera lens ribbon connector.

    • Locate the blue camera lens ribbon connector

  23. Google Pixel 2 Back Camera Lens Replacement: 23 단계, 이미지 1/2 Google Pixel 2 Back Camera Lens Replacement: 23 단계, 이미지 2/2
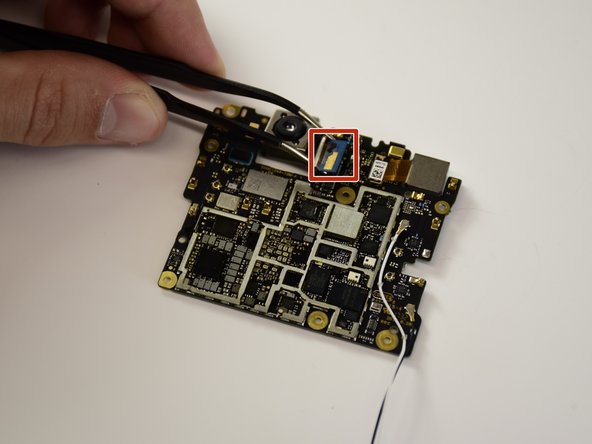
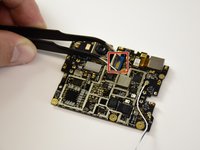
    • Remove the ribbon connector that connects the camera lens to the motherboard by grabbing it with tweezers and lifting up.

  24. Google Pixel 2 Back Camera Lens Replacement: 24 단계, 이미지 1/1
    • Remove the camera module.

결론

Compare your new replacement part to the original part—you may need to transfer remaining components or remove adhesive backings from the new part before installing.

To reassemble your device, follow the above steps in reverse order.

Take your e-waste to an R2 or e-Stewards certified recycler.

Repair didn’t go as planned? Check out our Answers community for troubleshooting help.

다른 2명이 해당 안내서를 완성하였습니다.

Monica Andres

회원 가입일: 01/24/18

286 평판

안내서 2개 작성하였습니다

Cal Poly, Team S18-G5, Livingston Winter 2018 Cal Poly, Team S18-G5, Livingston Winter 2018 회원

CPSU-LIVINGSTON-W18S18G5

4 회원들

안내서 11개 작성하였습니다

댓글 한 개

Step 17 it's NOT an SD card tray as the phone doesn't have SD card support…I know you meant Simcard tray.

MONKEYSATENEIL - 답글

댓글 쓰기

조회 통계:

24 시간 전: 0

7일 전: 0

30일 전: 1

전체 시간: 4,833