소개
이 수리 안내서는 iFixit 직원이 작성했으며 Google의 지지를 받지 않았습니다. 여기.에서 수리 안내서에 대해 자세히 알아보세요.***
이 안내서를 따라서 고장났거나 깨진 Google Pixel 5의 스크린을 교체하세요.
이전 Google Pixel 모델과 달리 Pixel 5의 스크린은 금속 프레임으로 강화되었습니다. 이어피스 스피커도 스크린 뒷면에 접착되어 있습니다.
필요한 것
-
-
스크린 이음새: 이 이음새는 스크린을 휴대폰의 나머지 부분과 분리합니다. 이 이음새를 비집지 마세요.
-
베젤 이음새: 스크린을 보호하기 위해 설계된 플라스틱 베젤이 프레임과 만나는 지점입니다. 플라스틱 클립으로 고정되어 있습니다. 이곳을 비집어야 합니다.
Please remove the image of the pick in the bottom of the phone in Step 2. This led me to place a pick there BEFORE step 5 which damaged my digitizer. Now I have to replace the entire screen as a result.
Alternatively, add the image from step 5 with the suction cup in place, or just draw an arrow digitally to the seam you're referring to in step 2. Or call "Step 2" "Important Note" instead of a step.
Wow, I'm glad I read this first. I too assumed this step was about inserting the pick, but wasn't sure because it wasn't clearly written that way.
Agreed with the "important note" idea, along with combining this with step 5 where the context is actually relevant.
-
-
-
파란색 손잡이를 힌지를 향해 당겨 열기 모드를 해제하세요.
-
흡입 컵을 스크린 하단 가장자리 근처에 배치하세요—전면에 하나, 후면에 하나.
-
컵들을 아래로 눌러 원하는 부위에 흡착하세요.
-
-
-
가열된 가장자리에 최대한 가깝게 흡입 컵을 스크린에 대세요.
-
흡입 컵을 강하고 일정한 힘으로 위로 당겨서 틈을 만드세요.
-
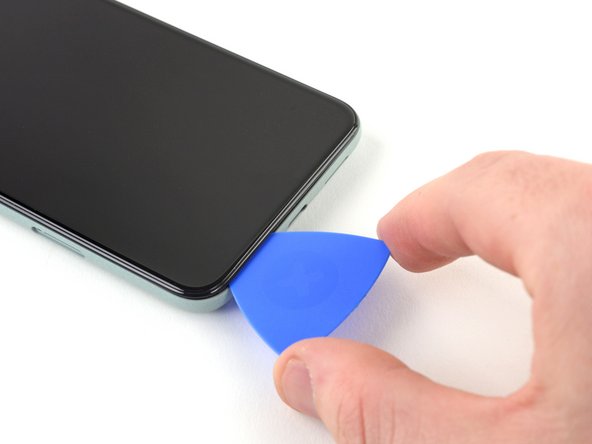
틈에 여는 픽을 끼우세요.
"Insert the opening pick into the gap." NOT the gap under the glass, the second gap... If not you will probably break your screen, at least I did. Especially important if your pixel 5 shipped with the screen gap :(
-
-
-
-
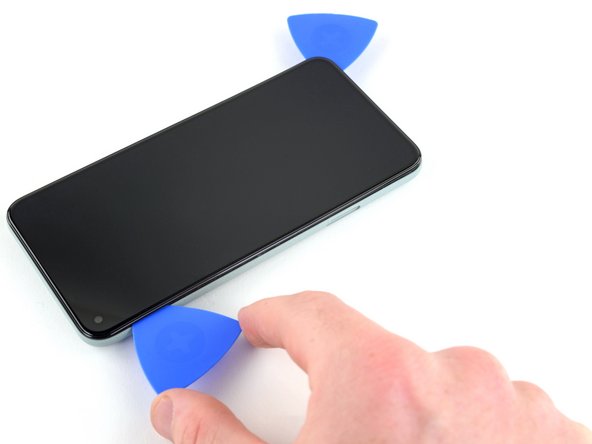
스크린 왼쪽 하단에 다른 여는 픽을 끼우세요.
-
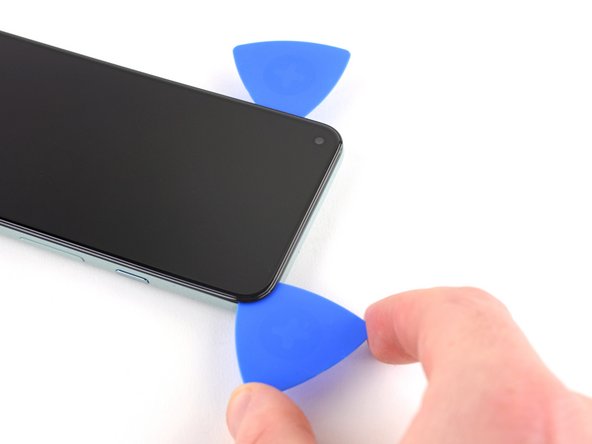
여는 픽을 왼쪽 모서리를 돌아서 미세요.
-
픽을 계속해서 전면 카메라를 향해 밀어서 스크린의 왼쪽 가장자리에 있는 접착제를 자르세요.
-
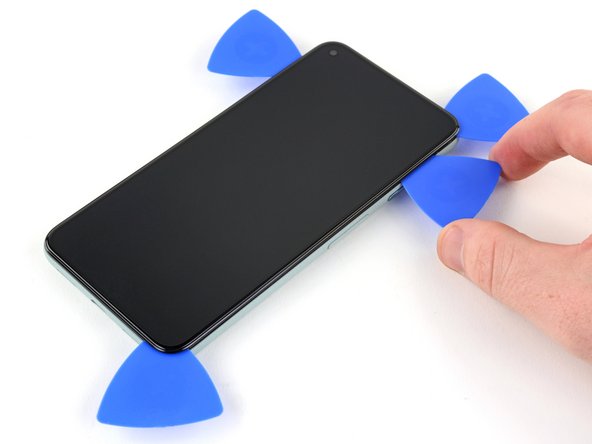
접착제가 다시 붙지 않도록 픽을 끼운 채로 두세요.
I suggest placing an orientation sticker on the screen so you don't lose track of where that delicate ribbon cable is. I gently bent one, immediately after doing a successful one, resulting in a costly screen replacement. It's important to know that it's incredibly delicate.
-
-
-
왼쪽 상단 모서리에 있는 여는 픽을 사용하여 스크린의 왼쪽 가장자리를 몇 밀리미터 들어 올리세요. 이렇게 하면 클립이 다시 케이스에 끼워지는 것을 방지할 수 있습니다.
-
스크린의 오른쪽을 들어 올려 책처럼 휴대폰을 여세요.
-
-
-
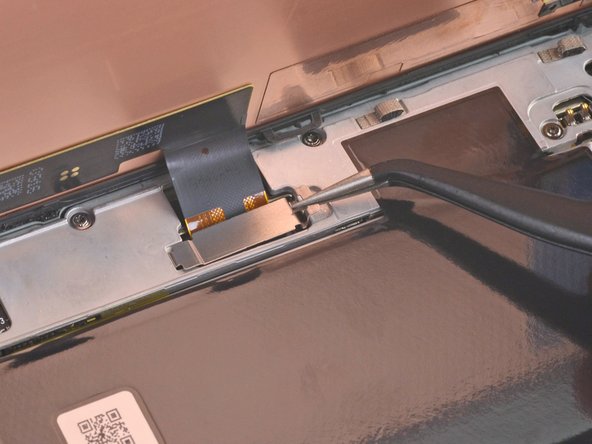
핀셋을 사용하여 스크린 플렉스 케이블을 고정하는 스크린 커넥터 커버를 잡으세요.
-
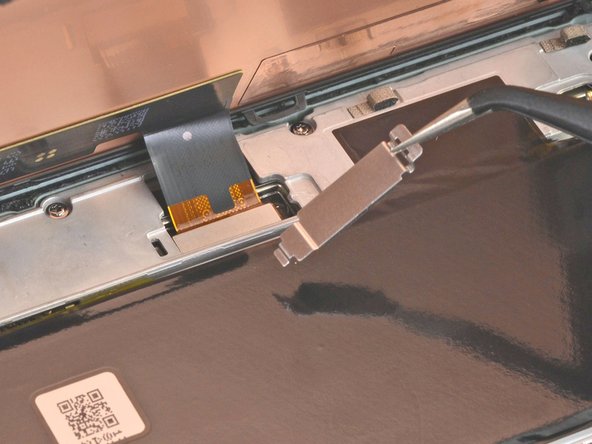
클립을 커넥터를 향해 밀어 잠금을 해제하세요.
I found it easier to use the spudger here rather than the tweezers (which have sharp ends that could damage something if you happen to slip).
some 5a models will have a screw instead of clip , here's a photo https://imgur.com/a/9dZG5pQ
-
-
-
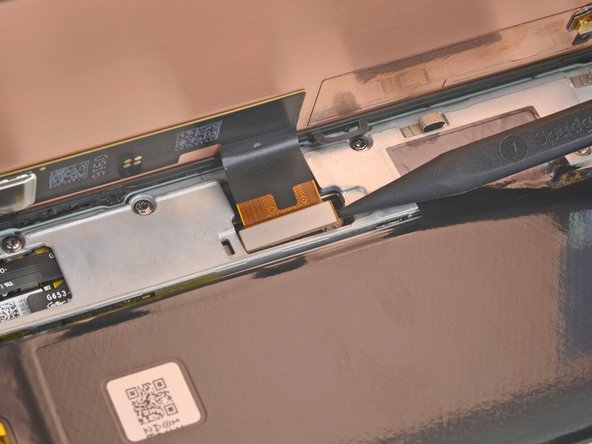
스퍼저의 끝을 사용하여 스크린 플렉스 케이블을 들어 올려 분리하세요.
The curved ends of the blue iFixit Opening Tool helped me reseat the connector when installing the new screen.
So hard to get this thing reseated to test the screen, even before putting the adheasive round the phone edge to finish the job. What made it particularly hard was that the flex cable on mine seemed very short compared to video's i've seen online.
-
-
-
스크린을 분리하세요.
Where from we can buy the screen. Thanks
the screen does not fit
Joel Kelly - 답글
After reconnecting the screen, is it necessary to remove a screen protector (if installed) for the a proper screen calibration?
Yes. Remove the screen protector when installing the screen.
-


새 교체 부품을 원래 부품과 비교하세요—설치하기 전에 남아있는 부품을 옮기거나 새 부품에서 접착 백킹을 제거해야 할 수 있습니다.
기기를 재조립하려면, 이 지침들을 역순으로 따르세요.
전자 폐기물을 R2 또는 e-Stewards 인증 재활용 센터로 가져가세요.
수리가 계획대로 진행되지 않았습니까? 자사의 기본 문제 해결 페이지를 이용하거나 자사의 답변 커뮤니티에 도움을 요청하세요.
새 교체 부품을 원래 부품과 비교하세요—설치하기 전에 남아있는 부품을 옮기거나 새 부품에서 접착 백킹을 제거해야 할 수 있습니다.
기기를 재조립하려면, 이 지침들을 역순으로 따르세요.
전자 폐기물을 R2 또는 e-Stewards 인증 재활용 센터로 가져가세요.
수리가 계획대로 진행되지 않았습니까? 자사의 기본 문제 해결 페이지를 이용하거나 자사의 답변 커뮤니티에 도움을 요청하세요.
다른 52명이 해당 안내서를 완성하였습니다.
다음 번역가들에게 특별히 감사 드립니다:
100%

Christian Kim님은 저희가 세상을 수리하는데 동참하신 분입니다! 기여하시겠습니까?
번역 시작하기 ›

댓글 29개
if i want only screen (lcd display) of pixel 5 from where can i get the screen. sudhri@gmail.com my mail address
Hello! This tutorial is well explained and seems ok to realize, but the problem i’m facing is to find the right spare part… Once contacted, google assistance said the only option is to send it back to them for 138€ and 7-10 days… Can you recommand a trustworsthy website for that?
Usually i look on amazon (sent by amazon) to get the warranty if i got any problem.
Check out the iFixit store. We stock some parts for the Pixel 5, including the screen and battery.
Zac Hall -
The screen that I ordered has a cable that runs the wrong way. It would need to be twisted to make it fit my Pixel 5. Any suggestions?
Get a refund and send it back and order a different display.
unless you’re a super pro, better with frame, It is not easy to glue up to the frame, and if that frame is damaged or gets damaged during tear down, can be a problem.
Hi,
I just replaced the screen with a new one, but now I have problems with the proximity sensor, When i press on one side of the screen it works, so I guess it is because it may be not glued strongly wnough? wich glue do you recommend?
I had the same problem -- the proximity sensor was unreliable after replacing the screen, and pressing down on the top of the screen helped. In my case, I used pre-cut adhesive both between the screen and the thin plastic frame and between the frame and the lower case. With this adhesive, the screen sat a little further away from the sensor and it's likely that the original calibration of the sensor was no longer correct.
I fixed it by heating the top of the phone, firmly clamping it, and leaving it overnight. The top of the screen sits flush now and the proximity sensor works reliably.
There is no info here about transferring the speaker. How is that done? Is adhesive needed? If so, what type?
I just use one or two strips of adhesive tape if I need to use new adhesive. Not much, though. If possible, get the earpiece speaker nice and warm to soften the adhesive. Apply lots of heat to the old display on the touchscreen side, not heating the earpiece directly. If you can heat it up enough, it should come off pretty cleanly. Then warm it up again and seat it well onto the new display with the original adhesive still attached the the earpiece speaker.
Hello! Just foolishly cracked my Google Pixel 5 screen and have no idea where to get the replacement. Based on your experience, could you please suggest where to order Pixel 5 screen replacement so that it would be as sharp and bright as the original? Ideally – THE original. Thank you in advance!
i bought a screen on ebay. supposedly oem. it seems just the same as the original.
Mike K -
Rounded.com expensive but 100% new and original parts straight from manufacturer
Simon -
I have to say I found this to be one of the easiest repairs I've ever done, I bought the complete original screen assembly from rounded.com and the manufacturer adhesive tape which gives the phone its IP rating seal back. Cost me about £160 all in. But I learnt skills at the same time. I used my nails and a guitar plectrum working from bottom end of the phone up. As good as new, well chuffed
Thanks ifixit. my pixel 5 lives again. screen replacement kit surprised me with some excellent tools provided. adhesive i thought would be the tricky part but you guys made it very easy to put on. cheers
My Google Pixel screen was replaced because it was accidentally broken while replacing another part. The screen put on it worked just fine until we tried to put the case back on the phone. Now I can't use the phone. Is there any way I can fix it myself without having to get a whole new screen or phone?
replacement screen works but has a green tint on low brightness? how can I fix this? (old screen works fine color wise, 2 other replacements also have green tint )
some 5a models will have a screw instead of clip , here's a photo https://imgur.com/a/9dZG5pQ
Ok for those that do not know, The pixel 5 you need the model number from it to be sure the part you get is for that phone, you can find the model number in about section, regulatory labels, yes it's a pixel 5 but it still has a model number for it and they a different from carrier to carrier and what not so be sure you got the right model of your pixel 5 that will solve most of your problems getting wrong parts
I completed the screen replacement, but when I turned the smartphone on, the selfie camera showed a black screen. I had to take the screen off the phone all over again to figure out what was wrong. Turns out there was a protective thin black film covering the lens hole. This wasn't mentioned in the guide.
Seems like there should be a step added where one powers the phone on and tests that the screen and front camera are working before pressing down the adhesive to seal the phone. Now I have to buy another adhesive template to seal the phone again. Grrr...
Also, the holding tabs for the adhesive are on the clear disposed film (contrary to the adhesive installation guide), which is peeled off first. Once peeled off, there are no longer tabs to use to hold the adhesive film, so it's awkward to position it without bending the colored adhesive film, distorting its shape, or inadvertantly touching adhesive.
Good guide, otherwise.
Good morning...
Replaced my cracked screen with the genuine google replacement part. The issue is the replacement adhesive sucks. It's terrible and worthless. The screen doesn't stay connected to the case. Does anyone have any recommendations for how to keep the screen adhered to the case?
An issue I had was that when I took off the old screen, the bezel was still stuck to the phone and came off the screen. I didn't understand it was supposed to come off as well and it was not well documented here. I would suggest adding it to this tutorial.
sean weiss - 답글
As other comments have mentioned, the genuine part comes with a black sticker over the front camera, and a blue transparent sheet that covers at least the proximity sensor. Test both the front facing camera and the proximity sensor (The knock knock to wake relies on the proximity sensor) in addition to your other checks before fixing the screen on permanently.
The bottom right corner of my screen will not close- it is coming up off of the case. My old screen did this too in the same spot (and my previous replacement was done by professionals at UBreakIFix).
Anyone have any idea why this is happening or how to fix it?
A white line with a thickness of 1 cm appeared in the screen of my phone, knowing the screen is intact and there is no breakage, I turned on and reset the phone to factory settings to no avail (google pexil 5 )
It would be helpful to know for how long ally the heated pad
Yuri Deglin - 답글
Agreed, my friend from the past.
Albert Einstein -
If you click on the "iOpener" link, it tells you to heat it up for 30 seconds, and if you're using a microwave with a carousel, make sure it moves freely.
Azurina Schalk-Smith - 답글
How long do you think it would take with a hair dryer?
Gen L. - 답글