주요 콘텐츠로 건너뛰기
Hoover LiNX The Nozzle Prongs Replacement

Hoover LiNX The Nozzle Prongs Replacement

Sara Vlhova

Sara Vlhova3 다른 기여자

최종 수정일 August 20, 2022

10 분
쉬움

This guide will show you how to replace the nozzle prongs in the motor in the nozzle. This guide would be needed if the prongs on your device are bent out of shape or if they are not transmitting power to the brush roll motor. Remember to remove thee battery from the device before starting this guide.

필요한 것

도구

  1. Hoover LiNX The Nozzle Prongs Replacement, Replace The Motor: 1 단계, 이미지 1개 중 1개
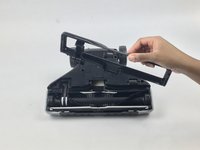
    • Detach the rolling assembly from the body by pushing the button found at the base.

  2. Hoover LiNX The Nozzle Prongs Replacement: 2 단계, 이미지 1개 중 1개
    • Remove the seven 7.5mm Phillips #1 screws from the brush retainer.

  3. Hoover LiNX The Nozzle Prongs Replacement: 3 단계, 이미지 2개 중 1개 Hoover LiNX The Nozzle Prongs Replacement: 3 단계, 이미지 2개 중 2개
    • Remove the brush and retainer from the rolling assembly.

    • The brush will need to be disconnected from the belt.

  4. Hoover LiNX The Nozzle Prongs Replacement: 4 단계, 이미지 1개 중 1개
    • Remove the eight 4mm Phillips #1 screws from the bottom panel.

  5. Hoover LiNX The Nozzle Prongs Replacement: 5 단계, 이미지 1개 중 1개
    • Remove the bottom panel.

  6. Hoover LiNX The Nozzle Prongs Replacement: 6 단계, 이미지 1개 중 1개
    • Remove the motor.

  7. Hoover LiNX The Nozzle Prongs Replacement, The Nozzle Prongs: 7 단계, 이미지 1개 중 1개
    • Remove the two 7.5mm Phillips #1 screws from the main body.

  8. Hoover LiNX The Nozzle Prongs Replacement: 8 단계, 이미지 1개 중 1개
    • Remove the black covering from the air tube.

  9. Hoover LiNX The Nozzle Prongs Replacement: 9 단계, 이미지 1개 중 1개
    • Slide the prongs out through their channels.

  10. Hoover LiNX The Nozzle Prongs Replacement: 10 단계, 이미지 2개 중 1개 Hoover LiNX The Nozzle Prongs Replacement: 10 단계, 이미지 2개 중 2개
    • Remove the angled neck and feed the prongs out through their channels.

  11. Hoover LiNX The Nozzle Prongs Replacement: 11 단계, 이미지 2개 중 1개 Hoover LiNX The Nozzle Prongs Replacement: 11 단계, 이미지 2개 중 2개
    • Replace the prongs.

결론

To reassemble your device, follow these instructions in reverse order.

다른 2명이 해당 안내서를 완성하였습니다.

작성자

3다른 기여자 명과 함께

Sara Vlhova

회원 가입일: 01/25/18

541 평판

안내서 4개를 작성함

USF Tampa, Team S7-G4, Passmore Spring 2018 USF Tampa, Team S7-G4, Passmore Spring 2018 회원

USFT-PASSMORE-S18S7G4

4 회원들

안내서 12개를 작성함

댓글 2개

How do I get to the receivers for the prongs? They appear to be too loose to make a connection and i have not been able to get into the body to tighten. Is there another way to improve this connection?

Robert L Worthing - 답글

Thank you for asking ifixit your 11/1018 question. I’ve been trying to disassemble the body to get at the receiver(s)/socket(s) for those prongs for days. And ifixit, please, have you got a picture of the routing of the brush motor wires from the motor through the rolling assembly, the swiveling universal joint, and along the back of the airtube?

donwesel - 답글

댓글 쓰기

조회 통계:

지난 24시간: 0

지난 7일: 3

지난 30일: 10

전체 시간: 1,884