주요 콘텐츠로 건너뛰기

Huawei Mate 8 Battery Replacement

필요한 것

  1. Huawei Mate 8 Battery Replacement, Back Cover: 1 단계, 이미지 1/2 Huawei Mate 8 Battery Replacement, Back Cover: 1 단계, 이미지 2/2
    • Switch off your phone and remove the SIM card tray.

  2. Huawei Mate 8 Battery Replacement: 2 단계, 이미지 1/1
    • Remove the Torx T2 screws from the bottom of the phone

  3. Huawei Mate 8 Battery Replacement: 3 단계, 이미지 1/2 Huawei Mate 8 Battery Replacement: 3 단계, 이미지 2/2
    • Use an iSclack or a suction handle in the bottom area of your phone to separate the display unit from the rear panel.

  4. Huawei Mate 8 Battery Replacement: 4 단계, 이미지 1/3 Huawei Mate 8 Battery Replacement: 4 단계, 이미지 2/3 Huawei Mate 8 Battery Replacement: 4 단계, 이미지 3/3
    • Use an opening pick to fully separate the clips, releasing the phone.

    • Do not fully remove the rear case. The fingerprint sensor cable is still connected to the back cover.

    • Open the phone like a book from the SIM tray side.

    • Use a spudger, to disconnect the fingerprint sensor cable.

  5. Huawei Mate 8 Battery Replacement, Daughterboard interconnect cable: 5 단계, 이미지 1/3 Huawei Mate 8 Battery Replacement, Daughterboard interconnect cable: 5 단계, 이미지 2/3 Huawei Mate 8 Battery Replacement, Daughterboard interconnect cable: 5 단계, 이미지 3/3
    • Remove the liquid indicator sticker.

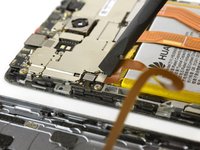
    • Remove the Phillips #00 screw that holds down the metal shield.

    • The metal shield is tightly held in place. If you try to remove it without holding it down on one side, it'll break easily.

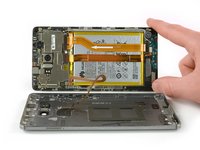
    • Use a spudger to remove the metal shield.

  6. Huawei Mate 8 Battery Replacement: 6 단계, 이미지 1/3 Huawei Mate 8 Battery Replacement: 6 단계, 이미지 2/3 Huawei Mate 8 Battery Replacement: 6 단계, 이미지 3/3
    • Use the flat end of a spudger to disconnect the display, daughterboard interconnect, and battery cables.

  7. Huawei Mate 8 Battery Replacement: 7 단계, 이미지 1/1
    • Remove the Phillips #00 screw that holds down the interconnect cable bracket.

  8. Huawei Mate 8 Battery Replacement: 8 단계, 이미지 1/2 Huawei Mate 8 Battery Replacement: 8 단계, 이미지 2/2
    • Lift the coaxial connector off of its socket to allow access to the daughterboard interconnect cable bracket.

    • Remove the bracket.

  9. Huawei Mate 8 Battery Replacement: 9 단계, 이미지 1/1
    • Use a spudger to disconnect the interconnect cable.

    • Remove the interconnect cable.

  10. Huawei Mate 8 Battery Replacement, Battery: 10 단계, 이미지 1/1
    • The battery is glued in place with two adhesive strips. One with a pull tab and one without.

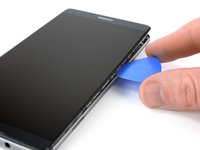
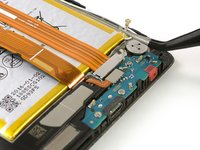
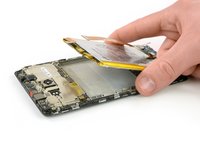
    • Get a good grip on the pull tab near the power button and peel out the adhesive strip by steadily pulling at the tab in a flat angle.

    • If the adhesive strip rips, grab and twist it around the tweezer tips a couple of times and then continue.

  11. Huawei Mate 8 Battery Replacement: 11 단계, 이미지 1/3 Huawei Mate 8 Battery Replacement: 11 단계, 이미지 2/3 Huawei Mate 8 Battery Replacement: 11 단계, 이미지 3/3
    • Do not bend or puncture the battery, damage to the cell can cause battery fires.

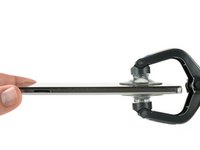
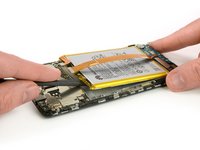
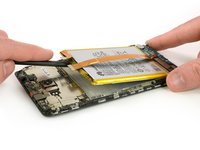
    • Heat an iOpener and place it on the phone for about a minute to loosen the remaining adhesive.

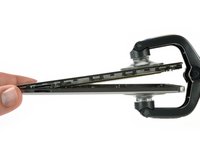
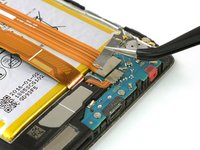
    • Carefully insert the flat end of a spudger to separate any remaining adhesive at the top of the battery.

  12. Huawei Mate 8 Battery Replacement: 12 단계, 이미지 1/2 Huawei Mate 8 Battery Replacement: 12 단계, 이미지 2/2
    • Lift the top end of the battery to pull the battery off of the remaining adhesive strip.

    • When reassembling your phone, apply stretch release adhesive strips, double sided adhesive tape, or pre-cut adhesive to secure the new battery.

    • Never reinstall a battery that has been bent or damaged during removal.

결론

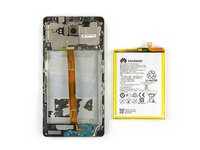
To reassemble your device, follow these instructions in reverse order. When reassembling your phone apply new adhesive where it is necessary.

다른 17명이 해당 안내서를 완성하였습니다.

Dominik Schnabelrauch

회원 가입일: 11/23/16

201,099 평판

안내서 682개 작성하였습니다

iFixit iFixit 회원

Staff

136 회원들

안내서 16,574개 작성하였습니다

댓글 7개

great guide changed my battery in under 30 min thank you @schnabel

george austin - 답글

Hi George,

nice to hear and i hope your phone works well!

Dominik Schnabelrauch -

Thank you for an excellent guide! Clear instructions and great pictures. I followed the steps and it worked flawless. One comment regarding Step 4 - I had greater luck opening from bottom side up rather than from left to right.

Jim My - 답글

Thanks for you guide, Easy and complete. Perfect

Jonathn - 답글

Thanks for the great guide! It took some effort to open the phone and to remove the old glue. Also with my old eyes (60 years) I could hardly see the tiny screws an connectors, even with my reading glasses on so it took me 2 1/2 hours to finish, but succeeded after all! Never did this before, so it is doable without experience, but you do need the tools. A looking glass would be helpfull too :)

Tom Hogendoorn - 답글

댓글 쓰기

조회 통계:

24 시간 전: 0

7일 전: 1

30일 전: 21

전체 시간: 15,844