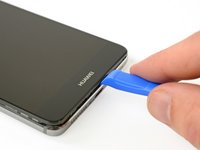
주요 콘텐츠로 건너뛰기

Huawei Mate 9 Display Assembly Replacement

필요한 것

  1. Huawei Mate 9 Display Assembly Replacement, Back Cover: 1 단계, 이미지 1/2 Huawei Mate 9 Display Assembly Replacement, Back Cover: 1 단계, 이미지 2/2
    • First switch off your phone and remove the SIM card tray.

  2. Huawei Mate 9 Display Assembly Replacement: 2 단계, 이미지 1/2 Huawei Mate 9 Display Assembly Replacement: 2 단계, 이미지 2/2
    • Remove both screws on the bottom with a Torx T2 screwdriver.

    • Use a plastic opening tool to get between the display and the case. Open the smartphone by carefully prying out the display with all the parts out of the case.

    • Don't open the phone all the way, yet. The fingerprint sensor cable is still connected to the back cover.

  3. Huawei Mate 9 Display Assembly Replacement: 3 단계, 이미지 1/2 Huawei Mate 9 Display Assembly Replacement: 3 단계, 이미지 2/2
    • Swing open the phone to the right side.

    • Disconnect the fingerprint sensor cable with a spudger.

  4. Huawei Mate 9 Display Assembly Replacement, Battery: 4 단계, 이미지 1/2 Huawei Mate 9 Display Assembly Replacement, Battery: 4 단계, 이미지 2/2
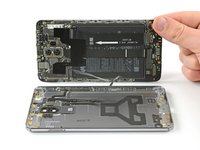
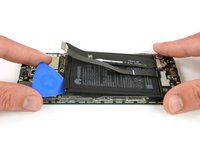
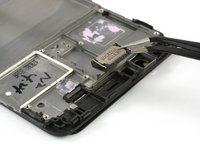
    • Peel out the adhesive strip which is placed beneath the battery by steadily pulling at the tab in a flat angle.

    • If the adhesive strip breaks, grab and twist it around tweezer tips a couple of times and then continue.

  5. Huawei Mate 9 Display Assembly Replacement: 5 단계, 이미지 1/2 Huawei Mate 9 Display Assembly Replacement: 5 단계, 이미지 2/2
    이 단계에 사용된 도구:
    Tesa 61395 Tape
    $5.99
    구매
  6. Huawei Mate 9 Display Assembly Replacement, Display Assembly: 6 단계, 이미지 1/3 Huawei Mate 9 Display Assembly Replacement, Display Assembly: 6 단계, 이미지 2/3 Huawei Mate 9 Display Assembly Replacement, Display Assembly: 6 단계, 이미지 3/3
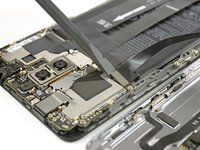
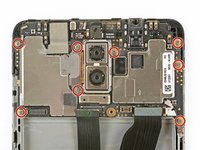
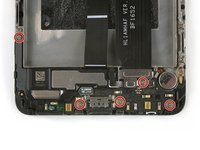
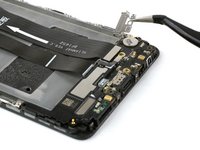
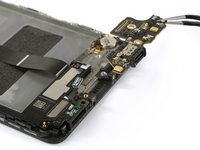
    • Remove the eight Phillips #00 screws that hold the motherboard in its place.

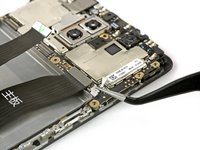
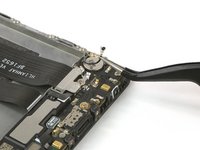
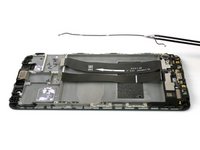
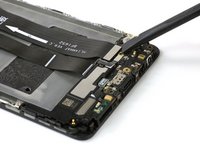
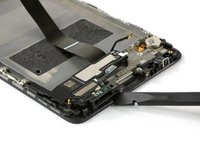
    • Unplug the antenna cable with a tweezer.

    • After you removed all screws there are still small clamps which hold the motherboard in its place. Don't break them while removing it but press them a little bit to the side to make the removal easier.

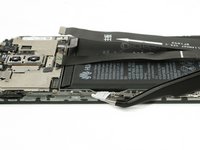
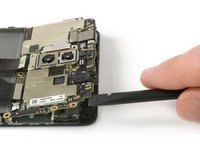
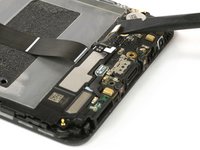
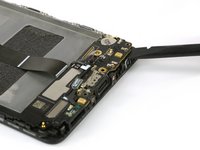
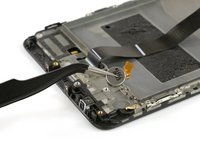
    • Use a spudger to carefully lift up the motherboard including all components holding onto it and remove it.

  7. Huawei Mate 9 Display Assembly Replacement: 7 단계, 이미지 1/3 Huawei Mate 9 Display Assembly Replacement: 7 단계, 이미지 2/3 Huawei Mate 9 Display Assembly Replacement: 7 단계, 이미지 3/3
    • Remove the earpiece speaker by levering it up from the side.

    • Take care not to bend the metal connectors.

    • Disconnect the antenna cable and remove it carefully.

  8. Huawei Mate 9 Display Assembly Replacement: 8 단계, 이미지 1/3 Huawei Mate 9 Display Assembly Replacement: 8 단계, 이미지 2/3 Huawei Mate 9 Display Assembly Replacement: 8 단계, 이미지 3/3
    • Move down to the bottom part of your phone and remove the five Phillips #00 screws.

    • Remove the metal shield that covers the connection of the motherboard flex cable.

    • Use a spudger to unplug the motherboard flex cable and remove it.

  9. Huawei Mate 9 Display Assembly Replacement: 9 단계, 이미지 1/2 Huawei Mate 9 Display Assembly Replacement: 9 단계, 이미지 2/2
    • Use a spudger to disconnect the loudspeaker and the charging port flex cable from the daughterboard.

  10. Huawei Mate 9 Display Assembly Replacement: 10 단계, 이미지 1/2 Huawei Mate 9 Display Assembly Replacement: 10 단계, 이미지 2/2
    • Use a spudger to carefully lever up the daughterboard and remove it. Don't break the small clamps that hold down the daughter board but press them a little bit to the side to make the removal easier.

  11. Huawei Mate 9 Display Assembly Replacement: 11 단계, 이미지 1/3 Huawei Mate 9 Display Assembly Replacement: 11 단계, 이미지 2/3 Huawei Mate 9 Display Assembly Replacement: 11 단계, 이미지 3/3
    이 단계에 사용된 도구:
    iOpener
    $19.99
    구매
    • Use a spudger to remove the loudspeaker and the charging port. There is some adhesive underneath and the unit might be a little bit sticky.

    • Use a tweezer to loosen the glued in vibration motor and remove it.

    • If you're having a hard time while removing the loudspeaker or the vibration motor you can use an iOpener to loosen the adhesive and try it again.

    • Before reassembly check your new part for any components that might need to be transferred from the old one.

    • When reassembling your phone, replace old adhesive with stretch release adhesive strips, double-sided tape, or pre-cut adhesive strips.

결론

To reassemble your device, follow these instructions in reverse order. Before reassembly check your new part for any components that might need to be transferred from the old one.

다른 16명이 해당 안내서를 완성하였습니다.

Dominik Schnabelrauch

회원 가입일: 11/23/16

202,836 평판

안내서 682개 작성하였습니다

iFixit iFixit 회원

Staff

135 회원들

안내서 16,732개 작성하였습니다

댓글 5개

why take out the battery??

JPBrokenIT - 답글

Hi JPBrokenIT,

this is a guide for the full display assembly. This means you’ll exchange the display including the whole mid frame for a new one. If you’re going to leave the battery in its place. You need a new one for your spare part. If you don’t want to buy a new battery, you’ll need to transfer it from the old mid frame with display, to the new one. If you want to exchange the display without the mid frame, you need to follow this guide - Huawei Mate 9 Display Replacement

Dominik Schnabelrauch -

Hi guys, just a small Thing, but you missed to mention one additional screw which holds the Speaker unit on top of the “arm” to the left. Anyway, very good and helpful guide. Christian

Chris V - 답글

Hi Chris V,

thanks for mentioning. I made the correction.

Dominik Schnabelrauch -

I was stuck at step 2. I could not pry open the case, not even a tiny gap, and the plastic opening tool broke. The assembly and case were attached so tight. I even tried to use a flat metal screw driver to try to get an “entering point”. But the case was so well snugged onto the assembly. Maybe Huawei put some glue during assembling process. I halted the repairing. At least the phone is now still functioning with a broken screen.

Sky Land - 답글

댓글 쓰기

조회 통계:

24 시간 전: 0

7일 전: 13

30일 전: 34

전체 시간: 12,928