주요 콘텐츠로 건너뛰기

Huawei P10 Battery Replacement

필요한 것

  1. Huawei P10 Battery Replacement, Back Cover: 1 단계, 이미지 1/3 Huawei P10 Battery Replacement, Back Cover: 1 단계, 이미지 2/3 Huawei P10 Battery Replacement, Back Cover: 1 단계, 이미지 3/3
    • Switch off your phone.

    • Remove the two Pentalobe P2 screws at the bottom.

    • Remove the SIM card tray.

  2. Huawei P10 Battery Replacement: 2 단계, 이미지 1/3 Huawei P10 Battery Replacement: 2 단계, 이미지 2/3 Huawei P10 Battery Replacement: 2 단계, 이미지 3/3
    • Insert a plastic opening tool between the display and the case starting at the bottom area of your phone.

    • Carefully pry the display with its parts out of the case.

    • Getting the prying tool in will require some effort, be careful not to slide the tool too much or you might slightly damage the housing.

    • After you pried out the bottom end, use the opening tool to open the clamps on both sides.

  3. Huawei P10 Battery Replacement: 3 단계, 이미지 1/2 Huawei P10 Battery Replacement: 3 단계, 이미지 2/2
    • Don't open the phone all the way, yet. The cable for the standby and volume buttons is still connected to the back cover.

    • Swing open the phone backwards.

    • Use a spudger to disconnect the power- and volume button flex cable.

  4. Huawei P10 Battery Replacement, Battery: 4 단계, 이미지 1/1
    • Remove the two Phillips #00 screws.

  5. Huawei P10 Battery Replacement: 5 단계, 이미지 1/2 Huawei P10 Battery Replacement: 5 단계, 이미지 2/2
    • Use tweezers to remove the two cable brackets.

  6. Huawei P10 Battery Replacement: 6 단계, 이미지 1/3 Huawei P10 Battery Replacement: 6 단계, 이미지 2/3 Huawei P10 Battery Replacement: 6 단계, 이미지 3/3
    • Use a spudger to disconnect the battery, the interconnect and the display flex cable.

  7. Huawei P10 Battery Replacement: 7 단계, 이미지 1/2 Huawei P10 Battery Replacement: 7 단계, 이미지 2/2
    • The battery is glued in place with two adhesive strips. One with a pull tab and one without.

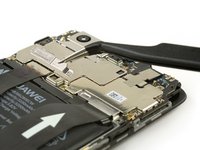
    • Peel out the adhesive strip which is placed beneath the battery by steadily pulling at the tab in a flat angle.

    • It is likely that the adhesive strip rips. In this case you can grab and twist it around a tweezers tip a couple of times and then continue.

    • Use an iOpener to loosen the remaining adhesive.

  8. Huawei P10 Battery Replacement: 8 단계, 이미지 1/2 Huawei P10 Battery Replacement: 8 단계, 이미지 2/2
    이 단계에 사용된 도구:
    Tesa 61395 Tape
    $5.99
    구매
    • Take care to not bend or puncture the battery.

    • Insert an opening pick or spudger beneath the battery and carefully pry it out.

    • Remove the battery.

    • When reassembling your phone, replace old adhesive with stretch release adhesive strips, double-sided tape, or pre-cut adhesive strips.

    • Never reinstall a battery that has been bent or damaged during removal.

결론

To reassemble your device, follow these instructions in reverse order. When reassembling your phone apply new adhesive where it is necessary.

다른 75명이 해당 안내서를 완성하였습니다.

Dominik Schnabelrauch

회원 가입일: 11/23/16

201,069 평판

안내서 682개 작성하였습니다

iFixit iFixit 회원

Staff

136 회원들

안내서 16,573개 작성하였습니다

댓글 16개

Thanks for posting this this give me new ideas.

Dave Dayanan - 답글

Facile comme bonjour. Les outils que j'avais reçu avec la batterie étaient de piètre qualité, j'ai donc utilisé des mini-spatules utilisées pour lisser les joints en silicone, c'est pile la consistance voulue pour décoller le dos et la batterie, ni trop ferme ni trop souple.

lepisosteus74 - 답글

Easy fix, thanks a lot.

Noé Barreau - 답글

Excellent guide, was done in 20 minutes, thankyou!

Mog Kupo - 답글

Eccellente guida peccato che una volta montata la nuova batteria in cellulare si sente che si accende la il display rimane buio, controllato connessioni ma sono tutte ok e display sempre spento, cosa può essere?

Adriano

Adriano Da Rold - 답글

댓글 쓰기

조회 통계:

24 시간 전: 11

7일 전: 70

30일 전: 269

전체 시간: 64,331