주요 콘텐츠로 건너뛰기

Nexus 5X Motherboard Assembly Replacement

단지 전제 조건
이 가이드는 전제 조건 전용 가이드입니다! 이 가이드는 다른 절차의 일부이며 단독으로 사용할 수 없습니다.

필요한 것

  1. Nexus 5X Motherboard Assembly Replacement, Motherboard Assembly: 1 단계, 이미지 1개 중 1개
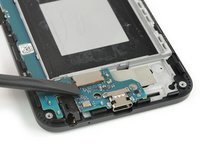
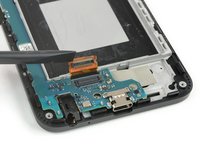
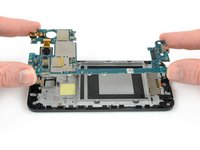
    • Use an iOpener to loosen the adhesive beneath the rear facing camera. Place the iOpener across the top part of the phone for about 30 seconds.

  2. Nexus 5X Motherboard Assembly Replacement: 2 단계, 이미지 2개 중 1개 Nexus 5X Motherboard Assembly Replacement: 2 단계, 이미지 2개 중 2개
    • Apply the flat end of a spudger to the left side of the rear facing camera and carefully lever it up. Make sure all of the adhesive underneath is loosened.

  3. Nexus 5X Motherboard Assembly Replacement: 3 단계, 이미지 2개 중 1개 Nexus 5X Motherboard Assembly Replacement: 3 단계, 이미지 2개 중 2개
    • Use the flat end of a spudger to pry up the display flex connector.

  4. Nexus 5X Motherboard Assembly Replacement: 4 단계, 이미지 3개 중 1개 Nexus 5X Motherboard Assembly Replacement: 4 단계, 이미지 3개 중 2개 Nexus 5X Motherboard Assembly Replacement: 4 단계, 이미지 3개 중 3개
    • Grip the lower part of the motherboard with your fingers and carefully lift it upwards.

    • There's a small plastic clip next to the rear-facing camera that holds the motherboard in place.

    • Gently pull the motherboard towards the bottom edge to free it from the plastic clip next to the rear-facing camera.

    • Carefully lift the motherboard out of the frame.

    • Be careful—the two cameras are still connected to the board.

결론

To reassemble your device, follow these instructions in reverse order.

Dominik Schnabelrauch

회원 가입일: 11/23/16

246,398 평판

안내서 682개를 작성함

iFixit iFixit 회원

Staff

123 회원들

안내서 23,611개를 작성함

0가이드 댓글

댓글 쓰기

조회 통계:

지난 24시간: 0

지난 7일: 0

지난 30일: 3

전체 시간: 127