이 번역은 원본 안내서의 최신 업데이트를 반영하지 않을 수 있습니다. 번역 업데이트를 돕거나 아니면 원본 안내서 보기를 참조하세요.
소개
이 안내서를 사용하여 Samsung Galaxy S9 후면 유리를 분리하십시오.
Samsung Galaxy S9를 여는 것은 기기의 방수 실링을 손상시킵니다. 접착 실을 교체하지 않을 경우 휴대 전화는 정상적으로 작동하지만 방수 기능을 잃게됩니다.
기기를 재조립할 때 부품을 다시 부착하려면 대체 접착제가 필요합니다.
필요한 것
-
이 단계는 번역되지 않았습니다. 번역을 도와주십시오
-
Before you begin, switch off your phone.
-
Apply a heated iOpener to a long edge of the phone to loosen the adhesive beneath the rear glass. Apply the iOpener for at least two minutes.
-
-
이 단계는 번역되지 않았습니다. 번역을 도와주십시오
-
In the following steps, you'll be cutting through the adhesive securing the back cover.
-
You'll be slicing through the adhesive in the areas shown:
-
Thick portions of adhesive
-
Thin areas of adhesive
-
Avoid prying or slicing in this area, to protect the fingerprint sensor flex cable.
-
-
이 단계는 번역되지 않았습니다. 번역을 도와주십시오
-
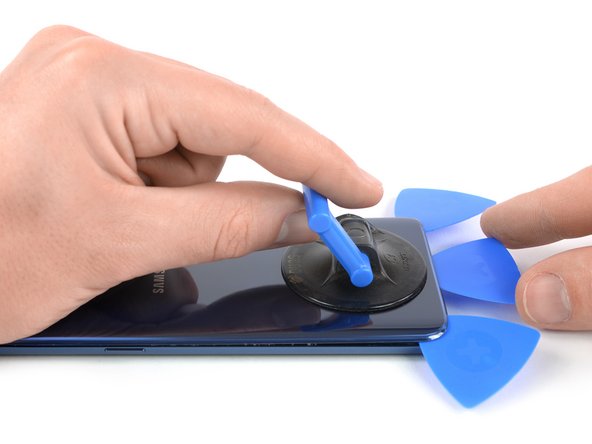
Press a suction cup onto the back cover.
-
Lift the back cover's bottom edge with your suction cup, opening a slight gap between the back cover and the frame.
-
Insert an opening pick in the gap you created and slide it to the bottom right corner.
-
Insert a second opening pick and slide it to the bottom left corner.
-
Insert a third opening pick to prevent the adhesive from resealing during the rest of the removal procedure.
-
-
-
이 단계는 번역되지 않았습니다. 번역을 도와주십시오
-
While inserting only the tip of the opening pick, slide it from the bottom left corner along the side to the top.
-
Slide the pick around the top corner and leave it there to prevent the adhesive from resealing.
-
-
이 단계는 번역되지 않았습니다. 번역을 도와주십시오
-
Slide the opening pick from the bottom right corner along the side to the top.
-
Slide the opening pick around the corner and cut the remaining adhesive at the top of the phone.
-
-
이 단계는 번역되지 않았습니다. 번역을 도와주십시오
-
Carefully lift the side of the rear glass where the volume button is located.
-
Use the edge of a spudger to pry up and disconnect the fingerprint sensor flex cable.
-
규격에 맞는 접착제 또는 양면 접착 테이프로 새 후면 커버를 고정하십시오.
기기를 재조립하려면 이 지침을 역순으로 따르십시오.
후면 커버를 설치한 후 몇 분 동안, 두꺼운 서적 더미 아래에 놓아 두듯이, 휴대 전화에 강하고 일정한 압력을 가하면 접착제가 잘 붙도록 돕습니다.
규격에 맞는 접착제 또는 양면 접착 테이프로 새 후면 커버를 고정하십시오.
기기를 재조립하려면 이 지침을 역순으로 따르십시오.
후면 커버를 설치한 후 몇 분 동안, 두꺼운 서적 더미 아래에 놓아 두듯이, 휴대 전화에 강하고 일정한 압력을 가하면 접착제가 잘 붙도록 돕습니다.
다른 13명이 해당 안내서를 완성하였습니다.
다음 번역가들에게 특별히 감사 드립니다:
36%
Christian Kim님은 저희가 세상을 수리하는데 동참하신 분입니다! 기여하시겠습니까?
번역 시작하기 ›
댓글 한 개
Sollte nach Abschluss der Reparatur der Fingerabdrucksensor nicht funktionieren bitte folgende Schritte machen:
1. Schalte das Handy aus und hänge es ein Ladegerät
2. Starte das Handy im Restore Modus indem du die Bixby, Lauter und Powertaste gleichzeitig drückst bis das Samsung Logo kommt.
3. Wähle in dem Menü den Punkt: Wipe Cache Partition aus und bestätige mit Power deine Auswahl.
4. Starte das Gerät neu.


