주요 콘텐츠로 건너뛰기

Sony Cyber-Shot DSC-TX9 Lens Replacement

필요한 것

  1. Sony Cyber-Shot DSC-TX9 Lens Replacement, Prerequisites Only: 1 단계, 이미지 1/3 Sony Cyber-Shot DSC-TX9 Lens Replacement, Prerequisites Only: 1 단계, 이미지 2/3 Sony Cyber-Shot DSC-TX9 Lens Replacement, Prerequisites Only: 1 단계, 이미지 3/3
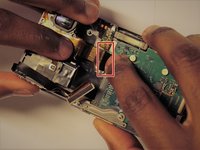
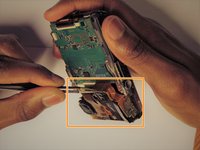
    • Use a Phillips #0 screwdriver to unscrew the six 2mm screws on the outer case of the camera.

    • If there is a battery or SD card inside remove before beginning the process.

  2. Sony Cyber-Shot DSC-TX9 Lens Replacement: 2 단계, 이미지 1/2 Sony Cyber-Shot DSC-TX9 Lens Replacement: 2 단계, 이미지 2/2
    • Use your hands or a Spudger to Pull off the front cover of the camera.

    • If the casing is not coming apart easily, do not force it.

  3. Sony Cyber-Shot DSC-TX9 Lens Replacement: 3 단계, 이미지 1/1
    • Remove the protective black cover layer with your hands and set it aside.

    • The use of tweezers may be necessary if the cover is difficult to remove.

  4. Sony Cyber-Shot DSC-TX9 Lens Replacement: 4 단계, 이미지 1/2 Sony Cyber-Shot DSC-TX9 Lens Replacement: 4 단계, 이미지 2/2
    • The ZIF connector can be removed by flipping the small black holder into the upright position and then sliding the ribbon cable out carefully.

    • Once this has been done, use tweezers to unplug the flat topped connector for the lens’ circuit board from the motherboard.

    • DO NOT force the ribbon cables or they will rip.

    • Refer to the (케이블 커넥터 인식 및 분리) page for assistance.

  5. Sony Cyber-Shot DSC-TX9 Lens Replacement, Lens: 5 단계, 이미지 1/1
    • Using the tweezers carefully remove the broken/damaged lens with its attached circuit board

결론

To reassemble your device, follow these instructions in reverse order.

robert.oliver6

회원 가입일: 03/23/17

101 평판

안내서 1개 작성함

UMass Dartmouth, Team S4-G3, Julie Spring 2017 UMass Dartmouth, Team S4-G3, Julie Spring 2017 회원

UMASSD-JULIE-S17S4G3

5 회원들

안내서 8개 작성하였습니다

댓글 0개

댓글 쓰기

조회 통계:

24 시간 전: 0

7일 전: 0

30일 전: 6

전체 시간: 396