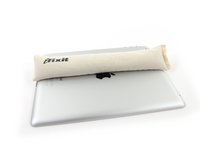
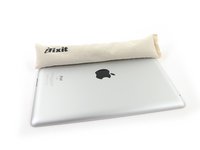
소개
Use this guide to replace a worn-out battery and give your iPad new life. If your battery is swollen, take appropriate precautions.
필요한 것
-
-
Heat the iOpener for thirty seconds.
-
Throughout the repair procedure, as the iOpener cools, reheat it in the microwave for an additional thirty seconds at a time.
DO NOT USE IN NON ROTATING MICROWAVE! It will pop a hole. I had it in for 45 seconds the first time. It wasn't very hot inside and I saw it started to leak on the paper towel I put under it. Just a fair bit of advice. I think I will just stick with the heat gun. Loud but useful.
I heated mine up for 30 seconds, tested, then again for 30 seconds. It felt adequately hot. Leaving it on the left side, per the instruction, for a minute did not loosen the adhesive. I ended up pulling the suction cup hard enough to shadder the old screen. Moral of the story, I don't think it gets hot enough safely to have an affect.
There is a clear problem here with the heating part using the iopener things....no details are given. Whoever is testing them needs to make it clear - What temperature does it need to be? And for which phone models, because they differ in what's needed. It's only £10-15 for a laser guided temp sensor unit, and the designers/repairers should have one of those already for doing these kinds of repairs. Explaining half a repair, is worse than not explaining at all :-(
All phones/devices differ it’s unrealistic and unsafe to put a exact time/temperature needed to soften the adhesive. It’s really quite simple you warm the device evenly and in a controlled manner just enough to enable pry tools and picks to begin separating. Best tool in my opinion but again this is because I have experience is a hot plate and heat gun both of which are used at nearly the lowest settings and I can handle flat palming the plate for almost 10 seconds I leave the device to conduct heat until approx it’s about 110 at most 120 ish this will be plenty to soften all the adhesive if any problem areas I use heat gun while prying. Again you need go slowly and learn with a throw away phone
If I may suggest include your microwave wattage so people can get an idea on time for there own
I agree with this.
I ended up using a hair dryer. That iOpener thing took forever.
30 seconds sure isn’t cutting it… 45 didn’t get the screen of my iPad air 2 to budge either… even after resting on the ipad for 4 minutes.
60 seconds in the microwave, the iOpener burst.
I’ll get a new one and try once more with heating it 45 seconds and repeat that for 30 minutes like others have said here. If that doesn’t work it’ll have to be the heat gun.
K
I can’t recommend the microwave. If the the iOpener becomes too hot, it bursts. Better put the opener in cooking water. Dry it and use it. Instead of an iOpener you can use hot/cool packs as well.
Great idea with using the heat packs. I will try that next time. Thank you
Collins -
Trust the directions! I forgot and left it in the Microwave too long and after 1 minute I had Mt Vesuvius - the iOpener burst and spewed the goodies out. The problem is, the Digitizer can be damaged by a hot air gun, so I had to tough out and remove the glue the hard way. I made it … with lots of patience! Tough lesson.
I also used a hairdryer. I used it on the low setting and I cut a piece of carboard to protect the rest of the screen. The iFixit tool and method is vert tedious and very time consuming in comparison. With the hairdryer method you can literally have the display apart in a few minutes. Using your other hand nearby the area you are heating it should be very hot but not enough to burn your hand. You only have to heat metal part of case near glass edge. If you have a cellular model then you need to be very careful because the black antenna area is plastic. So less heat and work your way up in adding heat just enough to separate around the area but not so much you melt the plastic!
iOpener was the worst part of the kit. Followed directions for :30 in microwave and took 4 trips to the microwave to loosen adhesive on left side of home button. I thought I was figuring it out and it was working well… even set a timer to wait 10 minutes between heating it up. Was on the right side and was on my 12th heat up when it exploded in the microwave. My only tip is that if you set it clear side up, as soon as you see any bubbles or boiling in the liquid, STOP! If you put a pot holder over the iOpener and press slightly to make good surface contact, that seemed to help. I finished heating with a “Corn Sack” that held heat better than the provided iOpener.
Mon iopener n'a pas tenu une réparation. Je ne vous conseille pas ce produit
Bonjour,
Nous sommes désolés que votre réparation ne se soit pas déroulée comme prévu. Il se peut que le produit était défectueux. Veuillez contacter notre service client support@ifixit.com (boutique américaine) ou eustore@ifixit.com (boutique européenne) en décrivant ce qui s’est passé.
Readers looking for temperature advice might check the comments of the previous instruction, as there are more there. I used an immersion bath to heat this to 180F and applied it to the device until the outside temperature of the opener read 150F with an IR thermometer. Removing the screen took very little force with this method.
Thank you for posting some actual temperatures. I have a heat gun with a very fine self-temperature regulation setting capability.
I will set it for 150-180 F, and use that to soften the adhesive.
Get a heat gun.
I followed the directions and heated my iOpener for 30 seconds in a 1000 watt microwave, and it came out at 160 degrees F, as verified by a infrared thermometer. A second heating about 15 minutes later in the micro and it came out at 190 degrees F. Plenty hot enough to soften the adhesive for removing the back on my S8. Based on the comments above I think people just need to use more patience.
I used various time settings. It got very hot. It would soften the glue but not a whole lot. If my screen had been intact and I was replacing something that was not a digitizer, it may have worked. A broken screen makes the process significantly more difficult. I ended up breaking the home button cable. Good bye TouchID…
It appeared 30 seconds were not enough, so I heated it more, by 5 seconds at a time until I got the right temperature about 70 degrees Celsius (measured with infrared pistol) to get the screen heated up to 60 C, the best for softening the glue. But the heat was quickly dissipating by the big aluminum back cover, so the best I got in 2 minutes of applying iOpener was around 45 C, which made the procedure difficult and having risk of breaking the screen. So I eventually abandoned iOpener and user a hot air gun with precise temperature setup. I set it to 90 C, which allowed me to open my iPad quickly and safely.
You need to remember here are different sizes of microwaves. I had the same issue.
Heating on a smaller unit I used 45-60 seconds. That worked but was time comsuming
Yeah, the iOpener didn't work for me either.... ended up using a hair dryer and that worked. The iOpener was too warm to soften the glue in my case.
-
-
-
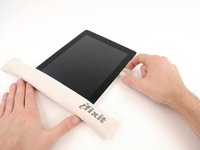
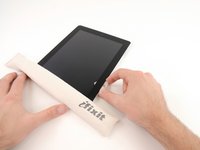
Remove the iOpener from the microwave, holding it by one of the two flat ends to avoid the hot center.
I did this repair. I used a hair dryer, I think it works better: gets very hot fast.
I did too, you get far more control and no expense on fancy equipment.
Readers looking for temperature advice might check the comments of the previous instruction, as there are more there. I used an immersion bath to heat this to 180F and applied it to the device until the outside temperature of the opener read 150F with an IR thermometer. Removing the screen took very little force with this method. I don’t know how much microwaves vary in heating consistency with these pads, but knowing how inconsistent the temperature of a bowl of plain rice gets in my microwave, I wasn’t interested in even trying to use it for this.
I vote for the hair dryer. The other methods work too but if you aren’t having any luck, switch to the hair dryer. While holding the iPad in my hand, I found that I am aiming the dryer at my finger at the same time and it gauges how hot it is. I stop when my finger can’t take it - maybe five seconds up close. Repeat as needed like I did.
If the maximum temperature for this iOpener is lower than the gadget glue minimum temperature, this device does not make sense.
I think the maximum temperature for this iOpener is below 100⁰C and most gadget glue minimum temperature is higher than 100⁰C. So the iOpener is useless for many opening steps in repair guides. But who knows because temperature range is not specified for this iOpener.Jarl Friis - 답글
heres how you fix it
-
-
-
Fill a pot or pan with enough water to fully submerge an iOpener.
-
Heat the water to a boil. Turn off the heat.
-
Place an iOpener into the hot water for 2-3 minutes. Make sure the iOpener is fully submerged in the water.
-
Use tongs to extract the heated iOpener from the hot water.
-
Thoroughly dry the iOpener with a towel.
-
Your iOpener is ready for use! If you need to reheat the iOpener, heat the water to a boil, turn off the heat, and place the iOpener in the water for 2-3 minutes.
What do I do if I don’t have a iopener?
Use a hair dryer
2 or 3 cups Rice in a sock, heat for about 2 minutes. But, I recommend the iopener.
When boiling in water you can put the iopener in a ziplock to keep it dry.
Even if you don't put in a ziplock bag, I found that the surface is mostly hydrophobic so drying it is very easy. I also didn't have tongs, but the bag is denser than water, so it sank and I attached clothes pins to the ends and was able to remove it with those.
2-3 minutes in near boiling water, then 2-3 minutes on my s10+ and it was super easy to cut the glue off.
I have a question, if I have a pan, and I have water, and a mean to boil the water, won't it be easier and cheaper to just use that.
Have you tried it? Water limits your temperature to 100℃, whereas 'pan on the stove' can easily get up to twice that. If your pan is even slightly warped, you'll have a few hot spots of direct conduction with convection everywhere else, heating things unevenly. Assuming you get the device up to temperature, how will you get it out without scratching it or burning yourself? After you're finished, do you really want to prepare food in the pan you warmed up adhesives and trace manufacturing substances in?
.
Boiling something form fitting to heat your device with is a lot more foolproof, and not being foolish is easier and cheaper. Direct pan heating can work, but you are leaving yourself open to a lot more problems than just taking the safe route.
add a little basil and oregano on the pan peanuts cashews walnuts and bam it pops right off
It's more 3 minutes than 2 minutes in hot water, in 2 minutes it's not getting hot enough I think. I used the combo iOpener + hair dryer for about 2 minutes and I could then insert a first opening pick easily. The first opening pick is the trickiest step, then if you go slowly and with patience around the screen with other opening picks, it works well.
-
-
-
If your display glass is cracked, keep further breakage contained and prevent bodily harm during your repair by taping the glass.
-
Lay overlapping strips of clear packing tape over the iPad's display until the whole face is covered.
-
Do your best to follow the rest of the guide as described. However, once the glass is broken, it will likely continue to crack as you work, and you may need to use a metal prying tool to scoop the glass out.
If you have ANY cracks FOR SURE do the tape. I would also make sure to wear safety glasses as it can fly all over even with the tape. And do it somewhere that you don't mind tiny glass shards going everywhere. I had one 3 inch crack in the glass in the lower right corner and it started spidering. The plastic pics don't work once well once they hit a broken point in the glass so you better have a lot of heat to loosen the adhesive, or you end up using an exacto knife to get around the cracked spots.
On a few occasions I had an unexpected pop as the glass shattered and little shards struck me in the face. I had taped the surface but pieces at the edge still managed to break free. My advice: definitely wear the safety glasses, and definitely tape the entire glass surface.
Echo jesseokerlund's comments that you will have glass flying. I made the mistake of doing the repair at my kitchen table and had a lot of cleanup to do. The job would be much easier if there was no broken glass, and the hardest part is where the glass is broken right next to the bezel. I used the metal spudger to work those pieces free, but it takes some time.
+ 1 on the safety glass, I almost got hurt while doing this.
I followed all the safety precautions mentioned: tape, safety glasses… The best advice I saw on this is to put the iPad in the sun for a few minutes. I placed mine on the windshield of my car in direct sunlight for about 5 minutes. I also used the iOpener to keep heat on the edges I wasn’t working on. I was able to easily remove the glass without any shards flying in about 30-40 minutes total. Great advice and safest way I’ve seen to remove broken glass.
-
-
이 단계에 사용된 도구:Safety Glasses$3.19
-
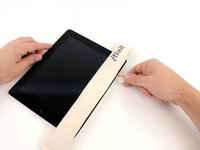
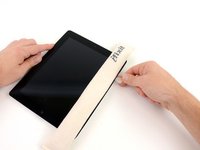
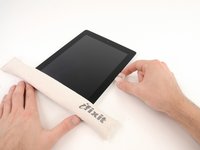
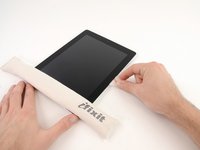
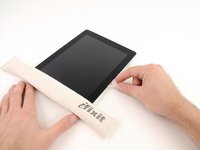
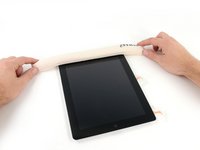
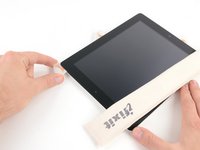
Lay the iOpener flat on the right edge of the iPad, smoothing it out so that there is good contact between the surface of the iPad and the iOpener.
-
Let the bag sit on the iPad for approximately 90 seconds before attempting to open the front panel.
It is ver likely that the glass you are trying to replace is broken, and this is tempered glass therefore it will chatter in many small pieces while you are working on it. Take this safety advice very seriously and protect your eyes!!! The glass pieces fly everywhere. AGAIN: PROTECT YOUR EYES!!!! BE SAFE!!!
This last statement cannot be underemphasized! I got two shards of very fine glass into my right eye, luckily got them out right away, before reaching for the safety goggles! Later on, I removed them again because working w/ the small parts was easier. Protect your eyes, people!
Just use some scotch wide transparent tape and cover the broken screen BEFORE you start to taking it apart. It will hold all the shards together and nothing will fly around.
Vatevaaa -
I covered the screen in clear packing tape to control glass particles.
I placed the ipad outside in direct afternoon sunlight for an hour and all of the adhesive was softened quite well.....the screen was off in just a few minutes !
This is a very good idea John, I wish I'd seen this comment before I spent hours picking tiny bits of glass off the glue!
Thumbs up for this tip. I left it out in the sun for 15 min only and it worked a treat. I used a razor blade. The plastic tools are next to useless.
olafgoy -
I had some issues after replacing this cable.
Once I had it in and back together only the down volume was working, and shortly after the gyro gave out.
I ended up going to where the new cable connects to the board, removing it, then replacing it as gently as possible. Not too firm.
I also removed a foam spacer in that area because it was pushed out over the gyro board.
Now I'm back to full functionality!
me 2 my volumen up doesn't work and the switch sound/silent any fix?
Zadd -
Badly broken screen, taped and warmed about 15 minutes on heating pad set on high. Perfect, gentle, overall warming! Mark the front with Sharpie, ie WiFi, cable, etc. Used thin metal iSes... type tool and guitar pics. BUY NEW Plastic bezel!!! So super cheap. Rewarm on heating pad as necessary. Compressed air helpful to blow away tiny glass bits. Wear glasses! Take breaks! This is easy if you warm carefully and are patient!
I am in the process of replacing a shattered screen on an iPad 3 wifi, and I literally was removing glass piece by piece! I do recommend having a roll of wide clear sealing tape at hand. Then, when you see loose glass shards, pull off about 4 to 5 inches, and stick the tape to pick up the loose glass, and once in a while, fold the tape onto itself (sticky to sticky side), and set it aside. This helps keep it from getting everywhere. Also, spread news paper under your work. Some people don't really think of these things, but the fact is, hardened glass will find its way into your skin very easily. Extremely sharp!
Have not attempted this repair on my wife's iPad 2, but is there a reason that you put the iOpener on top of the device rather than putting the device on top of the iOpener? After all, heat rises.
-
-
-
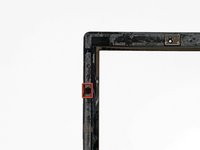
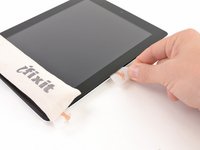
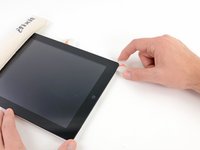
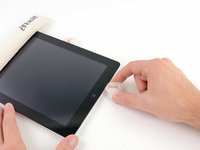
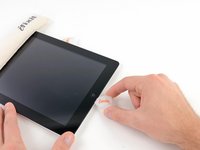
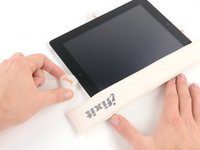
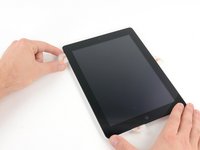
There is a small gap in the iPad's adhesive ring in the upper right corner of the iPad, approximately 2.0 inches (~5 cm) from the top of the iPad. You are going to exploit this weakness.
-
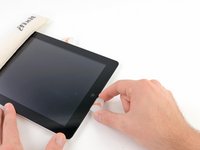
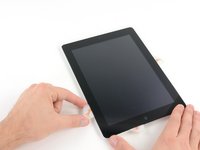
Align the tool with the mute button. Insert the tip of a plastic opening tool into the gap between the front glass and the plastic bezel. Just insert the very tip of the opening tool, just enough to widen the crack.
Yes, I severed this one on my first attempt. Might note that you want to start prying open below the sound controls. Additionally I found that a razor was helpful in getting the first pic into the device. Obviously you want to be careful as a razor could cause some serious damage, but I just used the tip of the metal to get some space to fit a pick.
Maybe I was doing it wrong, but the plastic opening tool I was using kept bending before it was prying anything apart. Therefore I suggest using either a metal spudger or a razor blade to make the very first opening but being VERY careful. My assistant/wife later scratched the LCD going overboard with the metal tools.
There is a way of making the Wifi/Bluetooth Antenna replacement much easier. If you have a steady hand and a soldering iron simply desolder the connecting cable from the bottom of the antenna and solder it back onto the new antenna. This means there is no need to dismantle the iPad and the repair is much faster. Hope this helps :-)
The process was pretty straightforward, you do need to be careful in a few spots (like the wifi antenna in the lower right) but overall I found it to be of medium level of difficulty.
It took me 2.5hrs to slowly dismantle and replace the broken screen.
Here are some tips I learned while doing it:
- instead of plastic spudger, better to use kit knife or razor blade. I found plastic to bend and malform quite easily.
- watch out for lower right corner where wifi antenna sits, it's easy to damage it
- if you have a cracked screen, use protective goggles - i used tape to secure broken glass pieces together, but that didn't quite work and lots of glass was flying as I was prying the screen off the ipad
- opening tool you put in the microwave sold here is not worth it - didn't do that great for me. I mostly used a hair drier and was very successful melting adhesive
- tools I'd only need again to do it again - guitar picks, kit knife, phillips screwdriver, hair drier :D
Overall, I found it to be quite interesting project!
Seconding the problem about plastic components. They just aren't strong / precise enough to fight this glass. Save them for the really nasty bits like the wifi cable, and use an X-Acto or equivalent everywhere else.
Wish I would have seen your comment before I went through it. Switched to a razor blade and that helped for sure. Thought about a hair dryer as well but stuck with the micro heating tool. Probably should have done the dryer. :-/
Had much more success using the metal spudger versus the plastic opening tool that came with the front panel kit.
Paul Boyer - 답글
I had success using Paddle Pop sticks instead of guitar picks. (not sure what they are called in the US). The guitar picks tended to deform and melt with the heat of my hot gun. The glue used to attach the screen is just amazingly strong! It takes a lot of patience to remove all the fragments. I have done about 6 screens now and it is a turdful job!
I think we call those popsicle sticks. They seem kind of thick for this, at least a lot thicker than a guitar pick.
John -
It is not glue, they use a very strong double sided 3M tape
Odus182 -
Successful battery change but I did sever the cord/ribbon to the power/sleep button. As my iPad had been opened before at a repair shop, I think they put adhesive over the cord as the small section was stuck underneath the LCD, barely visible. So be careful not to put adhesive above that exposed ribbon/cord to the power/sleep button or the next time you open it up, it's severed.
My plastic opening tool broke in no time flat. Perhaps I was pressing down too hard and not wiggling it enough. But for me I found that the metal spudger was the best tool for the job. I was able to wiggle it while slowly prying up the glass and once it was under the surface of the glass I was able to work it along the edge quite easily. I saw that some people used a razor blade but I would be afraid the blade would break. The metal spudger was just thin enough to do the job well.
!!!!!!razor-blade & hair-dryer !!!!!!!
I have found that using these plastic picks, spudgers and edge tools are ineffective as tools for inserting or creating a gap and glue separation action.
They are just too soft and too thick for this, causing cracks and not able to reach underneath without causing stresses.
After heating the adhesive with a heat gun (and using cardboard to shield the lcd screen) I have been using a metal round headed scalpel to insert between the glass and bezel, and to very carefully use as an adhesive separation tool at a very oblique angle so as to miss any sensitive cables or components.
Also, instead of this iTool heating pad and a microwave, they should create an electrically heated shaped pad, this would avoid the constant cooling and reheating and maintain the right temperature.
The iOpener works fine, I'm not sure what y'all are talking about. To be fair, you have to press the iOpener into the iPad in order for it to work, which isn't explained well in this tutorial. Wear heat-resistant gloves when you do this, the center portion of the iOpener gets VERY hot. I use a pair of gloves from ACE Hardware. While it takes a bit more effort with the picks, I was able to heat up one side of the iPad, then seperate the adhesive with the picks the rest of the way through.
I do not recommend using the little blue tool they show above, the part you're supposed to wedge in is way too thick. I use the Jimmy and some opening picks.
Third image is slightly misleading, you want to go about a centimeter below the volume button.
der iOpener war bei meiner Aktion auch nicht der Hit; ich habe ein STEINEL 2000W-Heissluftgebläse benutzt, mit dem das Absetzen und Wiedererwärmen nicht so umständlich und effektiver war. Den Einstieg an der hier beschriebenen Stelle schaffte ich nicht mit einem Plastik-Opener-Tool, sondern mit Jimmy, dem Geräteöffner aus Metall.
-
-
-
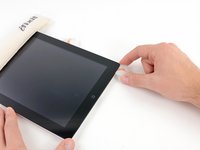
Make sure you place the tool in the proper spot—between the plastic display bezel and the front panel glass.
This visual is helpful. It would be great also to have a diagram of the top of the ipad, marked with "top," "bottom," "left," "right," and then an arrow pointing to each of the problematic areas, such as wifi cable, digitizer cable, etc. It would be easier to see the whole schematic while working rather than scrolling through the instructions and trying to visualize each piece separately. Good to see where to be careful...
!!!!!!razor-blade & hair-dryer !!!!!!!
-
-
-
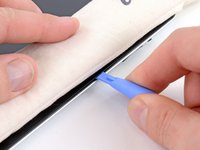
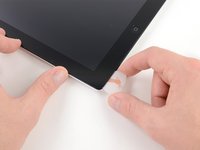
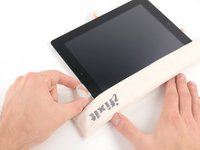
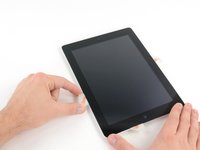
Keeping the tip of the plastic opening tool wedged between the front glass and plastic bezel, slide a plastic opening pick in the gap, right next to the plastic opening tool.
My screen was too broken for this "heat, cut with picks, and leave in place" method to work anywhere but the top, where it was essentially undamaged.
I wound up using a spudger through all the cracked sections to pry upwards just *inside* the perimeter of the adhesive, intentionally breaking the digitizer and the glass further, until I could remove the entire front panel except for the adhered portions - about half the perimeter in my case.
I then used tools to pry up the glass from the *opposite* direction, that is the broken interior edge I had earlier created, thus not having to fight the bezel and also having a clear line of sight to any interior components I might be damaging.
Of course, doing it this way made it much easier to drop tiny shards of glass all over the interior, but I found a little diligent cleaning much easier than trying to keep the glass intact while breaking the glue, as in this guide.
I found that using a scraper blade was the easiest way to get under the glass, both for broken and unbroken areas.
-
-
-
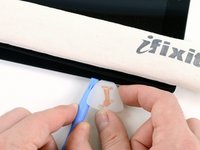
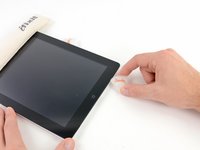
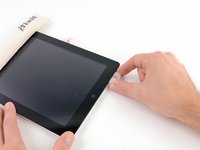
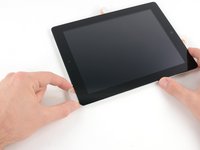
Remove the plastic opening tool from the iPad, and push the opening pick further underneath the front glass to a depth of ~0.5 inches.
It should be noted that the glass can be much more difficult to remove when it is cracked and shattered (as is usually the reason for replacement) . Depending on the location and severity of the cracks, the order and technique of removal requires modification.
I have found that putting a layer of clear packing tape over the entire screen is helpful, wether it's cracked or not. It will prevent the spraying of glass shards, should the glass break while separating the adhesive; with a broken screen, it should eliminate the risk of cutting yourself during removal, as well as hold all the pieces together. Unfortunately, it also makes the iOpener slightly less effective, so peel it back when applying it. Suction cups can also be helpful during final removal of the glass.
Having a hot air gun/pencil can be helpful in removing smaller pieces if broken glass that remain once the bulk of it is removed.
Just trashed an I pad... Not an electronics person. Did an iphone 5 battery with no problems was following instructions and once I hit the next step I realized I had already screwed up the screen... Moving forward tring to unhook LCD pictures are not very clear on which direction to push or pull so broke that... Now writing a review on it... Take it to a pro if you aren't certain!
I found that the adhesive could be separated when the pick or spudger was in at a depth of between 1/4" (6.4 mm) and 3/8" (9.5 mm). You can always go back and work it in deeper if you are having trouble separating.
Yoh but this is not so simple of your screen is shattered to the edges. Basically I had to lift, shatter more, and then pick off the splintered glass with tweezers bit by bit. Patience is a virtue here. I gave up on saving the adhesive and used it to help remove the splinters. I basically removed the edges of the iPad like that and then lift glass off. WEAR SAFETY GLASSES. I would be blind now if I didn’t. wifi antenna -Go slow make sure it’s hot +check what you are doing in the crack. Remove all splinters fromiPad when it’s open. Clean LCD with a microfibre cloth and inside of your new digitizer. When I first reassembled, the home button didn’t work. I reopened and made sure the two gold connectors align with the two spikes on the body. I placed the home button board face down onto the connector spikes with adhesive on the other side, then lowered the digitiser onto it so the board would stick to the digitiser. Notes: forget plastic spudger they’re only place holders, I used a blade knife and metal Spudgers
-
-
-
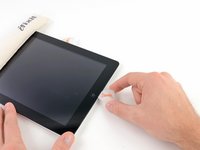
While you work on releasing the adhesive on the right side of the iPad, reheat the iOpener, and replace it on the bottom edge of the iPad.
I have found that its better to put more than one pick down the side of the screen to keep it open and prevent it from sticking back down.
-
-
-
If the opening pick gets stuck in the adhesive, "roll" the pick along the side of the iPad, continuing to release the adhesive.
The volume power button cable is really close to the edge and is frequently loose and non adherent to the frame. If your pick is deep into the iPad, you are almost sure to cut the cable. Be very cautious around the top right corner of the iPad.
I absolutely severed this cable when loosening the adhesive around the volume button area. There is really no way of knowing if this cable somewhat elevated from the frame and therefore susceptible to being cut, and it happens to be right where one starts to remove the face with the guitar picks. The cable is directly in from the down volume button, so be extra careful not to put the guitar pick in too far in this area. I recommend buying a power/volume button cable just in case. Replacing this cable is also not easy, but doable. Just try to avoid doing it.
Why not work in reverse to the top edge, and back around to the area where that cable may be unsecured? Haven't don't an iPad (yet, staring one in the face right now) but that would be my alternative so the screen is mostly loose and you could possibly see the cable looking from the now open left side of the glass?
-
-
-
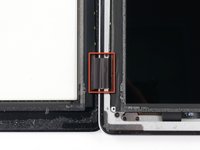
You will have to release the adhesive securing the antenna to the front panel without damaging the delicate parts attaching the antenna to the bottom of the iPad. Follow the next steps carefully.
I cut through my wifi cable partially, but it still works (surprisingly). I'd recommend staying well clear of this with the pick. When you go to lift the screen (future step, NOT NOW), use a really good light, start to lift the glass slightly at the corner and you will be able to see the cable. Then you can heat it more and watch the cable as you pull through the adhesive there making sure your not catching the cable.
If you heat the sides and top, releasing the adhesive, you can peel the broken glass front panel up from the body and with a little force the bottom comes loose. This avoids working around and damaging the Wi-Fi Antennae.
I know it is hard to tell from the photo, but the Wi-Fi antenna is kind of like a flap that opens on the right and is attached on the left. So if you use a pick to slide from right to left, the pick might slide under the flap and then sever how it is attached. When I had my pick just to the right of where the Wi-Fi antenna is, I was able to twist my pick a little (like you are tightening a screw) and pry the screen up where the antenna is located. Then I just moved my pick to the left of the antenna and could continue loosening the screen.
Irreversible damage to the Wi-Fi antenna is nearly unavoidable, but this is not the end of the world since you can pick up a perfectly fine replacement on-line for a few bucks. Many digitizer screen replacement kits include a new WiFi antenna and new bezel since removing the screen without damage to these is also nearly impossible. If your iPad is old enough to need a new battery, and you plan on keeping it thru at least another battery's expected life span, then I would plan on replacing the digitizer screen, bezel, and WiFi antenna as part of the battery replacement. The battery is going to be the most expensive of the set, say around $15 (US), and adding the other three will only add about another $15 (check the prices in ebay, amazon, etc.). Removing the screen often results in damage to the on/off and volume control cable since it too runs along the upper right hand edge of the base right under the screen. If you cut thru this then add another $1 to replace it too.
Based on my experience just (nearly) completing this job on an iPad 2, CDMA, is that the trickiest step is reconnecting the three CDMA antenna cables on the underside of the CDMA chip that is part of the logic board assembly. These are nearly microscopic button connectors (maybe 0.5 mm in diameter). I needed 8X magnification glasses, very bright light, tweezers, and incredible luck to get these reattached. They pop off no problem, but getting them positioned to apply pop-on force takes a LOT of patients! Maybe someone knows a trick to doing this? There’s a similar connector on the WiFi cable but the chip it attaches to can be removed from the logic board so you’re able to manage positioning them interdependently. The CDMA chip is attached (soldered?) to the logic board and the three button connectors are on the underside, and pretty close to one another, so getting all THREE attached and then the logic board in place is a miracle.
-
-
-
Slide the opening pick around the bottom right corner of the iPad, releasing the adhesive there.
Be extremely careful and patient at this step. Proceed slowly with only the tip ( 1/16th in. - 2mm max.) of the pick. There are two tinny screws that attach the bottom of the antenna to the iPad frame. This antenna part is easly severed if the pick goes too far.
Happenned to me and had to replace the antenna.
-
-
-
Slide the tip of the opening pick along the bottom edge of the iPad, releasing the adhesive over the Wi-Fi antenna.
I nearly broke my wifi antenna because I didn't read this whole step clearly and didn't go backwards and release the antenna from the front panel. Admittedly, this is my own fault but I've edited the step to make this point more clear.
My screen was way too shattered for me to be able to use the screen instructions as suggested, so I followed the general principal but ignored the order around, because that simply wouldn't have worked...and destroyed the antenna.
Maybe step one should be "BE CAREFUL IN THIS CORNER OR YOU WILL BREAK THE ANTENNA!" A diagram highlighting where all the cables (antenna, digitiser, volume, toggle switch) lie with the screen still attached would be helpful too.
Or maybe you should have read the entire thing before starting if you were not planing on following it step by step
I Broke my antenna like many others. It is glued to the glass and has 1mm thick foam backing that is also glued to the inner case. Then there is a tiny grounding connector screwed at the lower edge of the case. Once you can get things loosened up around this antenna, you will need to detach this antenna from the glass. Work at it with your picks or spudger until you get it free, if you do not get it to release from the glass you will break the grounding ribbon. I bought a cheap aftermarket antenna on amazon for $3. turns out it has a bad cable coming from it. I was able to unsolder the cable from the one I broke and solder it to the new antenna.
It wasn't obvious to me at first that I'd broken the antenna. A picture of the antenna that works compared with one that is broken would be useful. Fortunately I'd ordered the replacement part just in case, as suggested.
I think using extra heat on this spot may make it easier to unstick without breaking the antenna?
A diagram of what the antenna looks like, from the side, would make it clearer what to do with the pick. You are trying to detach the antenna from the glass, without ripping it off where it's screwed into the bottom of the ipad. Since you can't see what you are doing, and the antenna is quite fragile, that's tricky.
I think once you've broken one you would know better how to do it. When you slide the pick to the right you need to be sure the pick is moving above the antenna and not snagging on it in any way, and you need to be sure the antenna is completely detached from the glass, so you don't tear it when you lift the glass up.
Another lesson learned while removing the WiFi antenna. The photo shows the iPad laying face up on the table, but to see what you’re doing when detaching the antenna you ‘re better off with the iPad edge up so you can see how the antenna is attached. The antenna is very, very easily broken. To be honest, it’s a lot easier to replace a broken antenna than to try to pry it loose.
-
-
-
Once you have moved past the Wi-FI antenna (approximately 3" (75 mm) from the right edge, or right next to the home button) re-insert the opening pick to its full depth.
-
Slide the pick to the right, releasing the adhesive securing the Wi-Fi antenna to the front glass.
-
The antenna is attached to the bottom of the iPad via screws and a cable. This step detaches the antenna from the front panel, ensuring that when you remove the panel, the antenna will not be damaged.
Be extremely cautious on this step! I did it wrong and my antenna went to !@#$.
Also once it is unattached from the front panel, if the antennas adhesive touches the glass again it can re-adhere to front panel and may rip apart after all. Keep a close eye on it or leave a pick or card in there to prevent it from re-sticking.
Ordering a replacement antenna to anticipate the one you will brake(I should say shred) is probably your smartest move to have a successful repair
-
-
-
Continue releasing the adhesive all the way along the bottom edge of the iPad.
-
Leave the opening pick wedged underneath the front glass near the home button.
This should include details about the Home Button Ribbon Cable. Unlike an iPad 3 (which doesn't have this cable) the iPad 4 has a Home Button Ribbon Cable that runs along the left side of the Home Button and is adhered to the glass. If the guitar pick is inserted too far (more than 0.5") it is possible to damage or sever this cable.
There is a reason this is an iPad 2 Wi-Fi EMC-2560 repair guide. This guide isn't for iPad 3 or 4...
-
-
-
Slide the opening pick along the top edge of the iPad, pulling it out slightly to go around the front-facing camera bracket.
-
The adhesive along this section is very thick, and a fair amount of force may be required. Work carefully and slowly, making sure to not slip and damage yourself or your iPad.
In my case I damaged the right GSM antenna which was somehow sticked to the front panel... Be really careful as I really didn't felt that I was damaging anything...
+1 on the right 3g antenna - it is adhered to the glass and I cut right through it with the opening pick. The replacement included adhesive to re-stick it to the glass, so this is a definite feature of this antenna. This is a thin film similar to the wifi antenna, so maybe going around it at a shallow depth from the corner to the camera and then returning to the corner slightly deeper would allow you to separate the antenna from the glass without damaging it.
The GSM component is glued to the screen with different adhesive (more like glue). I managed to not damage this but it was really tricky. The guitar pick is too thick and weak to release this from the screen. Id recommend you wait until you lift the glass (future step, NOT NOW). Then, with a good light you'll see the white plastic adhered to the glass. A thin metal pick or exacto is needed to patiently cut & pry your way through the adhesive. Careful of the camera as your pulling in that direction.
-
-
-
-
Slide the opening pick along the left edge of the iPad, releasing the adhesive as you go. The adhesive is thin here due to the digitizer along the whole left side. Make sure the pick is not too deep (max 1/2 inch) 10 mm to prevent damaging the digitizer.
This is the hardest part the digitizer cable runs the length of this side and u have to be very carefull with the pick . Only go in an 1/8 inch I severed it by going the half (recommended) luckily I had a new screen standing by . I used I opener for heating and it was slow but ok.
wperrin623 - 답글
There is an error in the red text in this step. It says ‘The digitizer cable is located approximately 2" from the bottom of the iPad’. The next sentence says .. ‘Stop sliding the pick when you get ~2.25" from the bottom of the iPad.. This will slice and ruin that cable. The last sentence should read ‘Stop sliding the pick when you get ~1.75" from the bottom of the iPad.’ so you stop cutting glue before you get to the digitizer cable.
@Jenny & @dleimonis - you can buy the digitizer and new cable by itself if you do not need an LCD also. They are separate parts.
-
-
-
Using the opening pick that is still underneath the bottom edge of the iPad, release the adhesive along the bottom left corner.
If your screen is broken or shattered there are no worries with the digitizer cable, It is all on the new screen.
Exactly. I purposely severed mine as it was a complete screen replacement and made the LCD removal easier.
-
-
-
Using one of the opening picks, pry up the bottom right corner of the iPad and grab it with your fingers.
Be very careful when pushing the guitar pick around the corner of the power/volume buttons. The ribbon cable for these buttons may be stuck to the adhesive and break when lifting the screen or when sliding the pick along this area. I have done 4 iPad 2 repairs and at least one of the delicate components do not make it. I would recommend ordering a wi-fi/bluetooth antenna, bezel with strips, and a power/volume cable. It is nice to have a "just-in-case" part or two, they are very inexpensive. I noticed that the I tended to break one of these delicate components when the screen was shattered in the area of those components.
I absolutely severed this cable when loosening the adhesive around the volume button area. There is really no way of knowing if this cable somewhat elevated from the frame and therefore susceptible to being cut, and it happens to be right where one starts to remove the face with the guitar picks. The cable is directly in from the down volume button, so be extra careful not to put the guitar pick in too far in this area. I recommend buying a power/volume button cable just in case. Replacing this cable is also not easy, but doable. Just try to avoid doing it.
At this point it is a good idea to get the packing tape back out and wrap it around 2 or 3 of your fingers making a circle with the sticky on the outside. Make it loose enough you can place your fingers on the table surface to the side and pull your fingers out. When you remove all the tiny parts/screws in the next steps put them on top of the tape so you know exactly where they are when you need them
-
-
이 단계에 사용된 도구:Microfiber Cleaning Cloths$3.99
-
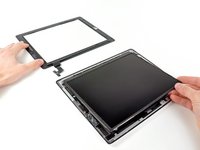
Holding the iPad by the top and bottom right corners, rotate the front glass away from the iPad.
Be very careful not to touch the LCD. It's a pain to remove smudges. One thing that might help when you need to hold it while reattaching it during reassembly: attach a small suction cup to the metal side. That way you can avoid touching the sides where your hand might slip to the LCD side.
Do you need to use some adhesive strips to remount the plastic bezel? The bezel I ordered didn't come with any and the ones you can order only seem to have strips for mounting the glass and not the bezel.
You'd better. The original bezel is glued. You can find 3mm fine/double-sided (black) tape on Amazon. I use it when I replace the bezel because they fit perfectly under the bezel. I use for all sorts of repairs on iPhones, Samsungs, etc. Such as this [one|http://www.amazon.com/gp/product/B005GIS...]
Rany -
In order to prevent touching the LCD screen with your finger(s), I use the thin plastic food wrapper to cover it. It will temporary stick to the LCD screen and provide excellent protection from fingerprints.
Very good suggestion. It worked like a charm.
where is the connecotr for home button at the ipad 3....i have nothin where i can plug in the flex cable comin from the button
Go slowly as you lift up the glass and be sure that you are not tearing a ribbon cable. When I lifted the glass the digitizer cable was torn and unusable. Perhaps I had cut it with the pick/spudger but it tore completely off when I lifted the glass. Good thing I had purchased the full front panel assembly with the digitizer (IF116-018-3).
When reassembling I used canned air to blow off dust on the LCD before closing it up.
You can use a clean soft brush like a make-up brush or small paint brush to brush off the LCD.
I like how the pictures show an intact screen being removed (although the one in step 4 has a couple of cracks in). I don’t know if anyone would have the luxury of being able to remove a screen in one piece, the ipads I've fixed have been completely smashed pretty much all the way around the outside of the lcd underneath. I used this guide to know where to watch for cables etc - very helpful. I end up using a window scraper/razor to scrape off the glass shards/adhesive around the edge. Glass shards/dust all over the lcd is easy enough to get off but cleaning the lcd after that is a real pain. Does anyone have any suggestions how to clean the lcd properly?
When reassembling the glass, align the camera first. On the back of the glass there are two pins on the metal camera frame.
Align them to the camera first, in order to avoid to get a ‘bulge’ visible on the glass or on the back of the iPad.
Luca Forti - 답글
+1 to Luca’s comment. This deserves a RED NOTE for reassembly. I probably just destroyed my new wifi antenna due to not having a reassembly call out for alignment of the screen. Had to pry things back apart and wifi antenna looks like it may have bit the dust. So this is a VERY important bit to know for a first timer.
-
-
-
Remove the four 2.0 mm Phillips screws securing the LCD to the rear case.
It would be good to see how reassembling.
Yes, or at least show where the adhesive parts go
There is a separate guide for this:
iPad 2 Wi-Fi EMC 2415 Front Panel Adhesive Strips Replacement
use the same way in reverse mode!!
-
-
-
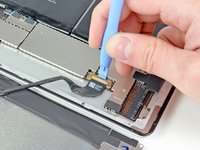
Use the edge of a plastic opening tool to carefully flip up the retaining flaps on the two digitizer ribbon cable ZIF sockets.
-
-
-
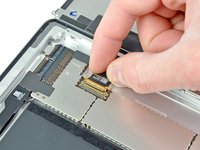
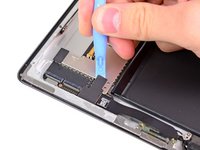
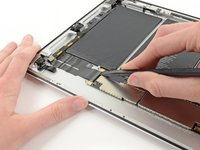
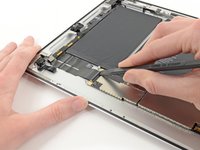
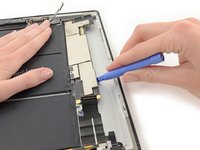
Use the edge of a plastic opening tool to peel the digitizer cable off the shields on the logic board.
-
Carefully pull the digitizer cable off the adhesive securing it to the side of the rear case.
-
-
-
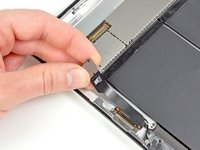
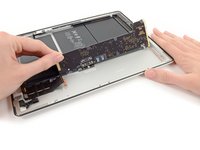
Pull the digitizer ribbon cable straight out of its two sockets on the logic board.
After I replaced the digitizer only half the screen is working. Any reason for this problem ?
When reassembling, don’t remove the adhesive strip until you’re sure the new cable is inserted correctly and locked in place. Place the LCD panel inside the case, and the screen inside the bezel, turn on the iPad. If you can drag an icon across the screen, from top to bottom, left to right, your screen is correctly installed and you can proceed removing the adhesive.
After I replaced the digitizer the volume button the side of my ipad will go down but not back up and it’s not powering off. Any ideas why this is happening?
-
-
-
Lift the LCD from its long edge farthest from the digitizer cable and gently flip it toward the rear case—like closing a book.
-
While holding the LCD up, gently slide the front panel away from the iPad. Be careful not to snag the digitizer cable on the rear case or LCD.
-
Set the LCD back into the body for safekeeping.
It should go without saying, but anytime you are handling the LCD, try to only touch the edges. Otherwise you'll be scrubbing fingerprints for 15 minutes. Not that I'm speaking from personal experience or anything.
Ed Chapman - 답글
random question...........1 problem i've ran into in the past is the digitizer cable is so long on aftermarket screens the adhesive isn't strong enough to hold the glass down around the digitizer area where it is folded.
would it help to have a 2nd person tilt glass straight up off table and tuck some extra cable under the lcd or will this cause a problem with the lcd itself?
-
-
-
Lift the LCD from its long edge closest to the volume buttons and gently flip it out of the rear case—like turning the page in a book.
-
Set the LCD face down on a clean surface. You may want to rest it on a soft cloth to prevent scratches.
-
-
-
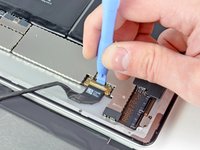
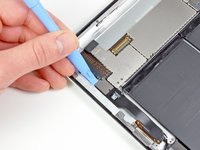
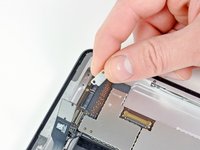
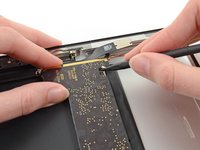
Use a plastic opening tool to lift the display data cable lock upwards.
-
Pull the display data cable out of its socket.
-
-
-
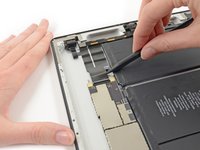
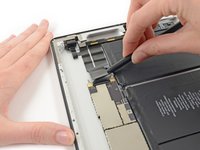
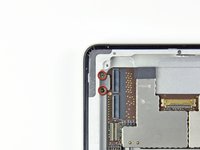
Remove the following screws:
-
Two 2.1 mm Phillips screws securing one of two metal brackets to the rear case.
-
One 2.6 mm Phillips screw securing the logic board to the rear case.
-
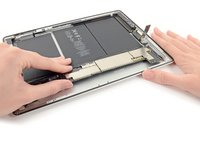
Remove the metal bracket from the rear case.
i ordered the IPAD 2 BATTERY KIT (IF110-014-3 ) assuming ill have everything i need but went over this guide i am not sure if i have the screw driver bits 2.1mm and 2.6mm to use on this step. am i correct?
-
-
-
Reheat the iOpener in the microwave for one minute.
-
Place the heated iOpener on the back of the iPad just right of center (the side opposite the rear facing camera). Let it sit there for 90 seconds to soften the battery adhesive.
-
Move the iOpener to the center of the back of the iPad and let the iOpener sit for another 90 seconds.
-
Move the iOpener to the left edge (the side with the rear facing camera) of the back of the iPad and let the iOpener sit for another 90 seconds.
-
-
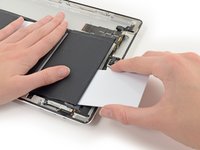
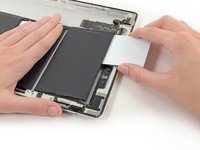
이 단계에 사용된 도구:Plastic Cards$2.99
-
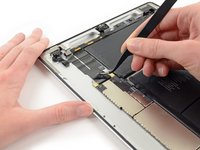
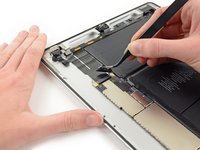
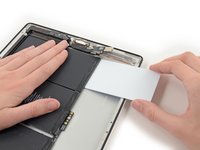
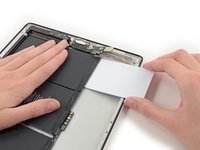
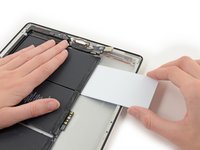
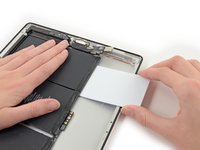
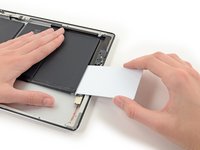
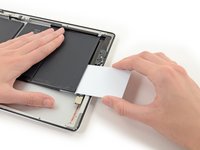
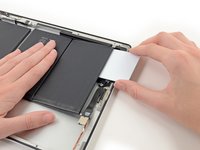
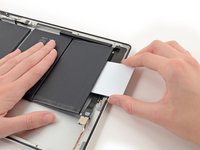
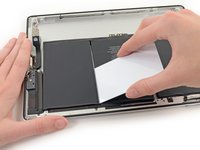
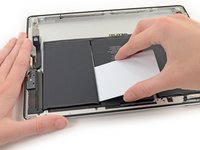
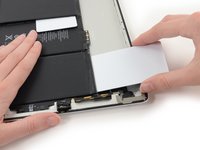
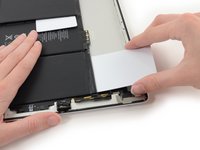
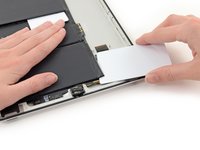
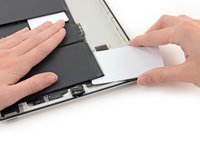
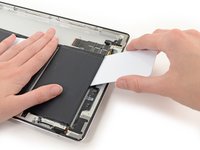
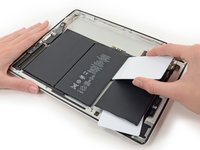
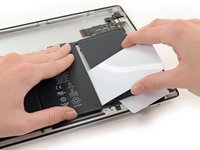
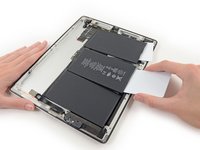
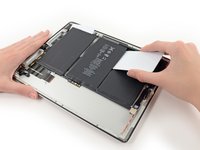
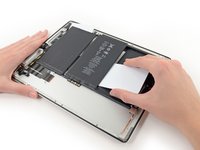
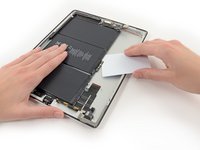
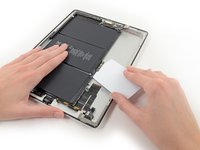
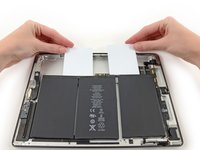
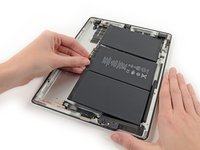
Flip the iPad back over and insert a plastic card between the bottom battery cell and the rear case.
It is much easier to use dental floss to cut the batteries lose. This way you don't risk to bend the batteries.
-
-
-
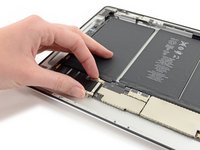
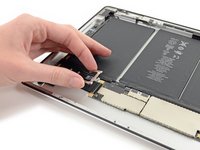
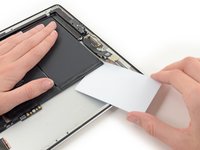
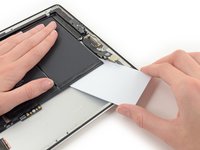
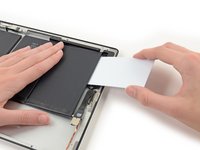
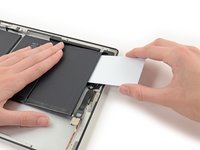
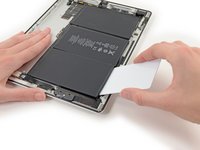
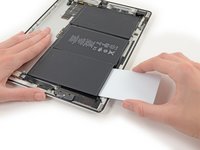
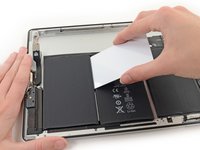
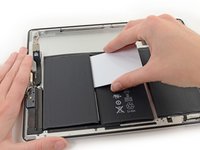
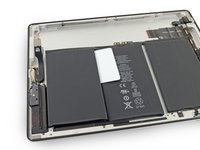
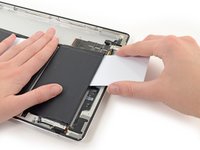
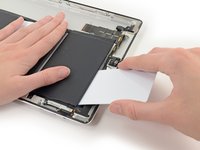
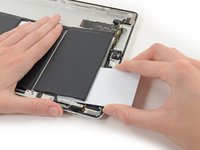
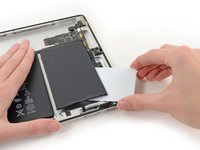
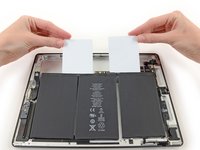
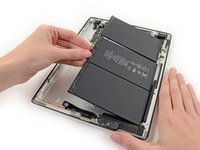
Lift and gently remove the battery assembly from the case.
Part 1: The 66 steps were well done, but they describe only about the first 1/3 of the effort. The “conclusion” states: “To reassemble your device, follow these directions in reverse and use our iPad 2 Wi-Fi EMC 2560 Front Panel Adhesive strips guide to reattach the front panel.”
Useless #1 - “…use our iPad 2 Wi-Fi EMC 2560 Front Panel Adhesive strips guide…” I tried (I have a 2560) but the guide was for an entirely different set of strips than the ones iFixit is selling in June 2019.
Useless #2 - There was no reference to ANY guide on how to remove adhesive. I searched hard. There was some stuff from users on the forum, but NO GUIDE on this CRITICAL aspect of iPad repair. Figured out a process myself (FIRST peel off the tape from the glass, then wet remaining adhesiveIPA saturated Q-tips, use sharp edged opening tool to scrape up the thick stuff while it’s still wet, and then use IPA-wetted 1” square cotton flannel rifle bore patches for the final cleanup).
(more to come)
Part 2: Useless #3 - “Follow directions in reverse.” Nope - the vast majority of the 66 steps involve how to cut through the adhesive strips. You can’t reverse that. The (fairly few) reversible steps involve removing screws/brackets and disconnecting cables. Even there, here are two critical oversights on reassembly:
- (A) INSTALLING THE BATTERY: The new battery positioning is very sensitive. Use the plastic sheet you peeled off the glue strips under the battery, with maybe 1/2” of adhesive poking past it on the connector side. Set the battery connector on its post, then align the two similar opposite-side battery edges as close to perfectly parallel as possible to the housing before pushing down their connector-side edges, then align the third battery section to the first two and push down on the connector edge to lock in its orientation. Then slide the plastic out and smoothly push down on the rest of the adhesive strips, working form the connector edge to the housing edge.
(more to come)
Part 3: - (B) FINAL ASSEMBLY OF LED PLATE AND GLASS/DIGITIZER — You have to be VERY careful in the installation sequence of the front glass/digitizer and LED plate. Before this step, (a) install the Bezel (I used the spudger’s point to push it down and sideways into the outer lip, then the flat of the spudger to adhere the flat 1/8”/3 mm base of the bezel), then (b) install the adhesive strips to the perfectly clean back side edges of the glass/digitizer, leaving only the blue peel-off protectors in place. Note: On the strip around the front-facing camera, the thin center part goes INSIDE the cameras, not along the outside edge! Painful lesson learned - do as I say, not as I did!)
(more to come)
Part 4: - Then: Connect the LED plate first, lay it open like a book, then CAREFULLY slide the glass/digitizer under it from the bottom, so that its flex cable slides into position. In this and ALL following steps, take GREAT CARE to (a) not to touch the digitizer or LED surfaces with your fingers (or anything else contaminated) and (B) Not to let either surface’s edge stuff to scratch the other surface. I used an old, well (and freshly-) washed hand towel for protection. (Again, Painful lesson learned - do as I say, not as I did!)
- Gently lower the LED plate into place and LOOSELY install the two far screws, away from the pivot edge, and prop the sharp opener tool under the lower corner of the “hinge) of the LED plate, to raise it about 3/8”/ 8 mm above the rear housing’s edge.
Part 5: - Lift up the glass/digitizer to vertical (for the ENTIRE rest of this step) and using the tip of the spudger, carefully work the loop of the digitizer’s flex cable UNDER THE LED PLATE so that only 1/8”/ 3 mm) is hanging out of the gap, then remove the opener tool, drop the LED plate down onto its four contact points, and finish installing and tighten all four screws.
- Now, here’s the tricky part. You have to hold up the LED plate vertical with one hand, while you remove the blue peel-off protectors from the glass/digitizer with your other two hands. My failure while doing this was to unknowingly brush/touch my hand or arm across the digitizer surface, leaving a large smear that I didn’t see until the assembly was complete. Sigh.
- Keeping the glass/digitizer vertical, use canned air to blow off any dust particles from the LED and digitizer surfaces.
(more to come)
Part 6 (final): Exclusive of the adhesive removal, the whole disassembly/reassembly effort (first try on an iPad) took me about 3 hours. The adhesive removal took another 3 hours before hitting on the , but only about 1-1/2 hours after I developed the technique above.
-


To reassemble your device, follow these directions in reverse and use our iPad 2 Wi-Fi EMC 2560 Front Panel Adhesive strips guide to reattach the front panel.
To reassemble your device, follow these directions in reverse and use our iPad 2 Wi-Fi EMC 2560 Front Panel Adhesive strips guide to reattach the front panel.
다른 28명이 해당 안내서를 완성하였습니다.


댓글 2개
Nicked (Cut) the Touchscreen cable, Wi-Fi Cable, (Power/ Lock/ Camera) Cable - taking the screen off. All I was trying to do is replace the battery. It was so cheep, I should have purchased items 2 & 3, new screen seam, as spares when attempting the repair to avoid multiple shipping delays. As far as my unbroken screen which I destroyed, I used a razor blade but went in more than 4mm, watch out for that. A difficult time consuming repair. Saying that, without ifixit.com, I would have been paddling up a creek, so special thanks to them for making the repair even possible.
jamieyazoo - 답글
I didn't find this to be as hard as I had built it up in my mind to be; HOWEVER, saying that I need to say years ago I was the local Nokia service center in my town. But many years ago right after they got rid of analog times. Yeah. A classic installer/repairer mistake when starting something they haven't fixed or installed before is picking up the instructions, flipping through them; maybe even reading a section that is new-then tossing the instructions over the shoulder. "I got this." This usually comes right before something major gets broke. And I can tell you when you try to do it yourself and then mess it up horribly then take it to the repair shop. Well we called that "I can do it myself" syndrome and charged extra to put back together what they brought in in the box. Now knowing all this - I can't stress this enough because I am stupid, stupid, stupid. COVER YOUR SCREEN IN CLEAR BOXING TAPE AND READ ALL THE INSTRUCTION BELOW THROUGH TO THE END BEFORE EVEN ATTEMPTING THIS FIX. Take my advise.
windizy - 답글
I didn't have an iOpener, so I used a wheat type heat bag. If you do this though, make sure you put a layer of plastic between your Mac and the bag, or you'll get condensation in places you don't want it.
Martin Gray - 답글
I started out using the iOpener but switched to my wife's hairdryer. A heat gun or hair dryer proved to be much more convenient and is a time saviour. You can heat more and the glue becomes more fluid make the next steps with the opening picks much easier
Jan Van Puymbroeck - 답글
I know this is obvious, but backup your iPad with iTunes before you start. I'd also turn off your passcode if you have one.
Laurie Higgins - 답글
Ther first time you heat up the iOpener for this repair when its room temperature I had to heat it up for more than 30 seconds. I remember I had to heat it up for around 45 seconds. However, after that when you need to reheat it again during the repair 30 seconds will be enough.
Yousef Ghalib - 답글
I used the wheat bag in a sensor microwave heating up to 65-70 deg C (155 def F).
ian cheong - 답글
Get yourself a cherry pit bean bag the size of your iPad. Heat it, put the iPad on it for 3 to 5 minutes or so, reheat the cherry pit bean bag, again put your iPad on it. Then heat the iOpener and start working. The cherry pit bean bag will have to be reheated several times, but it will soften the adhesive so you have less problems with the iOpener
Tim Feyaerts - 답글
The heating can be done very effectively (and quickly) with 3d printer heated bed. Make sure the bed is clean. Set the temperature to 60c, (130f ) and put the ipad face down for +/- 10 minutes. Repeat as needed throughout the “gentle prying” stages.
polleyphony - 답글
The iOpener did not work at all for me.
I had to use a heat gun and bring the edges of the case up to ~200 degrees (used an infrared thermometer to measure) before the glue would weaken. This obviously superheated the metal frame, so I also had to wear gloves to handle the phone while prying the back off with the included picks.
Mike Jeanette - 답글
Repair instructions worked like a charm. Had to be patient with the iOpener and getting the screen off. I tried repeatedly without success until shifting the suction cup a bit to the left side where perhaps the glue had loosened up a bit more.
Kyle - 답글
The iOpener, in my opinion, is of no help. Many warnings to say “don’t warm it too much”, but the glue doesn’t melt if not warm enough. As a result, a complete waste of time and energy. In addition, too much liquid in it, so it doesn’t lay on the device on a sufficient surface. I took a hairdryer and it worked much much better.
laurentvidu - 답글
I used an immersion bath to heat this to 180F and applied it to the device until the outside temperature of the opener read 150F with an IR thermometer. Removing the screen took very little force with this method.
breadandbits - 답글
My experience. I was replacing the screen which had been cracked and a little shattered in some places. The iopener is pretty much useless, so was the suction cup. The suction cup would probably be more useful if I was doing something besides the screen. Also you probably want the clean the screen before using it so it can get good suction. I used a hair dryer on high for a couple of minutes at a time (someone on this tread suggested that). I used my exacto knife and a razor blade to get into the adhesive. First the exacto to get the initial cut, then the razor blade to go a little deeper. Could have probably just used the razor blade, but the exacto has a little more finesse. I got the razor blade in and a little under the glass then I used the picks to wedge in. I didn’t want to risk anything using the razor blade too much. Used tape to keep the shattered glass together.
trebor65 - 답글
My experience pt2
Fortunately the shattering was mostly on the edges and most of it had adhesive on the back so it stuck together. Just take your time and work your way around following the guide to get the screen off. Have some goof off or goo be gone to clean the frame when putting the new glass on or putting the existing one back. (someone suggested that also, very good idea). Be careful of the LCD (you should know that). The cable on my LCD was pretty tight, so I propped it up while taking the cable cover off and when I put it back on I did the same thing. I just put a bottle on the battery and leaned the back of the LCD on that while attaching the cables and putting the screws back on the cover. Also be careful with the home button and the bracket on the back of it. I had enough old adhesive on left on the bracket that it stuck back to the new glass fine. So far only 12 hours in, so we will see how that holds up when the kids get at it.
trebor65 - 답글
Another alternative if you do not have the iopener is to use a bed time hotwater bottle. Do not over fill it though. Just put enough hot water in to support the phone while you work around the adhesive.
I use both the hot water bottle and iopener together on Samsung's. It makes life easier
gazza667 - 답글
I followed the directions and heated my iOpener for 30 seconds in a 1000 watt microwave, and it came out at 160 degrees F, as verified by a infrared thermometer. This allowed me to separate the last bit of the back of my Samsung S8, which was already coming off due to a swollen battery (hence the reason for the repair).
Dennis - 답글
Hallo,habe den Akku erfolgreich getauscht.Doch seitdem gibt es bei Telefonaten eine Rückkopplung für den anrufenden.Bei mir ist alles normal.Woran liegt das?Mfg
Manu R - 답글
If you follow these instructions, you will crack your screen like I did. Heating the iOpener for 30 seconds, using it to melt glue, then waiting 10 minutes to reheat is useless. The iOpener can be used to maybe warm the glue on whatever side you aren’t working on. You need a hairdryer and/or a heat gun to melt the glue and separate the glass from the iPad.
Anyone want to buy an old iPad with broken glass and a dead battery?
mpulliam - 답글
Not everybody has a microwave. You should provide a target temperature for the iOpener and instructions for a conventional oven, or pot of warm water, or whatever. Although I will probably use a heat gun …
Esmond Pitt - 답글
Three times heating opener and no luck. Tried pressing down gently on opener with a towel, and the opener broke. Wondering if I now replace table mats, fancy table cloth, etc. or will this stuff wash out.
Not impressed so far. Maybe the hair dryer next.
doug - 답글
I support the comments about the iOpener. Everyone has a hair drier, FHS, so get a cheap IR thermometer (£18) and blow heat until the area is 60+ deg C. Still takes w while, and getting the screen off is v scary, but just add more heat if you feel resistance.
The rest of the kit is good, esp the magnetic screwdrivers.
Richard O'Brien - 답글
No, everyone does not have a hairdryer. Some of us don’t even have hair. Thank goodness I already had an IR thermometer, though.
nin10doh -
#### WARNUNG WENN MINIMALSTER SPRUNG IM DISPLAY IST FUNKTIONERT DAS NICHT!!! ######
Hatte einen winzigen, minimalen Sprung im Display. Ich dachte es könnte gehen, weil der Sprung “abgeschlossen” war. Er hat in einer Ecke ein winzige Glasteil rausgeschnitten. NEIN! Geht nicht. Habe alles mit viel Geduld dem iOpener und einem Föhn erhitzt. Es ist trotzdem sofort über das komplette Display zersprungen…
T z - 답글
I’ve started with iOpener but changed very quickly to a heatgun. That was more efficient.
Mizzoo, s.r.o. - 답글
I could not get the iOpener hot enough to melt the glue on my ipad 6. I heated for 45 seconds once and it was boiling and it still never worked. Thank goodness contributors mentioned using a hair dryer. Using an 1700w hair dryer on high did the trick to get the screen off. Still took some time and the case got pretty hot but be patient. It took twice as long and a lot more patience to get the battery out.
Randal Haufler - 답글
I have an Ipad with touch screen issue, if i replace this part it should be Ok?
janderson martin - 답글
WARNING - DO NOT MICROWAVE ON A METAL MICROWAVE RACK
The metal microwave rack can heat up and melt through the iOpener cover letting the contents leak out.
Not a big issue for me as I have a heat gun and used that instead.
Run Up A Tree - 답글
I opened my iPad with the iOpener. Be patient! It may take quite a bit longer to it the iOpener in the microwave than it says in the guide. My microwave can only do 800W and I had to put the iOpener in several times (maybe a total of 90-120 seconds). I recommend that you have the transparent side up an watch the bag carefully. As long a the bag doesn't bloat up and the liquid doesn't start bubbling you should be fine. But I recommend to take the iO out from time to time to check it. (More comments in Step 6.)
marcelflueeler - 답글
I gave upon the I opener and used a hairdryer. (Fixed an iPad 6)
Tom Weber - 답글
iPad mini gen5. I used the iOpener. My microwave is 1200w with carousel. 30 sec got the iOpener to 155ºF. For the 2nd heating, after 10 minutes sitting, the temp was still around 125º so I only cooked it for 15 sec. Not enough increase so +5 sec more which me to 165-170ºF. This should be considered ballpark info because who knows the real output of the various microwaves and the quality of the IR tool used to determine temp.
To successfully open my iPad mini I applied the iOpener twice to the left edge and twice to bottom. & once to R edge. Using the suction cup was difficult for me (I'm in my 70's so my hands don't work too well anymore). I had trouble holding the guitar pick and slipping them in (at an downward angle). In the end, sliding my thumbnail along the edge opened it very slightly and allowed the pick to get into the gap. I marked the ends of all my picks with a sharpie pen for the recommended 2mm insertion to avoid going in too deep. To get the screen open it took me approx 1 hour.
jharrison - 답글
Can’t you just use a hair curler instead?
Aspect22 - 답글
A hairdryer or heat gun works, if heating is kept around 100 deg C (212 deg F - boiling point of water). But… heating this way is cumbersome. Using a hotplate, set to 100 deg C, measured carefully with a fairly inexpensive IR gun, is simpler and easier, if you can afford the hotplate (I used an old pancake griddle with a thermostat knob). It works great for phones, setting them face down for 2 minutes, then picking them up with insulated gloves - cheap, wool gloves work fine. This may require repeated reheating to continue the display removal, but its much simpler.
Because its almost impossible to repeatedly lay an iPad/tablet on the hot plate, I propose an alternative.
Initially lay the larger iPad/tablet, face down, for 2 min, to heat all of the adhesive surrounding the display. Lift and begin the picking process describe in your removal steps. Then lay an iOpener on the hotplate for 2 min (already set to the exact, desired temp) to bring it to working temp for the remaining operations.
Dan Smith - 답글
For iPads in particular, it makes sense to construct a simple, aluminum window frame, laid on a hotplate (see my comment above) that only touches the edges of the display, heating only the adhesive underneath. This prevents general heating of the entire device. Four strips of aluminum, placed together as a frame, would be the simplest and allow variations for all devices - envision it as a pinwheel of strips, radiating outward. Use it for any size device.
Dan Smith - 답글
BTW, always read all comments at each step. New, and possibly useful, suggestions appear on occasion that can be crucial.
Dan Smith - 답글
My iOpener got damaged at the first heating (30 s @ 800 W). The bag got a little melted hole where the liquid came out and a little melted area. I used a combination oven (normal heat and microwave) in microwave only mode. It has a metal grill where the iOpener was placed on. I suppose the metal grill concentrates the microwaves at some points and there the bag melted?
K. Fe - 답글