주요 콘텐츠로 건너뛰기

iPad Air 2 Wi-Fi Battery Replacement

필요한 것

  1. iPad Air 2 Wi-Fi Battery Replacement, iOpener Heating: 1 단계, 이미지 1/2 iPad Air 2 Wi-Fi Battery Replacement, iOpener Heating: 1 단계, 이미지 2/2
    • We recommend that you clean your microwave before proceeding, as any nasty gunk on the bottom may end up stuck to the iOpener.

    • Place the iOpener in the center of the microwave.

    • For carousel microwaves: Make sure the plate spins freely. If your iOpener gets stuck, it may overheat and burn.

  2. iPad Air 2 Wi-Fi Battery Replacement: 2 단계, 이미지 1/1
    • Heat the iOpener for thirty seconds.

    • Throughout the repair procedure, as the iOpener cools, reheat it in the microwave for an additional thirty seconds at a time.

    • Be careful not to overheat the iOpener during the repair. Overheating may cause the iOpener to burst. Do not attempt to heat over 100˚C (212˚F).

    • Never touch the iOpener if it appears swollen.

    • If the iOpener is still too hot in the middle to touch, continue using it while waiting for it to cool down some more before reheating. A properly heated iOpener should stay warm for up to 10 minutes.

  3. iPad Air 2 Wi-Fi Battery Replacement: 3 단계, 이미지 1/1
    • Remove the iOpener from the microwave, holding it by one of the two flat ends to avoid the hot center.

    • The iOpener will be very hot, so be careful when handling it. Use an oven mitt if necessary.

  4. iPad Air 2 Wi-Fi Battery Replacement, Alternate iOpener heating method: 4 단계, 이미지 1/2 iPad Air 2 Wi-Fi Battery Replacement, Alternate iOpener heating method: 4 단계, 이미지 2/2
    • If you don't have a microwave, follow this step to heat your iOpener in boiling water.

    • Fill a pot or pan with enough water to fully submerge an iOpener.

    • Heat the water to a boil. Turn off the heat.

    • Place an iOpener into the hot water for 2-3 minutes. Make sure the iOpener is fully submerged in the water.

    • Use tongs to extract the heated iOpener from the hot water.

    • Thoroughly dry the iOpener with a towel.

    • The iOpener will be very hot, so be careful to hold it only by the end tabs.

    • Your iOpener is ready for use! If you need to reheat the iOpener, heat the water to a boil, turn off the heat, and place the iOpener in the water for 2-3 minutes.

  5. iPad Air 2 Wi-Fi Battery Replacement, iPad Air 2 Wi-Fi  Opening Procedure: 5 단계, 이미지 1/3 iPad Air 2 Wi-Fi Battery Replacement, iPad Air 2 Wi-Fi  Opening Procedure: 5 단계, 이미지 2/3 iPad Air 2 Wi-Fi Battery Replacement, iPad Air 2 Wi-Fi  Opening Procedure: 5 단계, 이미지 3/3
    • If your display glass is cracked, keep further breakage contained and prevent bodily harm during your repair by taping the glass.

    • Lay overlapping strips of clear packing tape over the iPad's display until the whole face is covered.

    • This will keep glass shards contained and provide structural integrity when prying and lifting the display.

    • Do your best to follow the rest of the guide as described. However, once the glass is broken, it will likely continue to crack as you work, and you may need to use a metal prying tool to scoop the glass out.

    • Wear safety glasses to protect your eyes, and be careful not to damage the LCD screen.

  6. iPad Air 2 Wi-Fi Battery Replacement: 6 단계, 이미지 1/1
    • The following steps involve using an iOpener to soften the adhesive holding the front panel assembly in place. When using the iOpener, be sure to heat it in the microwave for no more than 30 seconds.

    • Handling it by the tabs on either end, place a heated iOpener over the top edge of the iPad.

    • Let the iOpener sit on the iPad for two minutes to soften the adhesive securing the front panel to the rest of the iPad.

  7. iPad Air 2 Wi-Fi Battery Replacement: 7 단계, 이미지 1/3 iPad Air 2 Wi-Fi Battery Replacement: 7 단계, 이미지 2/3 iPad Air 2 Wi-Fi Battery Replacement: 7 단계, 이미지 3/3
    • While the iPad looks uniform from the outside, there are delicate components under certain portions of the front glass. To avoid damage, only heat and pry in the areas described in each step.

    • As you follow the directions, take special care to avoid prying in the following areas:

    • Home Button

    • Front Facing Camera

    • Main Camera

  8. iPad Air 2 Wi-Fi Battery Replacement, Anti-Clamp instructions: 8 단계, 이미지 1/3 iPad Air 2 Wi-Fi Battery Replacement, Anti-Clamp instructions: 8 단계, 이미지 2/3 iPad Air 2 Wi-Fi Battery Replacement, Anti-Clamp instructions: 8 단계, 이미지 3/3
    이 단계에 사용된 도구:
    Anti-Clamp
    $24.95
    구매
    • The next two steps demonstrate the Anti-Clamp, a tool we designed to make the opening procedure easier. If you aren't using the Anti-Clamp, skip down two steps for an alternate method.

    • For complete instructions on how to use the Anti-Clamp, check out this guide.

    • Elevate the iPad enough for the Anti-Clamp's arms to rest above and below the screen.

    • Pull the blue handle towards the hinge to disengage opening mode.

    • Position the suction cups near the top edge of the iPad—one on the front, and one on the back.

    • Push down on the cups to apply suction to the desired area.

    • If you find that the surface of your device is too slippery for the Anti-Clamp to hold onto, you can use packing tape to create a grippier surface.

  9. iPad Air 2 Wi-Fi Battery Replacement: 9 단계, 이미지 1/3 iPad Air 2 Wi-Fi Battery Replacement: 9 단계, 이미지 2/3 iPad Air 2 Wi-Fi Battery Replacement: 9 단계, 이미지 3/3
    • Push the blue handle away from the hinge to engage opening mode.

    • Turn the handle clockwise until you see the cups start to stretch.

    • Make sure the suction cups remain aligned to each other. If they begin to slip out of alignment, loosen the suction cups slightly and realign the arms.

    • Wait one minute to give the adhesive a chance to release and present an opening gap.

    • Insert an opening pick under the screen when the Anti-Clamp creates a large enough gap.

    • If the Anti-Clamp doesn't create a sufficient gap, apply more heat to the area and rotate the handle clockwise half a turn.

    • Don't crank more than a half a turn at a time, and wait one minute between turns. Let the Anti-Clamp and time do the work for you.

    • Skip the next two steps.

  10. iPad Air 2 Wi-Fi Battery Replacement: 10 단계, 이미지 1/2 iPad Air 2 Wi-Fi Battery Replacement: 10 단계, 이미지 2/2
    • Place a suction cup over the iPad's front-facing camera and press down to create a seal.

    • To get the most leverage, place the suction cup as close to the edge as possible without going past the edge of the display.

  11. iPad Air 2 Wi-Fi Battery Replacement: 11 단계, 이미지 1/3 iPad Air 2 Wi-Fi Battery Replacement: 11 단계, 이미지 2/3 iPad Air 2 Wi-Fi Battery Replacement: 11 단계, 이미지 3/3
    • Firmly pull up on the suction cup to create a small gap between the front panel and the rear case.

    • Do not pull too hard or you may shatter the glass.

    • Once you've opened a sufficient gap, insert an opening pick into the gap to prevent the adhesive from resealing.

  12. iPad Air 2 Wi-Fi Battery Replacement: 12 단계, 이미지 1/3 iPad Air 2 Wi-Fi Battery Replacement: 12 단계, 이미지 2/3 iPad Air 2 Wi-Fi Battery Replacement: 12 단계, 이미지 3/3
    • Slide the pick along the edge of the display, towards the headphone jack.

    • If there is still a considerable amount of resistance when sliding the opening pick, repeat the iOpener heating procedure and apply additional heat.

    • Be careful not to let the opening pick slide between the fused LCD and front panel, as doing so can permanently damage the display.

    • A good rule of thumb is to never insert the opening pick more than a quarter inch (6 mm) into the iPad.

  13. iPad Air 2 Wi-Fi Battery Replacement: 13 단계, 이미지 1/2 iPad Air 2 Wi-Fi Battery Replacement: 13 단계, 이미지 2/2
    • Insert a second opening pick by the front-facing camera.

  14. iPad Air 2 Wi-Fi Battery Replacement: 14 단계, 이미지 1/3 iPad Air 2 Wi-Fi Battery Replacement: 14 단계, 이미지 2/3 iPad Air 2 Wi-Fi Battery Replacement: 14 단계, 이미지 3/3
    • Slide the second pick along the top edge of the iPad, towards the Sleep/Wake Button.

  15. iPad Air 2 Wi-Fi Battery Replacement: 15 단계, 이미지 1/2 iPad Air 2 Wi-Fi Battery Replacement: 15 단계, 이미지 2/2
    • Insert a third pick by the front-facing camera.

  16. iPad Air 2 Wi-Fi Battery Replacement: 16 단계, 이미지 1/3 iPad Air 2 Wi-Fi Battery Replacement: 16 단계, 이미지 2/3 iPad Air 2 Wi-Fi Battery Replacement: 16 단계, 이미지 3/3
    • Bring the right opening pick down and around the top right corner of the iPad.

  17. iPad Air 2 Wi-Fi Battery Replacement: 17 단계, 이미지 1/3 iPad Air 2 Wi-Fi Battery Replacement: 17 단계, 이미지 2/3 iPad Air 2 Wi-Fi Battery Replacement: 17 단계, 이미지 3/3
    • Bring the left opening pick around the top left corner of the tablet.

  18. iPad Air 2 Wi-Fi Battery Replacement: 18 단계, 이미지 1/1
    • Reheat the iOpener and lay it over the right edge of the display to loosen the adhesive underneath.

  19. iPad Air 2 Wi-Fi Battery Replacement: 19 단계, 이미지 1/3 iPad Air 2 Wi-Fi Battery Replacement: 19 단계, 이미지 2/3 iPad Air 2 Wi-Fi Battery Replacement: 19 단계, 이미지 3/3
    • Slide the right opening pick roughly halfway down the display.

  20. iPad Air 2 Wi-Fi Battery Replacement: 20 단계, 이미지 1/1
    • Reheat the iOpener and apply heat to the left side of the iPad.

  21. iPad Air 2 Wi-Fi Battery Replacement: 21 단계, 이미지 1/3 iPad Air 2 Wi-Fi Battery Replacement: 21 단계, 이미지 2/3 iPad Air 2 Wi-Fi Battery Replacement: 21 단계, 이미지 3/3
    • Slide the left-hand opening pick about halfway down the edge of the display.

  22. iPad Air 2 Wi-Fi Battery Replacement: 22 단계, 이미지 1/3 iPad Air 2 Wi-Fi Battery Replacement: 22 단계, 이미지 2/3 iPad Air 2 Wi-Fi Battery Replacement: 22 단계, 이미지 3/3
    • Slide the opposite opening pick down to the bottom right corner of the iPad.

    • If necessary, reheat the adhesive on the right edge to loosen the display assembly.

  23. iPad Air 2 Wi-Fi Battery Replacement: 23 단계, 이미지 1/3 iPad Air 2 Wi-Fi Battery Replacement: 23 단계, 이미지 2/3 iPad Air 2 Wi-Fi Battery Replacement: 23 단계, 이미지 3/3
    • Slide the left-hand opening pick down the edge of the display until you reach the corner.

  24. iPad Air 2 Wi-Fi Battery Replacement: 24 단계, 이미지 1/1
    • Use the iOpener to apply heat to the bottom edge of the iPad.

  25. iPad Air 2 Wi-Fi Battery Replacement: 25 단계, 이미지 1/3 iPad Air 2 Wi-Fi Battery Replacement: 25 단계, 이미지 2/3 iPad Air 2 Wi-Fi Battery Replacement: 25 단계, 이미지 3/3
    • Bring the right-hand opening pick around the bottom corner of the iPad.

  26. iPad Air 2 Wi-Fi Battery Replacement: 26 단계, 이미지 1/3 iPad Air 2 Wi-Fi Battery Replacement: 26 단계, 이미지 2/3 iPad Air 2 Wi-Fi Battery Replacement: 26 단계, 이미지 3/3
    • Repeat for the left-hand pick.

    • Reheat and reapply the iOpener as needed. Always wait at least ten minutes before reheating the iOpener.

  27. iPad Air 2 Wi-Fi Battery Replacement: 27 단계, 이미지 1/2 iPad Air 2 Wi-Fi Battery Replacement: 27 단계, 이미지 2/2
    • Remove the right-hand opening pick at the bottom of the iPad.

  28. iPad Air 2 Wi-Fi Battery Replacement: 28 단계, 이미지 1/3 iPad Air 2 Wi-Fi Battery Replacement: 28 단계, 이미지 2/3 iPad Air 2 Wi-Fi Battery Replacement: 28 단계, 이미지 3/3
    • Slide the left-hand opening pick along the bottom edge of the display, then remove it from the bottom right corner of the iPad.

    • Be very careful to not insert the pick more than 2 mm below home button to avoid damaging the button.

    • Be very careful to not insert the pick more than a quarter inch (6 mm) into either side of the home button to avoid damaging the display cables underneath.

  29. iPad Air 2 Wi-Fi Battery Replacement: 29 단계, 이미지 1/3 iPad Air 2 Wi-Fi Battery Replacement: 29 단계, 이미지 2/3 iPad Air 2 Wi-Fi Battery Replacement: 29 단계, 이미지 3/3
    • Twist the remaining pick by the front-facing camera to separate the top edge of the display assembly from the rear case.

  30. iPad Air 2 Wi-Fi Battery Replacement: 30 단계, 이미지 1/3 iPad Air 2 Wi-Fi Battery Replacement: 30 단계, 이미지 2/3 iPad Air 2 Wi-Fi Battery Replacement: 30 단계, 이미지 3/3
    • Continue lifting the display assembly from the front-facing camera side.

    • Pull the display slightly away from the bottom edge to completely separate it from the rear case.

    • Keep lifting until the display assembly is roughly perpendicular to the body of the iPad.

    • Do not attempt to remove the display yet—it is still attached to the rear case by three delicate ribbon cables.

  31. iPad Air 2 Wi-Fi Battery Replacement: 31 단계, 이미지 1/1
    • Remove the single 1.8 mm Phillips screw securing the battery terminals to their contacts on the logic board.

  32. iPad Air 2 Wi-Fi Battery Replacement, Battery connector information: 32 단계, 이미지 1/3 iPad Air 2 Wi-Fi Battery Replacement, Battery connector information: 32 단계, 이미지 2/3 iPad Air 2 Wi-Fi Battery Replacement, Battery connector information: 32 단계, 이미지 3/3
    • These photos show what the battery connector looks like underneath the logic board. Use these photos as a reference while you safely disconnect the battery.

    • Notice that the battery connector has springs on the logic board that press down against the battery contact pads. You'll need to slide something thin and flexible between the contact points to disconnect the battery.

  33. iPad Air 2 Wi-Fi Battery Replacement: 33 단계, 이미지 1/2 iPad Air 2 Wi-Fi Battery Replacement: 33 단계, 이미지 2/2
    • To reduce the risk of a short, you can use a battery isolation pick to disconnect the battery.

    • Be very careful when you isolate the battery using a battery blocker. The battery contacts are easily damaged, resulting in irreversible damage to the logic board.

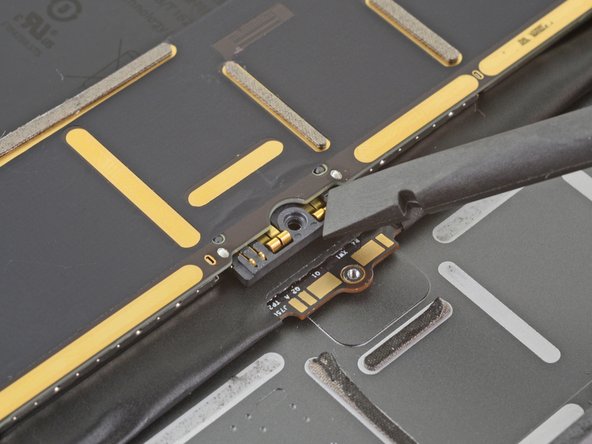
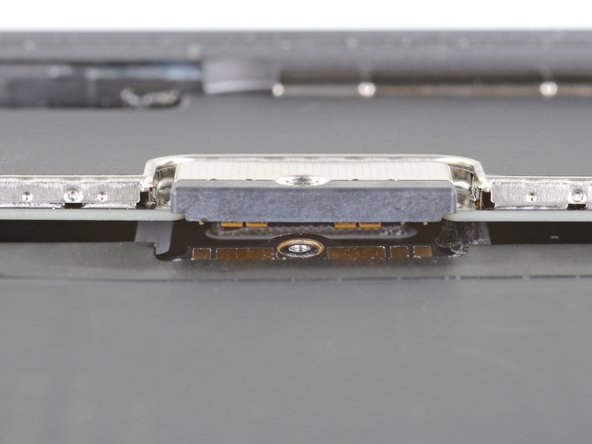
    • Slide a battery isolation pick underneath the battery connector area of the logic board, and leave it in place while you work.

    • Alternatively, make a battery blocker using a playing card and slide it underneath the logic board connector to disconnect the battery.

  34. iPad Air 2 Wi-Fi Battery Replacement: 34 단계, 이미지 1/3 iPad Air 2 Wi-Fi Battery Replacement: 34 단계, 이미지 2/3 iPad Air 2 Wi-Fi Battery Replacement: 34 단계, 이미지 3/3
    • Remove the three 1.3mm Phillips screws from the display cable bracket.

    • Remove the bracket.

  35. iPad Air 2 Wi-Fi Battery Replacement: 35 단계, 이미지 1/2 iPad Air 2 Wi-Fi Battery Replacement: 35 단계, 이미지 2/2
    • Disconnect the display data connector from its socket on the logic board.

  36. iPad Air 2 Wi-Fi Battery Replacement: 36 단계, 이미지 1/3 iPad Air 2 Wi-Fi Battery Replacement: 36 단계, 이미지 2/3 iPad Air 2 Wi-Fi Battery Replacement: 36 단계, 이미지 3/3
    • Disconnect the two remaining digitizer cables underneath the display data cable.

  37. iPad Air 2 Wi-Fi Battery Replacement: 37 단계, 이미지 1/1
    • Remove the front panel assembly from the rear case.

    • If you plan to reuse your display assembly, you will need to replace the display adhesive. Follow our iPad Adhesive Guide to reapply your display adhesive and reseal your device.

  38. iPad Air 2 Wi-Fi Battery Replacement, Upper Component Cable Bracket: 38 단계, 이미지 1/3 iPad Air 2 Wi-Fi Battery Replacement, Upper Component Cable Bracket: 38 단계, 이미지 2/3 iPad Air 2 Wi-Fi Battery Replacement, Upper Component Cable Bracket: 38 단계, 이미지 3/3
    • Remove the following four Phillips screws securing the upper component cable bracket to the tablet.

    • Two 1.6 mm

    • Two 1.3 mm

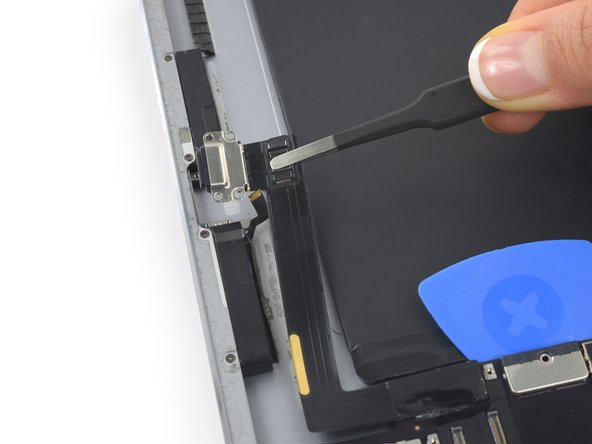
    • Slide the upper component cable bracket out from under the protective flaps and remove it from the iPad.

  39. iPad Air 2 Wi-Fi Battery Replacement, Logic Board: 39 단계, 이미지 1/3 iPad Air 2 Wi-Fi Battery Replacement, Logic Board: 39 단계, 이미지 2/3 iPad Air 2 Wi-Fi Battery Replacement, Logic Board: 39 단계, 이미지 3/3
    • Remove the tape covering the two speaker ZIF connectors.

  40. iPad Air 2 Wi-Fi Battery Replacement: 40 단계, 이미지 1/2 iPad Air 2 Wi-Fi Battery Replacement: 40 단계, 이미지 2/2
    • Use a spudger to flip up the retaining flap on the left speaker's ZIF connector.

  41. iPad Air 2 Wi-Fi Battery Replacement: 41 단계, 이미지 1/2 iPad Air 2 Wi-Fi Battery Replacement: 41 단계, 이미지 2/2
    • Slide the left speaker cable out of its ZIF connector.

  42. iPad Air 2 Wi-Fi Battery Replacement: 42 단계, 이미지 1/2 iPad Air 2 Wi-Fi Battery Replacement: 42 단계, 이미지 2/2
    • Use a spudger to flip up the retaining flap on the right speaker's ZIF connector.

  43. iPad Air 2 Wi-Fi Battery Replacement: 43 단계, 이미지 1/2 iPad Air 2 Wi-Fi Battery Replacement: 43 단계, 이미지 2/2
    • Slide the right speaker cable out of its ZIF connector.

  44. iPad Air 2 Wi-Fi Battery Replacement: 44 단계, 이미지 1/3 iPad Air 2 Wi-Fi Battery Replacement: 44 단계, 이미지 2/3 iPad Air 2 Wi-Fi Battery Replacement: 44 단계, 이미지 3/3
    • Use a spudger to gently pry up the antenna cables from their sockets.

  45. iPad Air 2 Wi-Fi Battery Replacement: 45 단계, 이미지 1/3 iPad Air 2 Wi-Fi Battery Replacement: 45 단계, 이미지 2/3 iPad Air 2 Wi-Fi Battery Replacement: 45 단계, 이미지 3/3
    • Firmly grasp the antenna cable and peel up the grounding tape attaching it to the logic board.

    • Upon reassembly, it is important to reattach the antenna cable to the logic board with grounding tape properly adhered on the copper tape.

  46. iPad Air 2 Wi-Fi Battery Replacement: 46 단계, 이미지 1/2 iPad Air 2 Wi-Fi Battery Replacement: 46 단계, 이미지 2/2
    • Remove the 1.2 mm Phillips screw securing the bracket covering the volume control cable connector.

    • Remove the bracket.

  47. iPad Air 2 Wi-Fi Battery Replacement: 47 단계, 이미지 1/2 iPad Air 2 Wi-Fi Battery Replacement: 47 단계, 이미지 2/2
    • Detach the volume button cable connector by prying it straight up from its socket.

  48. iPad Air 2 Wi-Fi Battery Replacement: 48 단계, 이미지 1/2 iPad Air 2 Wi-Fi Battery Replacement: 48 단계, 이미지 2/2
    • Pry up the rear facing camera cable connector from its socket.

  49. iPad Air 2 Wi-Fi Battery Replacement: 49 단계, 이미지 1/2 iPad Air 2 Wi-Fi Battery Replacement: 49 단계, 이미지 2/2
    • Pry up the home button/microphone ribbon cable connector from its socket.

  50. iPad Air 2 Wi-Fi Battery Replacement: 50 단계, 이미지 1/3 iPad Air 2 Wi-Fi Battery Replacement: 50 단계, 이미지 2/3 iPad Air 2 Wi-Fi Battery Replacement: 50 단계, 이미지 3/3
    • Use the flat end of a spudger to disconnect the Facetime camera connector from its socket on the logic board.

    • Pry up the adhesive attaching the Facetime camera cable to the audio jack cable underneath.

    • Fold the Facetime camera cable up and out of the way.

  51. iPad Air 2 Wi-Fi Battery Replacement: 51 단계, 이미지 1/3 iPad Air 2 Wi-Fi Battery Replacement: 51 단계, 이미지 2/3 iPad Air 2 Wi-Fi Battery Replacement: 51 단계, 이미지 3/3
    • Disconnect the headphone jack cable connector from its socket on the logic board.

    • Pry the cable up to free it from the adhesive securing it to the rear case.

    • Pull the audio jack cable out of the way of the logic board below.

  52. iPad Air 2 Wi-Fi Battery Replacement: 52 단계, 이미지 1/3 iPad Air 2 Wi-Fi Battery Replacement: 52 단계, 이미지 2/3 iPad Air 2 Wi-Fi Battery Replacement: 52 단계, 이미지 3/3
    • Use tweezers to peel up the rightmost grounding tape attaching the antennas to the logic board.

    • Bend the antenna wire back and out of the way of the logic board.

  53. iPad Air 2 Wi-Fi Battery Replacement: 53 단계, 이미지 1/2 iPad Air 2 Wi-Fi Battery Replacement: 53 단계, 이미지 2/2
    • Peel up the tape covering the top left edge of the logic board.

  54. iPad Air 2 Wi-Fi Battery Replacement: 54 단계, 이미지 1/1
    • Remove the four 1.6 mm Phillips screws attaching the lightning port to the rear case.

  55. iPad Air 2 Wi-Fi Battery Replacement: 55 단계, 이미지 1/2 iPad Air 2 Wi-Fi Battery Replacement: 55 단계, 이미지 2/2
    • The Lightning connector cable is stuck to the case with some adhesive. To detach the adhesive you will be sliding an opening pick between the cable and the case. Be very careful not to cut the Lightning connector cable itself.

    • Insert an opening pick underneath the Lightning cable where it meets the logic board.

    • Slide the opening pick towards the bend in the cable.

  56. iPad Air 2 Wi-Fi Battery Replacement: 56 단계, 이미지 1/2 iPad Air 2 Wi-Fi Battery Replacement: 56 단계, 이미지 2/2
    • Pull the Lightning connector straight out of its recess in the rear case.

  57. iPad Air 2 Wi-Fi Battery Replacement: 57 단계, 이미지 1/1
    • Prepare an iOpener following the steps in the iOpener 데우기 Guide.

    • Place the iOpener along the top of the back of the iPad for 2-3 minutes to soften the adhesive holding the logic board in place.

  58. iPad Air 2 Wi-Fi Battery Replacement: 58 단계, 이미지 1/2 iPad Air 2 Wi-Fi Battery Replacement: 58 단계, 이미지 2/2
    • Insert an opening tool underneath the logic board below the FaceTime camera.

    • Pry the left edge of the logic board up.

    • Lift the end of the logic board slowly. If you encounter significant resistance, stop prying and reapply the iOpener.

  59. iPad Air 2 Wi-Fi Battery Replacement: 59 단계, 이미지 1/2 iPad Air 2 Wi-Fi Battery Replacement: 59 단계, 이미지 2/2
    • Insert an opening pick underneath the portion of the logic board pried up in the previous step.

    • Slide the opening pick towards the volume control buttons, and stop at the bend in the logic board.

  60. iPad Air 2 Wi-Fi Battery Replacement: 60 단계, 이미지 1/1
    • Place a heated iOpener on the lefthand side of the back of the iPad for 2-3 minutes.

  61. iPad Air 2 Wi-Fi Battery Replacement: 61 단계, 이미지 1/3 iPad Air 2 Wi-Fi Battery Replacement: 61 단계, 이미지 2/3 iPad Air 2 Wi-Fi Battery Replacement: 61 단계, 이미지 3/3
    • Insert a plastic opening tool underneath the logic board, inside the rectangular cut out, and gently pry the logic board up.

    • Slide the opening tool down the length of the gap while continuing to pry the logic board up.

    • Lift the logic board slowly. If you encounter significant resistance, stop prying and reapply the iOpener.

  62. iPad Air 2 Wi-Fi Battery Replacement: 62 단계, 이미지 1/3 iPad Air 2 Wi-Fi Battery Replacement: 62 단계, 이미지 2/3 iPad Air 2 Wi-Fi Battery Replacement: 62 단계, 이미지 3/3
    • Insert an opening tool underneath the logic board on the other side of the rectangular cut out and pry it up.

    • Slide the opening tool down the length of the gap while continuing to pry the logic board up.

    • Lift the the logic board slowly. If you encounter significant resistance, stop prying and reapply the iOpener.

  63. iPad Air 2 Wi-Fi Battery Replacement: 63 단계, 이미지 1/3 iPad Air 2 Wi-Fi Battery Replacement: 63 단계, 이미지 2/3 iPad Air 2 Wi-Fi Battery Replacement: 63 단계, 이미지 3/3
    이 단계에 사용된 도구:
    Plastic Cards
    $2.99
    구매
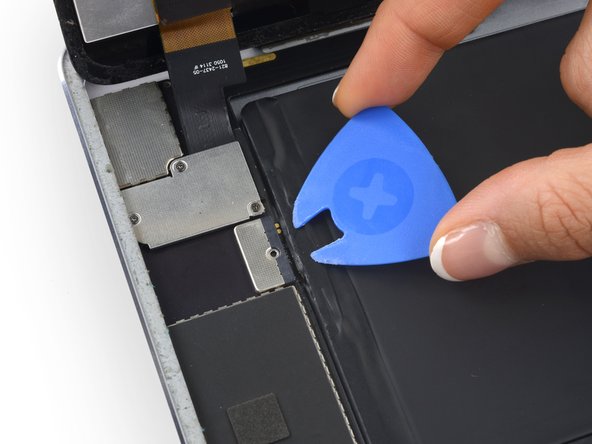
    • Insert a plastic card underneath the logic board.

    • Slide the card down the length of the logic board to release the adhesive.

  64. iPad Air 2 Wi-Fi Battery Replacement: 64 단계, 이미지 1/2 iPad Air 2 Wi-Fi Battery Replacement: 64 단계, 이미지 2/2
    • Slide a plastic card underneath the center of the logic board, pushing it in as far as it will go.

    • Slowly swing the left edge of the logic board up, while making sure it doesn't snag against any of the disconnected cables.

    • If any portion of the logic board requires excessive force to pry up, stop prying, re-apply the iOpener, and re-perform the corresponding guide steps to fully release the adhesive.

  65. iPad Air 2 Wi-Fi Battery Replacement: 65 단계, 이미지 1/3 iPad Air 2 Wi-Fi Battery Replacement: 65 단계, 이미지 2/3 iPad Air 2 Wi-Fi Battery Replacement: 65 단계, 이미지 3/3
    • Remove the logic board.

  66. iPad Air 2 Wi-Fi Battery Replacement, Battery: 66 단계, 이미지 1/3 iPad Air 2 Wi-Fi Battery Replacement, Battery: 66 단계, 이미지 2/3 iPad Air 2 Wi-Fi Battery Replacement, Battery: 66 단계, 이미지 3/3
    • Reheat the iOpener in the microwave for 30 seconds.

    • Remember to be careful not to overheat the iOpener during the repair procedure. Wait at least two minutes before reheating the iOpener, and never microwave it for more than 30 seconds.

    • Place the heated iOpener in the center of the back of the iPad. Keep it there for 90 seconds to soften the battery adhesive.

    • Move the iOpener to the right (away from the rear-facing camera), and keep it there for another 90 seconds.

    • Finally, place the iOpener near the right-hand edge of the iPad for 90 seconds.

    • You will likely need to repeat this step several times throughout the rest of the procedure to ensure the adhesive remains soft.

    • The iOpener may cool significantly. If so, reheat it for another 30 seconds between each position.

  67. iPad Air 2 Wi-Fi Battery Replacement: 67 단계, 이미지 1/2 iPad Air 2 Wi-Fi Battery Replacement: 67 단계, 이미지 2/2
    이 단계에 사용된 도구:
    Plastic Cards
    $2.99
    구매
    • Throughout the following procedure, you'll be sliding thin plastic cards between the battery and rear case of the iPad, to separate the adhesive securing the battery. Be careful to keep the cards as flat as possible to avoid bending the battery, which may damage it and cause it to release dangerous chemicals.

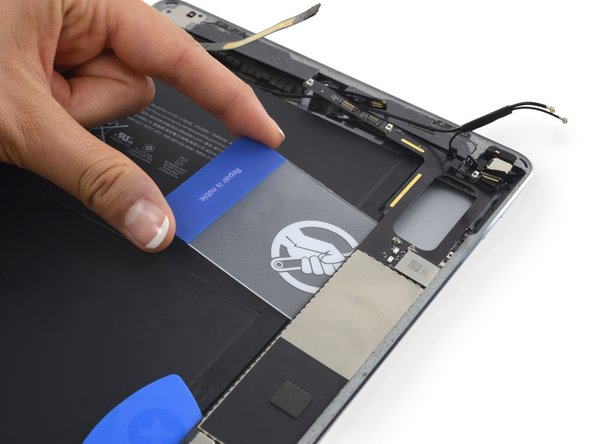
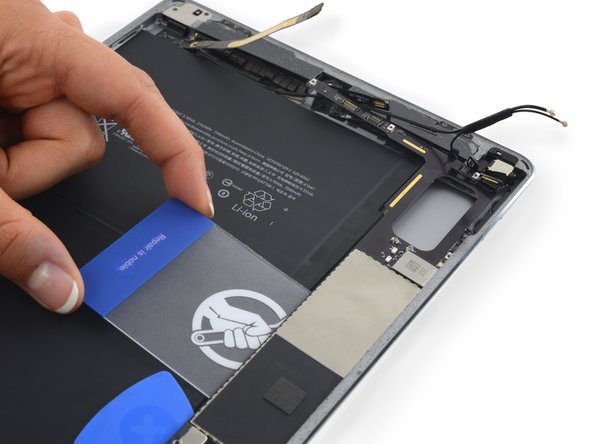
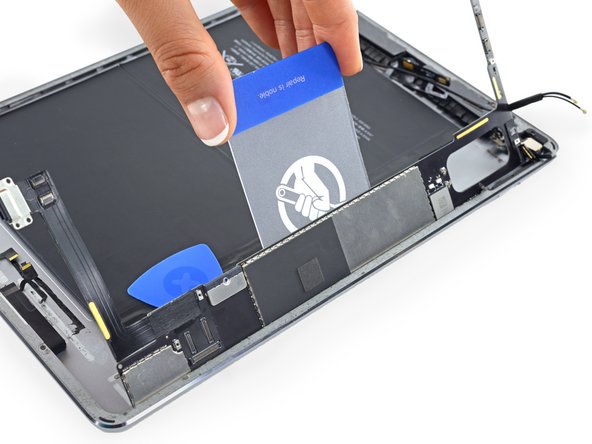
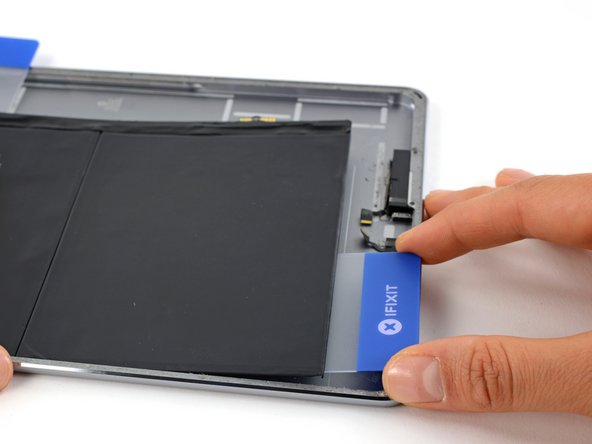
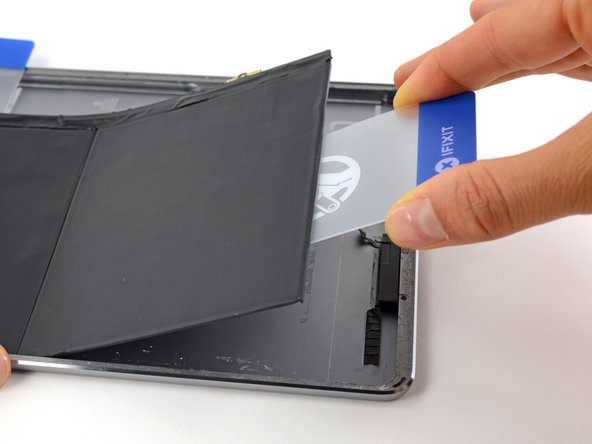
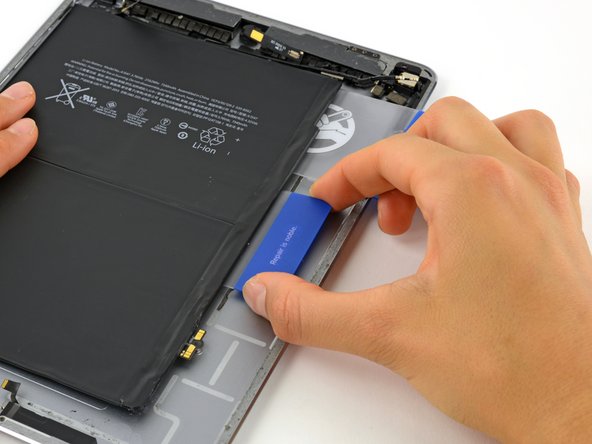
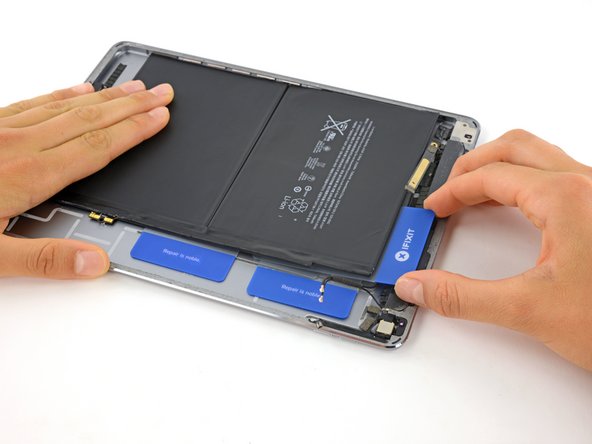
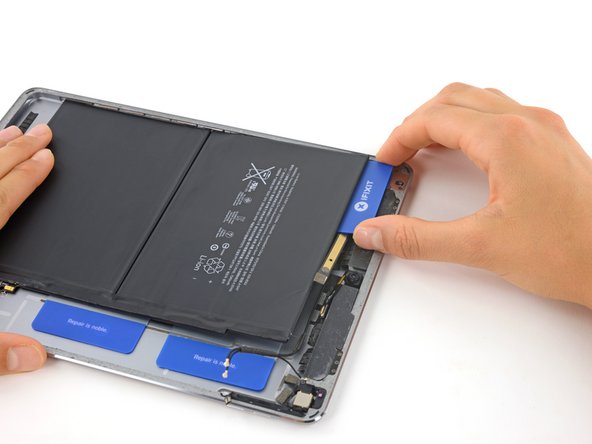
    • Once the adhesive has had a couple minutes to soften, flip the iPad over, battery-side up.

    • Insert a plastic card underneath the battery contacts.

    • There is a metal standoff under the battery contact. You will need to lift the contact up slightly to clear this standoff and insert the plastic card.

    • Push the card about an inch under the battery to begin breaking up the adhesive holding it in place.

  68. iPad Air 2 Wi-Fi Battery Replacement: 68 단계, 이미지 1/2 iPad Air 2 Wi-Fi Battery Replacement: 68 단계, 이미지 2/2
    • Slide the plastic card up along the edge of the battery until the card is even with the top edge of the battery.

  69. iPad Air 2 Wi-Fi Battery Replacement: 69 단계, 이미지 1/3 iPad Air 2 Wi-Fi Battery Replacement: 69 단계, 이미지 2/3 iPad Air 2 Wi-Fi Battery Replacement: 69 단계, 이미지 3/3
    • Insert a second plastic card underneath the battery contacts.

    • Rotate the plastic card around the lower right corner of the battery to begin breaking up the adhesive along the lower edge.

    • Carefully maneuver the card over the top of the speaker ribbon cables so as not to damage them.

  70. iPad Air 2 Wi-Fi Battery Replacement: 70 단계, 이미지 1/2 iPad Air 2 Wi-Fi Battery Replacement: 70 단계, 이미지 2/2
    • Slide the second card along the bottom edge of the battery to continue breaking up the adhesive holding it to the rear case.

    • You may need to reheat the iOpener and lay it across the bottom of the iPad to soften the adhesive securing the bottom edge of the battery.

  71. iPad Air 2 Wi-Fi Battery Replacement: 71 단계, 이미지 1/3 iPad Air 2 Wi-Fi Battery Replacement: 71 단계, 이미지 2/3 iPad Air 2 Wi-Fi Battery Replacement: 71 단계, 이미지 3/3
    • Push the plastic card about two inches underneath the battery, and lift it up to pry the first battery cell off the rear case.

    • If the battery begins to bend, use an iOpener to apply heat to the back of the battery and repeat the previous two steps to adequately break up the battery adhesive.

  72. iPad Air 2 Wi-Fi Battery Replacement: 72 단계, 이미지 1/2 iPad Air 2 Wi-Fi Battery Replacement: 72 단계, 이미지 2/2
    • Remove the card from the bottom of the battery and slide it between the battery and rear case, along the side and underneath the seam where the two battery cells meet.

    • Push the card as far underneath the battery as you can.

  73. iPad Air 2 Wi-Fi Battery Replacement: 73 단계, 이미지 1/2 iPad Air 2 Wi-Fi Battery Replacement: 73 단계, 이미지 2/2
    • Firmly grasp the first card you inserted underneath the battery and push it as far as you can underneath the battery.

    • You may need to add more heat to soften the adhesive before completing this step.

  74. iPad Air 2 Wi-Fi Battery Replacement: 74 단계, 이미지 1/2 iPad Air 2 Wi-Fi Battery Replacement: 74 단계, 이미지 2/2
    • Slide a third card underneath the top edge of the battery, on the right side.

    • Carefully maneuver the card past the upper component cables so as not to damage them.

    • Push the card in as far as it will go, breaking through as much of the adhesive underneath the battery as you can.

  75. iPad Air 2 Wi-Fi Battery Replacement: 75 단계, 이미지 1/2 iPad Air 2 Wi-Fi Battery Replacement: 75 단계, 이미지 2/2
    • Remove the card and slide it under the top edge of the battery again, on the left side near the edge of the iPad.

    • Be extremely careful to slide the card over the front-facing camera and headphone jack cables to avoid cutting them.

    • Push the card in as far as it will go, breaking through as much of the adhesive underneath the battery as you can.

  76. iPad Air 2 Wi-Fi Battery Replacement: 76 단계, 이미지 1/3 iPad Air 2 Wi-Fi Battery Replacement: 76 단계, 이미지 2/3 iPad Air 2 Wi-Fi Battery Replacement: 76 단계, 이미지 3/3
    • Remove the card and again slide it under the top edge of the battery, near the center.

    • Be extremely careful to slide the card over the front-facing camera and headphone jack cables to avoid cutting them.

    • Slide the card in as far as it will go, breaking through as much of the adhesive as you can.

    • Lift up on the card to pry the second battery cell up from the rear case.

    • If there is significant resistance from the battery when you try to pry it up, reheat the adhesive with an iOpener and repeat the previous 3 steps to break apart the adhesive as necessary.

  77. iPad Air 2 Wi-Fi Battery Replacement: 77 단계, 이미지 1/1
    • Remove the battery.

결론

To reassemble your device, follow these instructions in reverse order.

다른 229명이 해당 안내서를 완성하였습니다.

Evan Noronha

회원 가입일: 02/05/15

223,163 평판

안내서 168개 작성하였습니다

댓글 57개

Can the iPad air 2 battery be replaced without removing logic board or do all the internal components have to be dismantled before battery can be replaced?

AMT - 답글

The battery contacts are pinned underneath the logic board, so it's difficult to remove with the logic board in place. There's also very little room to work with the logic board installed, so there's an increased risk of damaging something with a wayward swipe of your card or pry tool. But yes, it's possible. You can reference this guide for tips on the procedure (it's for a different model but the same overall strategy will work).

Jeff Suovanen -

I just finished this repair successfully. Don't force ANYTHING Find something, a steel plate, aluminum plate, a heat gun and heat the plates not the iPad. Then it does not over heat, it is even and does not get cool. That makes it really easy. I used a piece of 6" of channel beam and blew the heat in the channel, measuring the top with a laser thermometer (140F target) after step #37, it worked so much better. I lifted the battery w/o touching electronics, and logic board too. It was easy with separators from IFixIT and slabs from a milk carton.

I don't think anything was risky this way and should have used the beam for the 1-37 steps.

Thanks to all who contribute here.

William Lane -

I've just completed this fix (among 4-5 others previously). First comment here b/c this was an unusual repair. The biggest surprise about this fix (or anything to do with the internals of an iPad): the size of the screws! I'm surprised it isn't mentioned at the top, along with the PN000 driver: these things are literally the size of a grain of sand! So, taking them out is the easy part. Putting them back in is a trick. The secret: place them on the holes first, in whichever direction, then maneuver them btw fingernail and driver into correct position. You'll need something to anchor the screen in a vertical position to use both hands. Not mentioned in Jeff and AMT's comments: there is a loop in the battery contact. Not removing the logic board means you'll be breaking the loop on the old battery to remove it, and you'll need to snip the loop on the new battery to insert it. It all worked for me. It made the actual fix a fraction of the steps from the written one (just 4 screws removed), but it's risky.

Thomas Linder - 답글

I bought the $20 repair kit to go along with the lithium ion battery. The suction cup and the heating tube did not work even after multiple attempts to use the heating tube. I had to resort to a hair dryer and use a straight razor to pry the edge just enough to slip a pick in there. I did find incredible use for the magnetized screw drivers and spudgers.

I bought the iFixIt lithium ion battery replacement and once reassembling the iPad Air 2 (double checking each connection for fit and order), it still does not turn on. ugh…

Robert Kachinski - 답글

댓글 쓰기

조회 통계:

24 시간 전: 113

7일 전: 830

30일 전: 3,964

전체 시간: 344,125