이 버전에는 잘못된 편집 사항이 있을 수 있습니다. 최신 확인된 스냅샷으로 전환하십시오.
필요한 것
-
-
분해를 시작하기 전에 iPhone 전원을 끄세요.
-
Lightning 커넥터 양옆 3.9mm Pentalobe/펜타로브/별나사 두 개를 풀어주세요.
-
-
-
iPhone 스크린이 깨진 경우 유리에 테입을 붙여서 더 이상의 손상을 막고 신체적 상해를 방지하세요.
-
스크린 전체를 덮을 때까지 iPhone 디스플레이에 투명 포장 테이프 스트립을 겹쳐 붙이세요.
-
-
-
사용하는 도구와 관계없이 전체 디스플레이를 위로 당겨야 합니다.
-
첫 번째 이미지와 같이, 유리가 플라스틱에서 분리되기 시작하면 플라스틱 여는 도구를 플라스틱 프레임과 금속 휴대폰 몸체 사이로 밀어서 금속 클립을 케이스에서 떼세요.
-
-
-
파란색 손잡이를 뒤로 당겨 안티-클램프의 팔을 잠금 해제하세요.
-
팔을 휴대폰의 왼편 또는 오른편 가장자리 위로 밀어 주세요.
-
흡입 컵을 휴대폰의 하단 가장자리 홈 버튼 근처에 배치하세요—전면에 하나, 후면에 하나.
-
적절한 위치에 컵을 함께 꽉 쥐고 흡착하세요.
-
-
-
한 손으로 iPhone을 잡고 흡입 컵을 위로 당겨 전면 패널 홈 버튼 끝 부분을 후면 케이스에서 약간 분리하세요.
-
흡입 컵을 위로 당기며 플라스틱 여는 도구로 후면 케이스 가장자리를 비집어 전면 패널 어셈블리에서 멀어 지도록 누르세요.
-
-
-
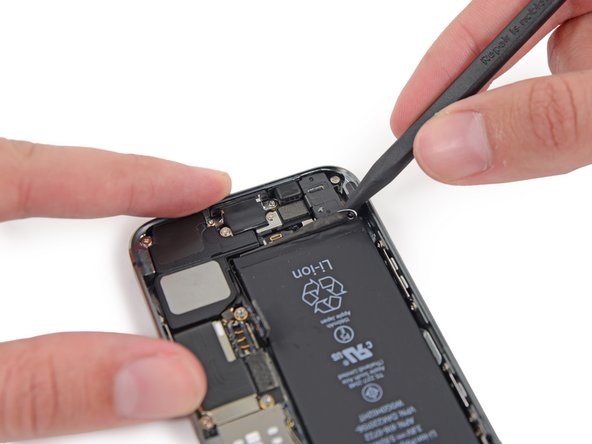
홈 버튼 케이블을 덮고 있는 금속 브래킷이 보일 정도만 휴대폰을 여세요.
-
Touch ID 기능은 휴대폰의 원래 홈 버튼 어셈블리만 사용할 수 있습니다. 케이블이 찢어져서 새 홈 버튼을 설치하는 경우 Touch ID 기능이 아닌 일반 홈 버튼 기능만 복원합니다.
-
Spudger/스퍼저의 뾰족한 끝을 사용하여 브래킷을 자유롭게 밀고 핀셋으로 분리하세요.
-
-
-
-
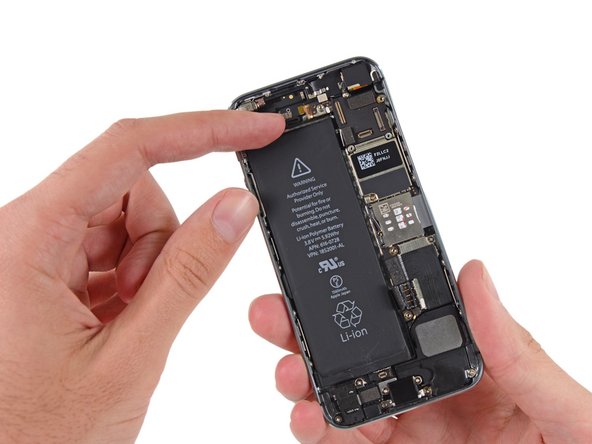
커넥터가 빠졌으면 휴대폰 상단을 hinge/힌지처럼 사용하여 어셈블리 홈 버튼 쪽을 후면 케이스에서 당겨 빼세요.
-
휴대폰을 작업하는 동안 디스플레이를 약 90º 각도로 열어서 어디에 기대어 놓으세요.
-
작업하는 동안 디스플레이를 안전하게 고정하기 위해 고무줄을 사용하세요. 이렇게 하면 디스플레이 케이블에 과도한 무리를 주지 않습니다.
-
-
이 단계는 번역되지 않았습니다. 번역을 도와주십시오
-
Remove the following screws securing the volume button and ringer switch brackets to the side of the rear case:
-
One 1.9 mm Phillips screw
-
Two 1.6 mm Phillips screws
-
-
이 단계는 번역되지 않았습니다. 번역을 도와주십시오
-
Use the tip of a spudger to pry the ringer switch bracket away from the side of the case.
-
Remove the ringer switch from its recess between the ringer switch bracket and the case.
-
-
이 단계는 번역되지 않았습니다. 번역을 도와주십시오
-
Use a spudger to pry the volume button bracket from the side of the rear case.
-
Remove the volume buttons.
-


다른 56명이 해당 안내서를 완성하였습니다.


댓글 4개
My phone was shattered and i did a total replacement of the rear case and the screen. All went well except... the volume controls do not work. The silence button above it does, but the +- dont. They feel wrong when pressed. They don't make the clicking sound. Anyone a suggestion of what went wrong?
I had to replace the power flex cable, which means taking almost everything out. Scary! When I restarted, my power button and flash were fixed but my volume was the same as yours and my home button didn't work. :( That Touch ID cable and cover are from h#$l! Anyway, I went back in and everything is working now. Instead of doing them like in the photos and videos, I attached the silence button first and then the volume buttons. So when you put in the middle screw that holds them both in, the screw goes through volume first and then silence.
Oh ya, ifixit is a great resource. Thanks!
I noticed one thing during my replacement that may affect others doing this repair. Upon reaching step 30 I noticed that my volume button bracket appeared to be bent slightly near the lower screw (the one toward the bottom of the case). Ultimately I had to bend the bracket to make the volume button work correctly. When I reassembled the bracket with the new buttons before bending it the - button would not come back fully to its normal position. After careful bending with a pair of needle nose pliers and the button worked correctly.
It is CRITICAL that you test your volume buttons and the ringer switch before you reassemble your phone!