주요 콘텐츠로 건너뛰기
iPhone 6s Plus Speaker Replacement

iPhone 6s Plus Speaker Replacement

Arthur Shi

Arthur Shi다른 한 명의 기여자

최종 수정일 February 25, 2024

1 - 2 시간
조정
단지 전제 조건
이 안내서는 다른 안내서의 선행 작업으로 사용하기 위한 것입니다. 그 자체로는 불완전합니다.

Prerequisite guide only! Speaker module replacement for the iPhone 6s Plus. Updated version which contains photos that have the logic board intact.

필요한 것

수리 키트

이 키트는 이 안내서를 완료하는데 필요한 모든 부품과 도구를 포함하고 있습니다.

부품

도구

  • Spudger
    Spudger
  • Phillips #000 Screwdriver
    Phillips #000 Screwdriver

더보기...

  1. iPhone 6s Plus Speaker Replacement, Speaker: 1 단계, 이미지 2개 중 1개 iPhone 6s Plus Speaker Replacement, Speaker: 1 단계, 이미지 2개 중 2개
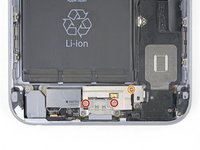
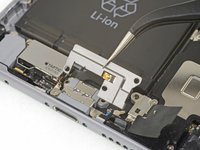
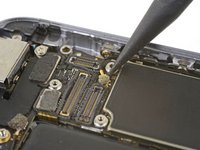
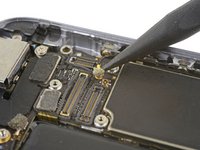
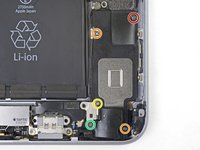
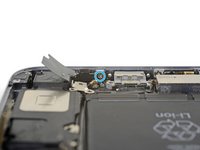
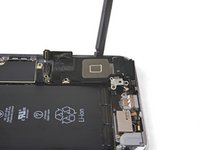
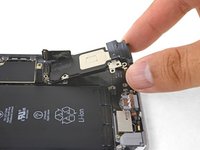
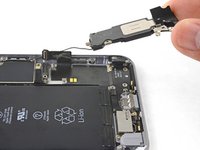
    • Use the point of a spudger to pry up and disconnect the antenna cable from the bottom of the logic board.

  2. iPhone 6s Plus Speaker Replacement: 2 단계, 이미지 2개 중 1개 iPhone 6s Plus Speaker Replacement: 2 단계, 이미지 2개 중 2개
    • Use the point of a spudger to pry up and disconnect the Lightning connector cable from the logic board.

  3. iPhone 6s Plus Speaker Replacement: 3 단계, 이미지 2개 중 1개 iPhone 6s Plus Speaker Replacement: 3 단계, 이미지 2개 중 2개
    • Remove the three Phillips screws securing the Lightning connector bracket:

    • Two 3.5 mm screws

    • One 2.7 mm screw

    • Remove the bracket.

  4. iPhone 6s Plus Speaker Replacement: 4 단계, 이미지 2개 중 1개 iPhone 6s Plus Speaker Replacement: 4 단계, 이미지 2개 중 2개
    • Use the point of a spudger to pry up and disconnect the antenna cable from the Lightning connector assembly.

  5. iPhone 6s Plus Speaker Replacement: 5 단계, 이미지 2개 중 1개 iPhone 6s Plus Speaker Replacement: 5 단계, 이미지 2개 중 2개
    • Use the point of a spudger to pry up and disconnect the antenna cable from the top of the logic board.

  6. iPhone 6s Plus Speaker Replacement: 6 단계, 이미지 3개 중 1개 iPhone 6s Plus Speaker Replacement: 6 단계, 이미지 3개 중 2개 iPhone 6s Plus Speaker Replacement: 6 단계, 이미지 3개 중 3개
    • Carefully lift the antenna cable and de-route it from the edge of the phone. Use the point of a spudger to help lift the cable free it from the retaining clips.

    • If the cable does not have enough room to lift up, loosen this Phillips screw securing the logic board so that the board can give more wiggle room.

    • Be sure to re-tighten this screw during re-installation.

    • If the cable snags near the SIM reader, it's likely caught on the SIM tray ejection mechanism. Use the point of a spudger to slide the plastic rod out of the way.

    • During re-installation, be sure to route the antenna cable underneath the logic board corner.

    • During reassembly, you can also re-insert the SIM card tray after re-routing the antenna cable.

    • If you feel any resistance, stop and make sure that the tray isn't snagging the antenna cable.

  7. iPhone 6s Plus Speaker Replacement: 7 단계, 이미지 2개 중 1개 iPhone 6s Plus Speaker Replacement: 7 단계, 이미지 2개 중 2개
    • Remove the six Phillips screws securing the speaker to the rear case:

    • One 2.5 mm screw

    • Two 2.7 mm screws

    • One 1.5 mm screw

    • One 1.7 mm screw

    • One 2.6 mm screw securing the speaker to the bottom edge of the rear case.

  8. iPhone 6s Plus Speaker Replacement: 8 단계, 이미지 3개 중 1개 iPhone 6s Plus Speaker Replacement: 8 단계, 이미지 3개 중 2개 iPhone 6s Plus Speaker Replacement: 8 단계, 이미지 3개 중 3개
    • Insert the flat end of a spudger between the long edge of the speaker module and the case wall.

    • Pry gently to loosen the speaker module.

    • Once the module is loose, lift and remove the speaker module and the attached antenna cable from the phone.

결론

To reassemble your device, follow these instructions in reverse order.

작성자

1다른 기여자 명과 함께

Arthur Shi

회원 가입일: 01/03/18

282,898 평판

안내서 587개를 작성함

iFixit iFixit 회원

Staff

119 회원들

안내서 19,481개를 작성함

댓글 0개

댓글 쓰기

조회 통계:

지난 24시간: 0

지난 7일: 0

지난 30일: 8

전체 시간: 176