이 버전에는 잘못된 편집 사항이 있을 수 있습니다. 최신 확인된 스냅샷으로 전환하십시오.
필요한 것
-
이 단계는 번역되지 않았습니다. 번역을 도와주십시오
-
Insert a SIM eject tool into the hole in the SIM tray.
-
Press to eject the SIM tray.
-
-
-
분해를 시작하기 전에 iPhone 전원을 끄세요.
-
Lightning 포트 양 옆에 위치한 3.4mm Pentalobe/펜타로브/별나사 두 개를 풀어주세요.
-
-
-
파란색 핸들을 뒤로 당겨 Anti-Clamp의 팔을 풀어 주세요 .
-
Anti-Clamp의 팔을 iPhone의 왼편 또는 오른편 가장자리로 밀어 주세요.
-
흡입 컵을 iPhone의 홈 버튼 바로 위 하단 가장자리 근처에 배치하세요—전면에 하나, 후면에 하나.
-
흡입 컵을 함께 눌러서 원하는 부위에 흡입하세요.
-
-
-
이 단계는 번역되지 않았습니다. 번역을 도와주십시오
-
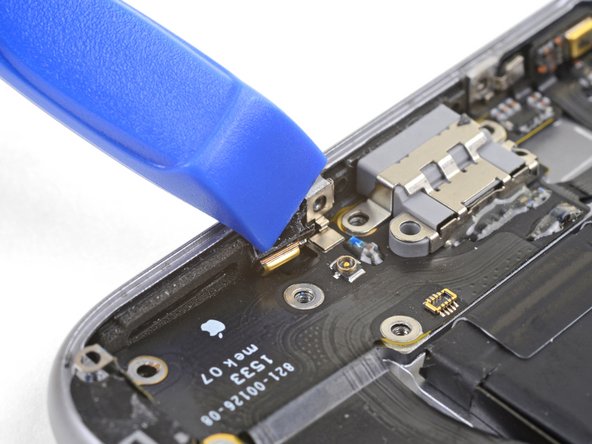
Use the point of a spudger to pry up and disconnect the antenna cable from the bottom of the logic board.
-
-
이 단계는 번역되지 않았습니다. 번역을 도와주십시오
-
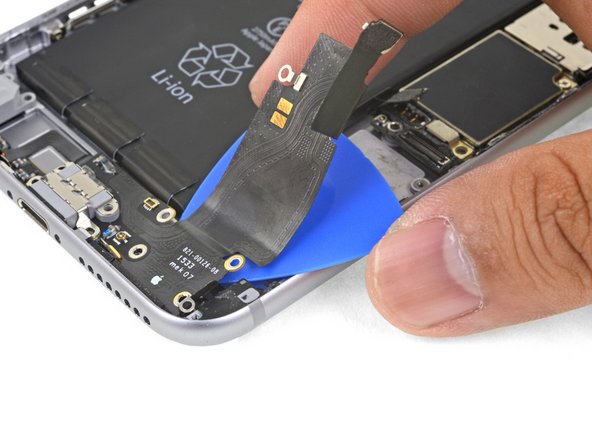
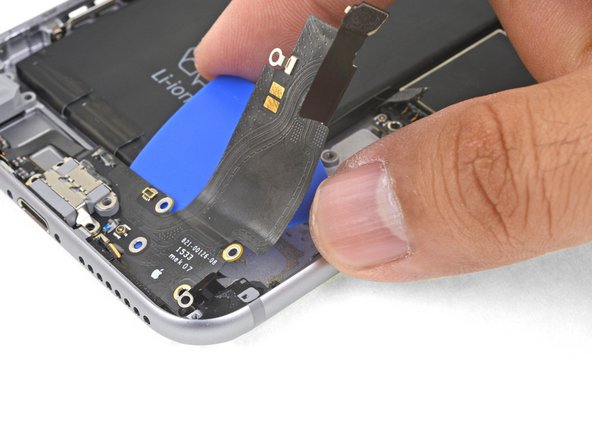
Use the point of a spudger to pry up and disconnect the Lightning connector cable from the logic board.
-
-
이 단계는 번역되지 않았습니다. 번역을 도와주십시오
-
Remove the three Phillips screws securing the Lightning connector bracket:
-
Two 3.5 mm screws
-
One 2.7 mm screw
-
Remove the bracket.
-
-
이 단계는 번역되지 않았습니다. 번역을 도와주십시오
-
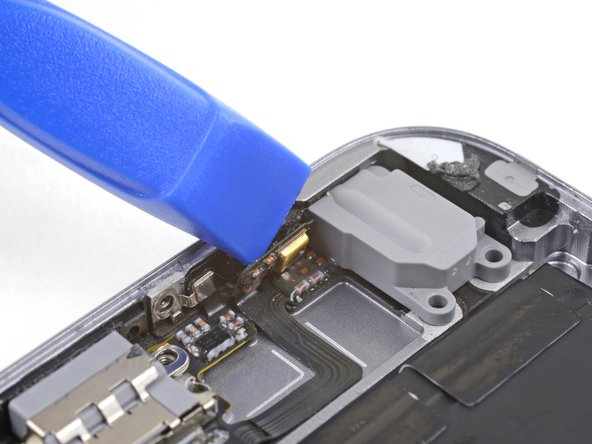
Use the point of a spudger to pry up and disconnect the antenna cable from the Lightning connector assembly.
-
-
이 단계는 번역되지 않았습니다. 번역을 도와주십시오
-
Use the point of a spudger to pry up and disconnect the antenna cable from the top of the logic board.
-
-
이 단계는 번역되지 않았습니다. 번역을 도와주십시오
-
Carefully lift the antenna cable and de-route it from the edge of the phone. Use the point of a spudger to help lift the cable free it from the retaining clips.
-
-
이 단계는 번역되지 않았습니다. 번역을 도와주십시오
-
Remove the six Phillips screws securing the speaker to the rear case:
-
One 2.5 mm screw
-
Two 2.7 mm screws
-
One 1.5 mm screw
-
One 1.7 mm screw
-
One 2.6 mm screw securing the speaker to the bottom edge of the rear case.
-
-
이 단계는 번역되지 않았습니다. 번역을 도와주십시오
-
Insert the flat end of a spudger between the long edge of the speaker module and the case wall.
-
Pry gently to loosen the speaker module.
-
Once the module is loose, lift and remove the speaker module and the attached antenna cable from the phone.
-
-
이 단계는 번역되지 않았습니다. 번역을 도와주십시오
-
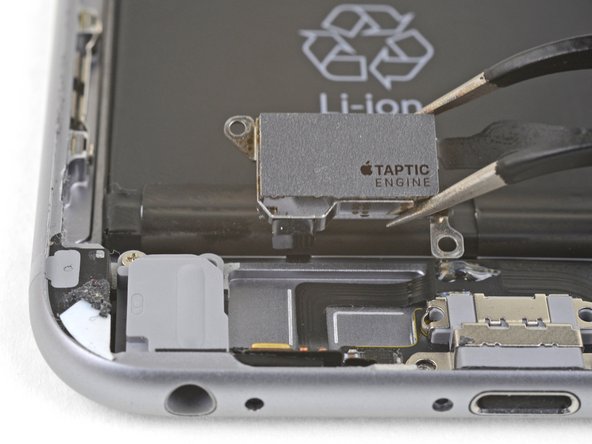
Use the point of a spudger to disconnect the Taptic Engine flex cable from the lower flex cable.
-
-
이 단계는 번역되지 않았습니다. 번역을 도와주십시오
-
Remove the two Phillips screws securing the Taptic Engine to the rear case:
-
One 3.1 mm screw
-
One 2.1 mm screw
-
Remove the Taptic Engine.
-
-
이 단계는 번역되지 않았습니다. 번역을 도와주십시오
-
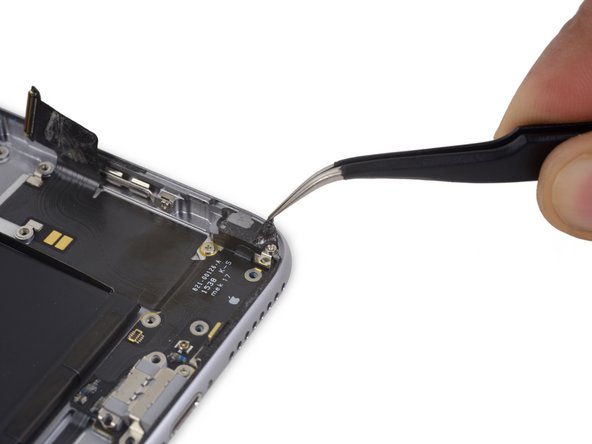
Peel back the tape over the screw securing the Lightning connector flex cable to the lip of the phone.
-
-
이 단계는 번역되지 않았습니다. 번역을 도와주십시오
-
Remove the following five Phillips screws:
-
One 2.9 mm screw
-
One 1.9 mm screw
-
One 1.5 mm screw
-
One 1.6 mm screw
-
One 1.3 mm screw set in the bottom edge of the rear case
-
-
이 단계는 번역되지 않았습니다. 번역을 도와주십시오
-
Prepare an iOpener and lay it across the bottom of the phone to soften the adhesive holding the Lightning connector flex cable in place.
-
Wait about a minute for the adhesive to soften before removing the iOpener and continuing.
-
-
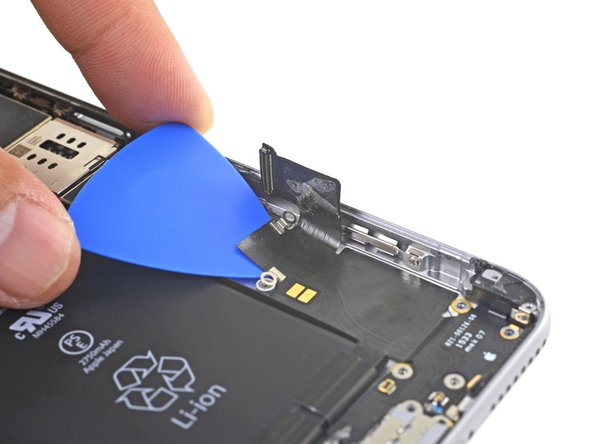
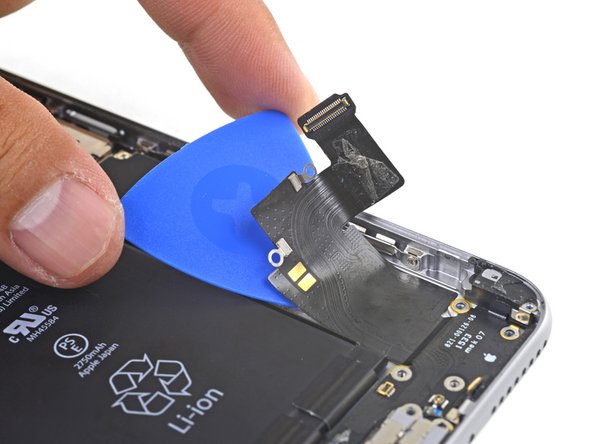
이 단계는 번역되지 않았습니다. 번역을 도와주십시오
-
Insert an opening pick under the Lightning connector flex cable and slowly slice through the adhesive holding the cable to the rear case.
-
-
이 단계는 번역되지 않았습니다. 번역을 도와주십시오
-
Use an opening pick to pry the left microphone off the edge of the rear case.
-
-
이 단계는 번역되지 않았습니다. 번역을 도와주십시오
-
Insert the point of a spudger into the headphone jack and wiggle it slightly to loosen the headphone jack from the bottom edge of the case.
-


다른 163명이 해당 안내서를 완성하였습니다.


댓글 24개
Hardest thing I have every done!! But well worth it. Now I know I need to go up on my labor price!!! :-) Thanks a ton from South Carolina!!
I just completed this repair, replacing the Headphone Jack/Lightening port, battery and iSight camera all at the same time. I removed everything as it explained in the guide, but can totally see how not removing the logic board would save time and isn't 100% necessary. I imagine that peeling the upper portion of the headphone/lighting port is slightly easier with the logic board removed, and you don't have to worry about that antenna cable. If I did it again, I would probably still remove the logic board.
you would have to be crazy to remove the board. just flip the speaker up on its back and rest against logic board. 20 mins should complete this . i cant stress enough that board or camera does not need removed . PERIOD
I completed this and it starts charging, but the home button stop working. It still sense my finger print, but it does not respond when i click on it.
Any help?