This is one of three iPod teardowns this week: We've also taken apart the new iPod Touch and Shuffle. Stay in the loop on twitter for the latest teardown shenanigans.
In case you missed it, last week we celebrated a major milestone. In addition to enabling Apple repair, we now have parts and repair manuals for most game consoles! We decided to celebrate by taking a trip through time and ripping apart five retro consoles.
Shameless plug: We fund teardowns like this by selling iPod Nano Parts! We've also got free open-source repair manuals for every iPod Nano but this one, and we're working on that.


-
-
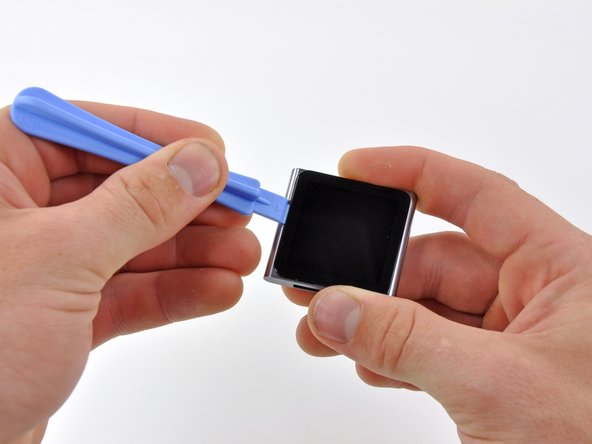
We finally have our hands on the new multi-touch iPod Nano!
-
The shiny new Nano graced our doorstep early this morning, and we can't wait to see what's inside.
-
Unlike the iPod Shuffle 4th Generation that we tore down yesterday, the Nano arrived in a more appropriately-sized shipping box.
-
Apple Model Number: A1366
-
-
-
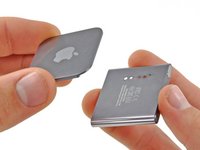
iPod Nano, meet iPod Nano.
-
Despite keeping the same price tag as its predecessor, ($149 and $179 for the 8GB and 16GB models, respectively) the new Nano is a bundle of trade offs.
-
Gone are the days of click wheels, cameras, and video playback.
-
Now is the time for a multi-touch screen [!]. The Nano also features volume control buttons and a sleep/wake button.
-
There were a few minor form factor revisions as well.
-
The 5th Gen Nano sizes up at 3.6" x 1.5" x 0.24", and weighs 1.28 oz.
-
The 6th Gen Nano sizes up at 1.48" x 1.68" x 0.35", and weighs 0.74 oz.
-
-
이 단계에 사용된 도구:Heat Gun$24.99
-
The new Nano is more like a Shuffle with a screen than a Nano with multi-touch. The iPod's case design is very similar to iPod Shuffle we took apart yesterday.
-
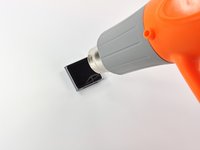
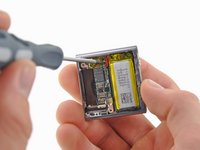
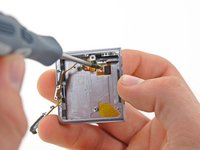
Since there were no visible screws, our first inclination was to turn up the heat.
-
Our lovely heat gun managed to loosen the glue holding the display in place.
-
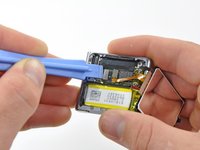
Gentle prying with an iPod Nano opening tool around the perimeter allowed us to separate the display from the rest of the device.
After I done it, the headphone jack broke over the conector near thehold button. The screen turns on but the multitouch isnt responding. Any ideas? Its very urgent! Plzzzzzz!!!
Thats exactly what I used. A Hair dryer. But BE WARNED, in no way it will go back to what it looked like before you took it apart. Mine separated again after some months... it's just not designed to be opened by users.
-
-
이 단계에 사용된 도구:Phillips #00 Screwdriver$5.49
-
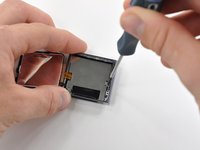
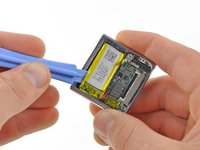
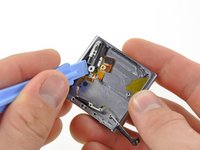
With the display still dangling off the side by its ribbon cable, our trusty #00 Phillips screwdriver makes short work of the two screws securing the EMI shield to the Nano.
-
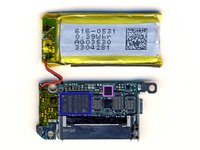
The inside of the Nano looks very similar to that of the new Shuffle; a tiny logic board and battery sharing the space 50/50.
I open the iPod but yanked it the screen out but the silver thing did not come out and still inn the device what do I do?
-
-
-
-
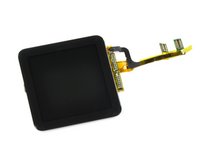
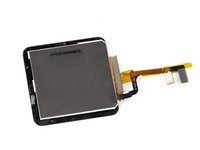
The display can be removed after detaching the digitizer and display data cable connectors.
-
The 1.54" LCD screen is equipped with multi-touch, although how anyone is supposed to comfortably fit more than one finger on the display is a mystery.
-
This LCD features a resolution of 240 x 240 pixels. That's a rather boring 1:1 aspect ratio. It's also a big reduction in size from the 2.2" 240 x 376 pixel LCD from the Nano 5th Generation.
-
Like its cousins the iPhone 4 and the iPod Touch, the touchscreen, LCD, and front glass are inseparably bonded.
-
-
-
The display assembly of the Nano measures 2.27 mm thick. That's even thinner than the 2.93 mm display on the new iPod Touch and the 3.05 mm iPhone 4 display.
-
The Nano has a 220 pixels-per-inch (PPI) screen, the highest pixel density on an Apple device aside from the iPhone 4 / iPod Touch 4th Gen. That's almost double the iPad's paltry 132 PPI density!
-
-
-
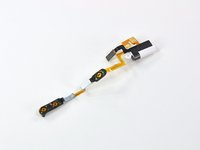
Yet another connector. This time it's for the headphone jack and power/volume button ribbon cable.
-
Using connectors instead of soldering greatly increases the repairability of the device. Thank you Apple.
-
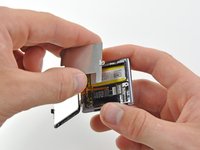
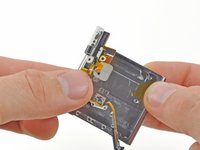
After removing the single logic board screw, we're finally ready to pull the logic board out.
-
-
-
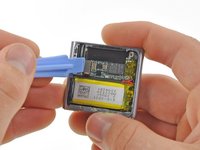
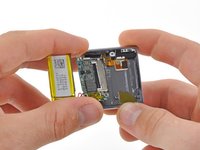
The battery can be pried out of the case with an iPod Nano opening tool, but unfortunately, it is soldered to the logic board.
-
The 3.7 V lithium-ion battery has a listed capacity of .39 Watt-hours that provides up to 24 hours of continuous music playback.
-
This iPod Nano's battery only has two wires, one red and one black. All the other iPod Nanos we've taken apart have included three battery wires. That third battery wire typically ties into a thermistor, a resistor whose value changes with temperature (a poor man's thermometer). Presumably the iPod Nano's battery is small enough and the charge rate is slow enough that overheating is not a concern.
-
-
-
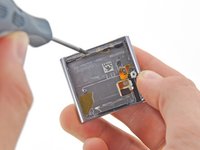
The headphone jack and button contacts are connected via a long, thin ribbon cable which runs along the inside edge of the Nano.
-
Four very small screws secure the button contacts to the top edge.
-
After removing yet another screw, the headphone jack pops out of place with the help of an iPod Nano opening tool.
-
-
-
The headphone jack, volume buttons, and sleep/wake button are all found on the same ribbon cable that snakes around the inner perimeter of the Nano.
-
Like its 5th generation predecessor, the new Nano utilizes the headphones as the FM radio antenna. Any headphones will work as an antenna.
-
Having a hardware based volume control on the exterior of the case is a new, albeit convenient, addition for the Nano.
Hello,
On the headphone audio cable, there is a small black "bubble" with small metal part near the white hole to fix the jack to the ipod case.
Do you think this small bubble can be a fuse ?
I've replace the cable with success, power and volume works, but have sound only on the right earphone. After some try, i have no more sound !
I've made some test with a multimeter to check continuity from the 4 jack pin to the motherboard connector and it's seems that there is no connection. I have done the same test on the old cable, and i found continuity for all pin (groud, mic, left and right)
Any ideas ?
There is no fuse in the headphone. I checked with a meter after my unit had sound from only one side, like yours. Apple did not want to repair it and offered a ten percent off on the 7th Gen model instead. I opened mine with a hair dryer and carefully inspected the headphone socket for damage with a circuit tester, no joy. I ordered a headphone part from eBay and replaced it carefully. No joy either, it still only has sound from one side. It's a paperweight now. I'll never get another Apple player. There are many others to choose from now.
-
-
-
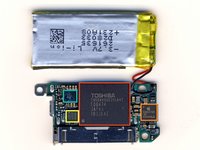
Chips of interest:
-
Toshiba TH58NVG6E2FLA4C 8GB NAND
-
Apple 33850859 C0E111022
-
Power management Dialog D1830B (Apple 338S0783-B1 10298HLS)
-
FM receiver 0650 D0UY 027
-
Apple 339S0104 YGC7 1031 K4X51323P1 YRF 020A3 ARM N2HXHZMP 4 1031
-
35758907 1025 A 04 629749
According to this teardown, the iPod Nano has a chip labeled: Apple 33850859. Is this the D/A conversion chip? Does it handle audio output?
According to the iPod touch 4th generation teardown: "On the far left is a 338S0859 chip. It's similar to the Cirrus Logic audio codec of the iPhone 4 (338S0589)."
Are these two chips (Nano and touch) identical even though one seems to have an S instead of a 5?
-
-
-
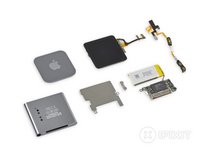
iPod Nano 6th Generation Repairability: 5 out of 10 (10 is easiest to repair)
-
Good: The ribbon cable connectors make it easy to disconnect the display and headphone jack from the logic board.
-
Good: Once the display is removed, the rest of the disassembly is relatively straightforward.
-
Bad: Removing the display is very difficult without using a heat gun.
-
Bad: The battery is soldered to the logic board, making replacement more cumbersome than necessary.
-


댓글 13개
I needed to perform this teardown in order to fix a volume button. It seems now that the hold button is non-functioning. Any ideas??
Karen Mann - 답글
the guide is not detailed. I damaged my headphone jack wiring while removing the board. Be careful, below the board, lies wires. While taking out board, i broke those. Its dead officially now. :(
Hi there! A teardown is meant for entertainment purposes only, it is not a guide to be followed! Be sure to read all warnings, like this one: "This teardown is not a repair guide. To repair your iPod Nano 6th Generation, use our service manual."
Why is there not a guide for replacing the battery? I understand that it involves some soldering, but surely it can still be done with a certain level of beginners skill.
This is a teardown, a fun look at the interior, not a repair guide. You can follow our logic board assembly guide to remove the logic board and battery, and with some fairly simple soldering, you can swap the battery.
when I open it!! the screen using two cables!! and one of these, come out of screen, and I realise I lose the touch!! there is any king of way to fix that problem? can I fix the cable on the screen again?
SCREEN REMOVAL
When handling the screenIe ie. folding it over out of the way, be most careful not to damage the screen cable.
This cable is made up of two pieces, the smaller of which is extremely delicate and is easily broken. GO SLOW AND CAREFULLY.
Apple came up with a poor design . The small cable should have been made much more robust.
BATTERY REPLACEMENT.
The two battery terminals are soldered to the motherboard. To disconnect the battery, the terminals at the motherboard can be heated up with a soldering iron but this must be done most delicately otherwise the red wire connection will be ruined and it will not be possible to connect the new battery terminal to the motherboard.
The red and black wires need to be carefully folded between the motherboard and the battery.
Apple came up with a poor design by using soldered wires rather than a cable type connection for the battery connection.
Sadly the charging port of my beloved 6th gen Nano has ceased connecting, for either charging or syncing. It looks like I’d have to replace the whole motherboard to get it to work again, which would probably cost as much as replacing it. Great write up, though. Thanks!
Matt Jones - 답글
Where I can buy batteries for the nano 6th generation
The iPod Nano(at least the first gen that I have) has THREE battery contacts on the logic board,and the battery itself has THREE wires: a red one, a blue one and a white one
And yes. I still have a 1st gen iPod nano
Perfect instructional