
HP Elitebook 840 G1 Heatsink and Fan Replacement
If your PC is overheating, you may simply have to dust and get rid of lint off the devices fan and heatsink or replacing the fan and heatsink on your HP EliteBook 840 G1


-
-
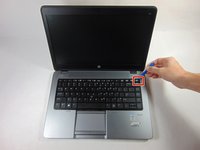
Slide the latch, to the right, away from the lock symbol.
-
Slide the cover away from the latch to remove it.
-
-
-
-
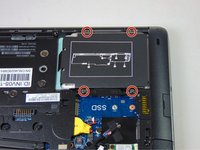
Loosen the four Phillips screws securing the hard drive.
-
-
-
Grab the pull tab on the hard drives plastic casing and pull it out and to the side.
-
Remove the 2.5" hard drive from the plastic bracket.
-
-
-
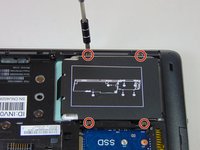
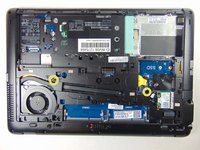
In order to take out the fan and heatsink the plastic cover must first be taken off.
-
Remove the eight 2 mm Phillips #1 screws.
-
-
-
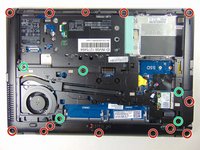
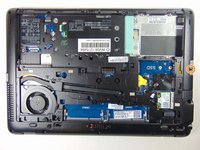
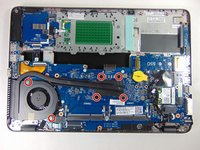
Remove the thirteen 6 mm Torx T8 screws.
-
Remove the five Torx M2.5x5 screws.
-
Remove the single 7 mm Phillips #1 screw.
-
Loosen the two Phillips #1 screws. These screws will remain captive to the device.
T8 Torx screws - I had something like 16 before the black bottom cover removal was possible, and two (marked here as offset from the bottom edge) were not installed at all, so there are 5 total in places not marked in the above photo.
I had 16 of them as well. The missing ones are:
1. Right next to Ethernet drop jaw.
2. To the left of the battery connector.
3. Next to VGA, right above the fan.
I actually had 18. The additional ones are between the fan and the RAM slots, and between the fan and battery.
Sorry, I actually had 16, but two from the picture did not exist (and I cannot edit my comment anymore !).
Several screws are missing, one near the ethernet port, and 3 out in the middle, and 1 near the fan (inline with the two below the fan)
-
-
-
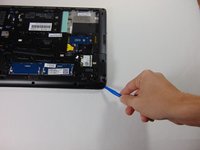
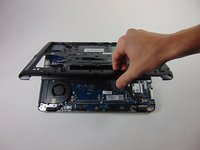
Use the plastic opening tools to remove the keyboard, starting at one of the top corners. You need to lift the top side and then takeing it out moving the keyboard towards the screen.
-
Once the keyboard is removed, detach the ribbons connecting the keyboard to the laptop by prying the small tab and sliding the ribbon out.
Keyboard removal was not necessary to remove the fan for me. Once you get the bottom shell off, the fan subassembly is completely accessible.
There is a hole by the fan to push the keyboard out instead of prying it out.
Paul Yoder - 답글
-
-
-
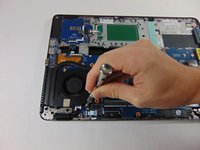
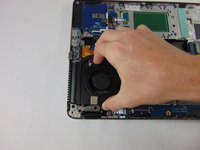
Loosen the six Phillips #1 screws. These will remain captive to the heatsink.
Heatsink removal is not necessary to take the fan out. You can remove just the fan with its two screws if that is the only thing needing replacement. Like for mine, the fan bearings were bad, but the heatsink was okay though a little dusty..
Remember, though, to have fresh thermal grease ready if you do decide to remove the heatsink anyway.
Warning: I removed the heatsink and now that I’ve re-applied the paste it no longer makes any contact at all with the graphics substrate and barely any with the CPU. HP have a habit of splurging several mm of paste onto their CPUs during manufacture and this has either bent the heatsink or it’s just a poor design full stop. I guess I’ll get a thermal pad and use that as it’s at least designed to conduct heat probably better than an ocean of thermal paste would
Yes, it could work, you can also try to unbend the heat sink but this laptop can become very hot, if the heat sink is bent, you should consider a heatsink replacement for an optimal heat dissipation.
Brendan -
-


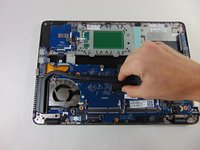
To reassemble your device, follow these instructions in reverse order.
To reassemble your device, follow these instructions in reverse order.
다른 16명이 해당 안내서를 완성하였습니다.
팀

USF Tampa, Team 5-3, Blackwell Fall 2015 USF Tampa, Team 5-3, Blackwell Fall 2015 회원
USFT-BLACKWELL-F15S5G3
4 회원들
안내서 19개를 작성함
댓글 4개
Quality guide. Very logical. Thank you.
mediatrigg - 답글
perfectly done, thank you!
Do you need to remove the keyboard for replacing the tehmal paste?
You don’t need to remove the keyoard to replace the thermal paste :)
Brendan -
Slide to your "other left", on this screen it would be to the right, to slide open the cover
petunia8107 - 답글
l’expression “Détachez le cache du loquet pour le retirer “ est ambigüe et source d’erreur, elle donne à penser qu’il faut retirer un “cache” qui serait sur le loquet.
Ce qu’il faut c’est détacher le cache (la grande plaque où il y a la logo bleu) de la partie fixe sur laquelle se trouve le loquet. Pour ça il faut glisser une lame fine dans la fente entre le cache et la partie fixe.
merci pour le tutoriel.
Philippe Fayolle - 답글
Bonjour Philippe,
Vous avez bien raison ! J’ai adapté la traduction. Merci pour l’observation ! N’hésitez pas à corriger le texte la prochaine fois. Vous trouverez l’interface de traduction en cliquant sur Traduire en haut à droite de l’étape.
Bonne réparation !
Claire Miesch -