소개
새 배터리로 iPhone 5에 다시 생명을 불어넣으세요. 배터리가 부풀어 오른 경우 적절한 예방 조치를 취하세요.
이 안내서는 전면 패널 어셈블리를 분리하도록 안내하며, 이는 디스플레이 케이블이 손상을 방지하기 위함입니다. 본체에서 배터리를 떼어내는 동안 디스플레이를 조심스럽게 지탱할 수 있다면 디스플레이 분리하기(13~16단계)를 건너뛰고 배터리 분리 단계로 이동하세요.
최적의 성능을 위해 이 안내서를 완료한 후 새로 장착한 배터리를 보정하세요: 100%까지 충전하고 최소 2시간 이상 계속 충전하세요. 그런 다음 배터리 방전으로 인해 iPhone이 꺼질 때까지 사용하세요. 마지막으로 중단 없이 100%까지 충전하세요.
이 안내서를 사용하여 배터리 커넥터 브래킷을 교체할 수도 있습니다.
필요한 것
동영상 개요
-
-
분해를 시작하기 전에 iPhone의 전원을 끄세요.
-
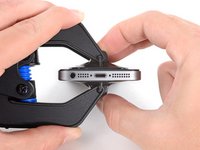
Lightning 커넥터 옆에 있는 3.6mm 펜타로브 나사 두 개를 풀어주세요.
-
-
-
사용하는 도구와 상관없이 디스플레이 전체를 위로 당겨야 합니다.
-
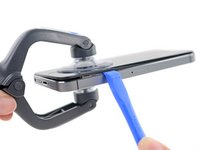
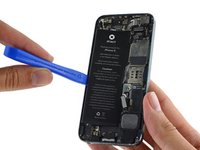
첫 번째 이미지처럼 유리가 플라스틱에서 분리되기 시작하면 플라스틱 프레임과 금속 휴대폰 본체 사이에 플라스틱 여는 도구를 밀어 넣어 금속 클립을 케이스에서 풀어주세요.
-
-
이 단계에 사용된 도구:Clampy - Anti-Clamp$24.95
-
파란색 손잡이를 뒤로 당겨 안티-클램프의 팔을 잠금 해제하세요.
-
팔을 휴대폰의 왼편 또는 오른편 가장자리 위로 밀어 주세요.
-
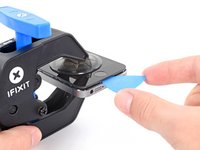
흡입 컵을 휴대폰의 하단 가장자리 홈 버튼 근처에 배치하세요—전면에 하나, 후면에 하나.
-
적절한 위치에 컵을 함께 꽉 쥐고 흡착하세요.
-
-
-
파란색 손잡이를 앞으로 당겨 팔을 고정하세요.
-
손잡이를 시계 방향으로 360도 돌리거나 컵이 늘어나기 시작할 때까지 돌리세요.
-
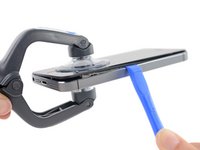
안티-클램프가 충분히 큰 틈을 만들면 스크린 밑으로 여는 픽을 끼우세요.
-
다음 두 단계는 건너뛰세요.
-
-
-
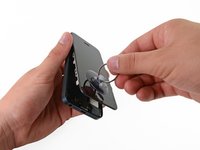
한 손으로 iPhone을 누른 상태에서 흡입 컵을 위로 당겨 전면 패널 어셈블리를 후면 케이스에서 살짝 분리하세요.
-
흡입 컵을 위로 당기면서 플라스틱 여는 도구를 사용하여 후면 케이스를 스크린에서 멀리 아래로 조심히 당기세요.
-
-
-
-
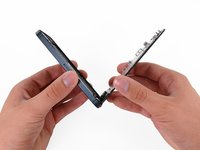
일단 전면 패널 어셈블리의 하단 및 측면에 있는 클립이 풀리면 후면 케이스에서 어셈블리의 하단을 당겨 빼세요.
-
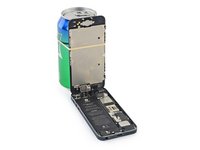
휴대폰에 작업하는 동안 디스플레이를 약 90도 각도로 열고 디스플레이를 받쳐줄 수 있도록 무언가에 기대어 놓으세요.
-
작업하는 동안 디스플레이를 제자리에 단단히 고정하기 위해 고무줄을 사용하세요. 이렇게 하면 디스플레이 케이블이 과도하게 늘어나는 것을 방지할 수 있습니다.
-
-
-
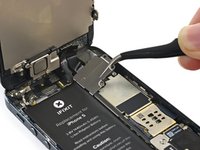
금속 배터리 커넥터 브래킷을 로직 보드에 고정하는 다음 나사 두 개를 풀어주세요:
-
1.8mm 십자 나사 한 개
-
1.6mm 십자 나사 한 개
-
-
-
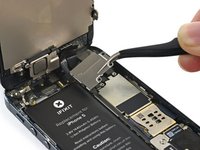
전면 패널 어셈블리 케이블 브래킷을 로직 보드에 고정하는 다음 나사를 풀어주세:
-
1.2mm 십자 나사 두 개
-
1.6mm 십자 나사 한 개
-
-
-
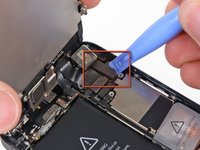
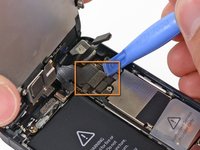
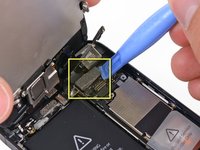
플라스틱 여는 도구 또는 손톱을 사용하여 전면 패널 어셈블리 케이블 세 개를 연결 해제하세요:
-
전면 카메라 및 센서 케이블
-
LCD 케이블
-
디지타이저 케이블
-
-
-
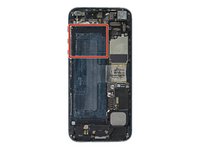
노출되어 있는 투명한 플라스틱 당김 탭을 사용하여 배터리를 iPhone에 고정하는 접착제를 벗겨내세요.
-
알코올 용액이 접착제를 약화시킬 때까지 1분 정도 기다리세요. 여는 도구를 사용하여 배터리의 가장자리를 잡고 살살 들어 올리세요.
-


새 교체 부품과 원래 부품을 비교하세요—설치하기 전에 남은 부품들을 옮기거나 새 부품에서 접착 뒷면을 분리해야 할 수 있습니다.
기기를 재조립하려면 위의 단계를 역순으로 따르세요.
전자 폐기물을 R2 또는 e-Stewards 인증 재활용업체로 가져가세요.
수리가 계획대로 진행되지 않았습니까? 자사의 답변 커뮤니티에서 문제해결 도움말을 확인하세요.
다른 3793명이 해당 안내서를 완성하였습니다.
다음 번역가들에게 특별히 감사 드립니다:
100%

Christian Kim님은 저희가 세상을 수리하는데 동참하신 분입니다! 기여하시겠습니까?
번역 시작하기 ›
첨부 문서


364가이드 댓글
When I finished installing the battery, I put everything back together the way it should be but I have two small problems.
Problem 1: The top of the screen doesn't sit the way it did before I opened it. It sticks out more at the top than the bottom. I'm not talking much, maybe fractions of a MM extra?
Problem 2: The screen isn't as responsive as before. When I'm typing, it sort of lags and then it catches up really fast, sort of like when they phone is "busy" and then it catches up with what you're typing. However, it's not only during typing but scrolling and when tapping the screen. It is generally overall less responsive.
Any ideas?
If others have this problem like I did too when first changing the batter. Here's the answer not in the steps in the guide:
When reassembling the case after replacing the battery and closing the case you have to do the following. The top of the screen (where the cables to the LCD screen are connected) has to be slid in first, before settling in the rest of the case, so that there is no "bumb" on the top of the case. If you don't slide in the case correctly, you will get screen artefacts (after effects, ghosting) when pressing the screen in normal use. You'll notice this immediately and should notice it by the frame not being even on the top.
Fix: Just reopen the screen top, slide the screen frame top first in place, then close the rest of the case and test. Should be ok.
jaakkohyry - 답글 공유
Super easy! I am not used to repair things on the regular but this was a breeze. The video was the perfect companion. Hardest part was removing the screen, then reapplying the cover for the three connections towards the top of the phone. The piece didnt seem to sit right, but jiggling it around a little helped and worked like a charm!
While trying to gingerly open a gap with the suction cup, my entire display assembly released all at once and flew up. I think I must have damaged a trace on the flex connector going to the backlight, since I now have hot spots along the top of the display and it seems half of the what-seem-to-be 8 LEDs are dead. Brightness at full is noticeably lower than a friend's iPhone 5.