
MacBook Air 11" Mid 2011 Solid-State Drive Replacement

Use this guide to upgrade or replace the solid-state drive in a MacBook Air 11” Mid 2011. This MacBook Air uses a proprietary storage drive connector, and is therefore not compatible with common M.2 drives without the use of an adapter.
Before you perform this repair, if at all possible, back up your existing SSD. Then, either familiarize yourself with internet recovery or create a bootable external drive so you’ll be ready to install macOS onto your new drive and migrate your data to the new SSD.
Finally, we strongly recommend installing macOS 10.13 High Sierra (or a later macOS) before replacing the original SSD from your MacBook Air. Most new SSDs require updated storage drivers not found in versions of macOS prior to High Sierra.


-
이 단계에 사용된 도구:P5 Pentalobe Screwdriver Retina MacBook Pro and Air$5.99
-
Remove the following ten screws:
-
Two 8 mm 5-point Pentalobe screws
-
Eight 2.5 mm 5-point Pentalobe screws
-
-
-
-
Use the flat end of a spudger to pry both short sides of the battery connector upward to disconnect it from its socket on the logic board.
-
Bend the battery cable slightly away from the logic board so the connector will not accidentally contact its socket.
My macbook air's configuration (Mid-2011 core i5) has a different battery connector. It slides into a receptacle on the logic board. If your battery connector does not look like the one pictured, use the pointy end of a spudger to depress the small indentation in the middle of the battery connector cable terminal, and pull aft to release the clasp mechanism.
Maybe your battery connector doesn't match the picture because these instructions are for the mid-2012 model and yours is mid-2011.
-
-
-
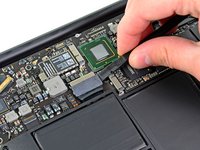
Remove the single 2.9 mm T5 Torx screw securing the SSD to the logic board.
-
-
-
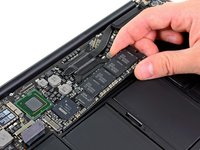
Use a spudger to help lift the free end of the SSD just enough to grab it with your other hand.
-
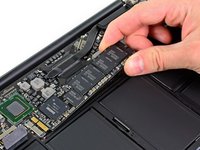
Pull the drive straight out of its socket and remove it from the logic board.
When you've completed all these steps to replace your SSD, don't despair if the MacBook Air shows a flashing folder with a question mark when you first power up the MacBook Air.
- Power off the machine, then keep the option key (= Alt key) pressed down, power on the machine again, and keep the option key pressed down until a prompt appears.
- If you've set a firmware password, then type it in at the prompt
- You should now be prompted for a hard drive to boot from. Select "EFI Boot"
- The MacBook Air should now boot to a window showing "OS X Utilities"
- Click on the at the top left, then select "Startup Disk..."
- Select your SDD/Hard drive, and restart.
When replacing the SSD, be careful about the connector orientation. Replacement boards look almost the same if they are upside-down. Note that the connector is not reversible - there is a notch that will only line up if the board is right-side up. If it doesn't seem to line up, flip the board over.
can i ask some links for some ssd’s that are compatible with that macbook model ?
Hi I completed steps above, but the MacBook Air 2012 doesn’t seem to read the drive, on reboot I get a flashing folder, and upon clicking Control R on reboot it goes to internet recovery mode and then can’t find the drive on disk utility. Any help would be much appreciated! Thanks, Devin
if you’re using an M2 adaptor, be mindful to check the compatibility with the other end. In my specific case my adaptor was only compatible with M2 Sata and not with M2 NVMe.
This was a confusing upgrade. Sintech M.2 NGFF SSD fo 2010-2011 MacBook Air was used, yet it’s got a graphic in the sales content that claims it works with ‘M’ key only (NVMe, AHCI), so NOT SATA. Yet in the answered questions on Amazon the sales tech claims you MUST use SATA drive. I bought 2 NVMe SSD’s and found that the first USB adapter board was unstable with both. So, bought another adapter board that supported SATA and NVMe (RIITOP M.2 SSD to USB 3.1 adapter that claimed to be compatible with ‘M’ and ‘B+M’ SATA SSD’s) and a SATA SSD (Silicon Power A55 M.2 SATA III). The NVMe drives couldn’t be seen by the MacBook Air, but the SATA drive worked (Restore didn’t work, but SuperDuper! does fine). Physical install is as shown.
-


To reassemble your device, follow these instructions in reverse order.
To reassemble your device, follow these instructions in reverse order.
다른 113명이 해당 안내서를 완성하였습니다.

댓글 16개
Note: if you're installing a blank SSD, you'll want to format it with Disk Utilities) before the OS X installer will recognize it.
is it possible to replace an 128 GB Solid State Drive with an 240 GB? (MacBook Air, 11", Mid 2011)
No, is not, I just bought a 1TB Samsung 960 EVO m.2 and had to return it, for not being compatible. (is smaller and the pin-out is not the same)
Can anyone suggest SSD that can be use with MacBook Air, 11", Mid 2011. Need at least 256 GB or more.
Chairat
480GB OWC Aura 6G SSD
Super clear and helpful, thank you.
Where can I get an adapter? And what’s the right signature ?
What adapter do I need to be able to put a 970 EVO plus, or any NVMe ssd into this machine??
Brick Wall - 답글
Thank you very much - worked like a charm; now….on to the battery…
Parfait mon macbook air vient de passer de 60 Go à 500 Go !!! Et en plus c’est facile ! Merci pour ce tuto très bien réalisé qui permet de recycler nos vieux macbook qui fonctionnent toujours très bien !
There are adapters available, so you can upgrade your MacBook Air with 'standard' SSDs - as long as they match the adapters specifications. In my case I found an adapter which supports SATA SSDs but not PCMe.
With this in mind you won't go wrong. Both my MacBook Pro 13 late 2012 and my MacBook Air 11 work fine. Especially the Air (which got only 2 GB RAM) benefits most, after installing a Linux with SWAP. Due to the speed of the new SSD it runs smoothly.
I recommend that one of the tools you obtain is a jeweler's loupe that mounts on your glasses. It makes things easier.
blairweaver - 답글
This is not correct. You need the pentalobe tool at this point.
Duane Hellums - 답글