
Nexus 5X Rear-Facing Camera Replacement

Use this guide to remove the rear-facing camera in the Nexus 5X.
You’ll need replacement adhesive to reattach components when reassembling the device.


-
-
Insert a SIM card ejection tool into the hole on the SIM card tray, located on the left edge of the phone.
-
Press in to eject the SIM card tray.
-
Remove the SIM card tray.
-
-
-
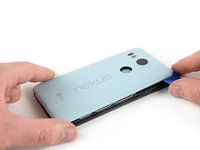
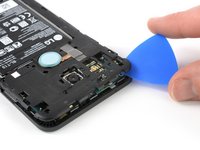
Place an opening pick in the opening of the SIM card tray slot and twist it sideways to release the first plastic clip that holds the rear panel in its place.
-
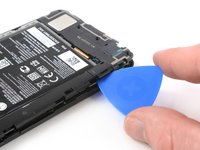
Slide the opening pick around the top edge of the phone to release the plastic clips that secure the rear panel.
Here’s a photo of the location of the 18 tabs that hold the back cover in place
Twisting sideways didn’t do it for me, but sliding along the edge did. However, at first I didn’t realize that the pick was between the motherboard and midframe, rather than between midframe and back cover like it was supposed to. This led to breaking off a spring-loaded connector on the motherboard, connecting to an antenna (I guess) in the back cover. So far I haven’t noticed any reception issues, but I can’t say for sure.
In essence: be careful to get the pick towards the back cover, and not “straight in” under the midframe.
-
-
-
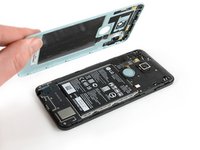
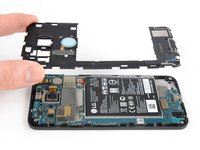
Remove the ten 3.6 mm Phillips screws that secure the midframe.
-
-
-
-
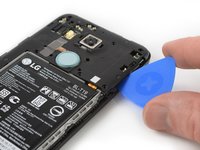
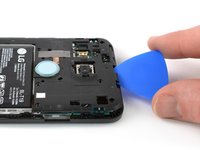
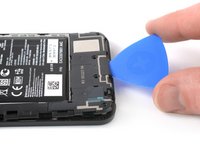
Insert an opening pick into the SIM card tray slot and twist the opening pick sideways to release the plastic clips.
The photo seems to show that the person is opening from the top, which is the opposite of your advice. So, just want to be clear.
yes, open from bottom first... the pic above shows the finished product after reaching top of phone. I found it best to actually start close to the right of the usbC connector. Pushing inbetween the 2 tabs and up will release the shell.. then work clockwise.
Chris, your advice to start to the right of the usbC connector was excellent, thank you!
I found that my middle panel was already broken at the narrowest part just to the left of the 2-D scan code on the battery, perhaps from some ham-fisted previous repair. This seems of little consequence, there do not seem to be any electrical connections running through this part.
After a long amount of prying, I discoved that, if used gently, a jimmy can really help get the plastic off
I could not remove the cover with the opening tool but had success with the opening picks (the triangle parts). Just slide them under the cover and gently bend and twist the pick to release the cover from the locks. By the way: it’s perfectly normal for the bottom cover part to come loose from the top cover part. It’s designed that way (they interlock).
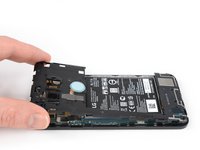
Here’s a photo of the location of the 20 tabs that hold the middle assembly in place, and the pry angle needed.
This is the scariest part but it is the same process of taking a bike tire off the rim: lift up one part of the cover then put a wedge under the lifted section to hold it up then continue around the frame lifting it up and holding it up with the blue picks. You’ll find that after you life the bottom you can wriggle free the rest by hand.
The 10 screws came out quickly using the IFIXIT.com magnetic screwdriver.
-
-
-
Use the edge of a spudger to pry up and disconnect the battery flex cable located at the bottom right of the motherboard.
-
-
-
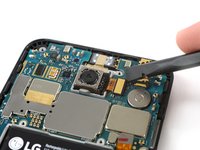
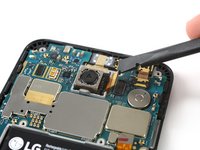
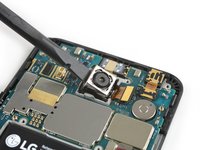
Use the flat end of a spudger to pry up the rear facing camera's flex connector.
-
-
-
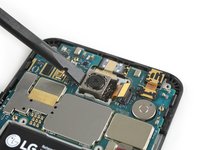
Use an iOpener to loosen the adhesive beneath the rear facing camera. Place the iOpener across the top part of the phone for about 30 seconds.
-


If possible, turn on your phone and test your repair before installing new adhesive and resealing the phone.
To reassemble your device, follow these instructions in reverse order.
Repair didn’t go as planned? Check out our Nexus 5X Answers community for troubleshooting help.
If possible, turn on your phone and test your repair before installing new adhesive and resealing the phone.
To reassemble your device, follow these instructions in reverse order.
Repair didn’t go as planned? Check out our Nexus 5X Answers community for troubleshooting help.
다른 11명이 해당 안내서를 완성하였습니다.


댓글 7개
Hi! I just replaced the entire screen panel on my Nexus 5x because it stopped working (it flipped 180* the screen and the image it showed was mirrored -- completely impossible to use the phone). I read several reviews describing the same issue and fixing it by replacing the screen panel. Now I'm having issues with the camera. The front camera works, but the back one doesn't. I reopened the phone to check it was plugged in correctly to the motherboard, and it was. Is there a way to figure out if it's the actual camera that's not working or if it has something to do with the motherboard?
Thanks! -MJ
Hello,
I replaced the back camera, but unfortunately the autofocus of the new camera does not work. All pictures are blurred. When I open the camera-app a "click-noise" can be heard. I also installed 3rd-party app, which has the option to change the focus manually. But that did not work as well. I also did a secure boot, but that also did not solve the problem. Do you have an idea, what I can do?
Thanks in advance,
Klaus
Hello,
just an update for my former question: I exchanged the camera-module again and now it is working. It seems, that the other "new" module was broken!
Cheers,
Klaus
Klaus M. -
I had a similar issue. After replacing the camera, the auto focus wouldn't work anymore. I did not test it with a manual focus app.
After some research i found out that this could have been caused by a faulty connection of the ribbon cable.
I reopened the phone, detached the ribbon cable and firmly pressed it on again. Had to repeat this twice, and after the second time the camera is doing auto focus again!
Anyone knows where to buy the OEM Back Camera for the Nexus 5x? The connector is broken after screen replacement.
Maybe you guys can help me,
Remy B
Here you are: