주요 콘텐츠로 건너뛰기

Pocophone F1 Battery Replacement

필요한 것

  1. Pocophone F1 Battery Replacement, Remove the SIM tray: 1 단계, 이미지 1/3 Pocophone F1 Battery Replacement, Remove the SIM tray: 1 단계, 이미지 2/3 Pocophone F1 Battery Replacement, Remove the SIM tray: 1 단계, 이미지 3/3
    • Before you begin, switch off your phone.

    • Insert a SIM eject tool or a paperclip into the small hole on the SIM card tray on the left edge of the phone.

    • Press firmly to eject the tray.

    • Remove the SIM card tray.

    • When reinserting the cards, make sure to properly orient them in the tray.

  2. Pocophone F1 Battery Replacement, Unfasten the back cover screws: 2 단계, 이미지 1/1
    • Remove the two 2.7 mm-long Torx T3 screws from the bottom edge of your phone.

  3. Pocophone F1 Battery Replacement, Insert an opening tool: 3 단계, 이미지 1/3 Pocophone F1 Battery Replacement, Insert an opening tool: 3 단계, 이미지 2/3 Pocophone F1 Battery Replacement, Insert an opening tool: 3 단계, 이미지 3/3
    • Insert an opening tool between the screen and the back cover at the bottom edge of the screen.

    • Slide the opening tool to the bottom right corner to release the plastic clips holding the back cover in place.

  4. Pocophone F1 Battery Replacement, Release the clips: 4 단계, 이미지 1/3 Pocophone F1 Battery Replacement, Release the clips: 4 단계, 이미지 2/3 Pocophone F1 Battery Replacement, Release the clips: 4 단계, 이미지 3/3
    • Slide the opening tool around the bottom right corner.

    • Slide the opening tool along the right edge of the Pocophone F1 to release the plastic clips.

  5. Pocophone F1 Battery Replacement: 5 단계, 이미지 1/2 Pocophone F1 Battery Replacement: 5 단계, 이미지 2/2
    • Slide the opening tool along the top edge of the phone to release the plastic clips holding the back cover in place.

  6. Pocophone F1 Battery Replacement: 6 단계, 이미지 1/3 Pocophone F1 Battery Replacement: 6 단계, 이미지 2/3 Pocophone F1 Battery Replacement: 6 단계, 이미지 3/3
    • Slide the opening tool along the left edge of the phone to release the remaining plastic clips.

    • Try not to remove the back cover all the way yet, the flex cable of the fingerprint sensor is still connected to the motherboard.

  7. Pocophone F1 Battery Replacement: 7 단계, 이미지 1/3 Pocophone F1 Battery Replacement: 7 단계, 이미지 2/3 Pocophone F1 Battery Replacement: 7 단계, 이미지 3/3
    • Carefully fold the phone assembly to the left side of the back cover like you'd open a book page.

    • Avoid tensioning the fingerprint flex cable during this procedure.

  8. Pocophone F1 Battery Replacement, Unfasten screws: 8 단계, 이미지 1/1
    • Remove the ten 3.2 mm-long Phillips screws.

  9. Pocophone F1 Battery Replacement: 9 단계, 이미지 1/3 Pocophone F1 Battery Replacement: 9 단계, 이미지 2/3 Pocophone F1 Battery Replacement: 9 단계, 이미지 3/3
    • Slide an opening pick under the bottom left corner of the motherboard cover.

    • Slide the opening pick around the corner and along the left edge of the motherboard cover to release the plastic clips holding it in place.

    • Use the opening pick to pry up the motherboard cover.

  10. Pocophone F1 Battery Replacement, Remove the motherboard cover: 10 단계, 이미지 1/2 Pocophone F1 Battery Replacement, Remove the motherboard cover: 10 단계, 이미지 2/2
    • Remove the motherboard cover.

  11. Pocophone F1 Battery Replacement, Remove the back cover: 11 단계, 이미지 1/3 Pocophone F1 Battery Replacement, Remove the back cover: 11 단계, 이미지 2/3 Pocophone F1 Battery Replacement, Remove the back cover: 11 단계, 이미지 3/3
    • Use the flat end of a spudger to pry up and disconnect the fingerprint flex connector.

    • Remove the back cover.

  12. Pocophone F1 Battery Replacement, Remove the protective foil: 12 단계, 이미지 1/3 Pocophone F1 Battery Replacement, Remove the protective foil: 12 단계, 이미지 2/3 Pocophone F1 Battery Replacement, Remove the protective foil: 12 단계, 이미지 3/3
    • Use a pair of tweezers to peel the black protective foil off the battery and logic board and remove it.

  13. Pocophone F1 Battery Replacement, Disconnect the battery: 13 단계, 이미지 1/2 Pocophone F1 Battery Replacement, Disconnect the battery: 13 단계, 이미지 2/2
    • Use the flat end of a spudger to pry up and disconnect the battery connector.

  14. Pocophone F1 Battery Replacement, Disconnect the interconnect flex cable: 14 단계, 이미지 1/3 Pocophone F1 Battery Replacement, Disconnect the interconnect flex cable: 14 단계, 이미지 2/3 Pocophone F1 Battery Replacement, Disconnect the interconnect flex cable: 14 단계, 이미지 3/3
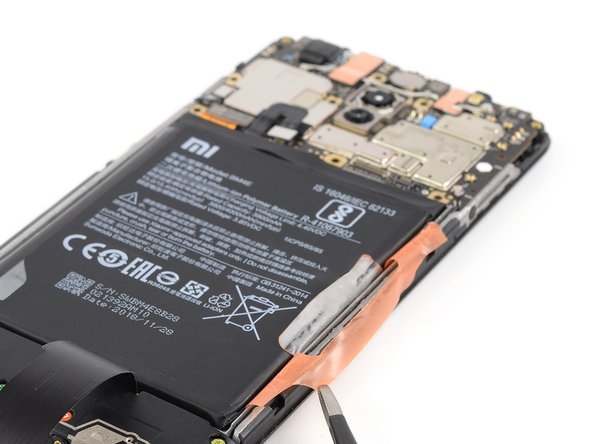
    • Use the flat end of a spudger to pry up and disconnect the interconnect flex cable.

    • Fold the interconnect flex cable out of your way in order to get access to the battery.

    • You might want to use some adhesive tape like tesa and tape the flex cable on your desk to hold it in its folded position.

  15. Pocophone F1 Battery Replacement, Peel off the stickers: 15 단계, 이미지 1/3 Pocophone F1 Battery Replacement, Peel off the stickers: 15 단계, 이미지 2/3 Pocophone F1 Battery Replacement, Peel off the stickers: 15 단계, 이미지 3/3
    • Use a pair of tweezers or your fingernails to peel the orange sticker off the battery.

    • Peel the small white sticker off the battery.

  16. Pocophone F1 Battery Replacement, Pull the battery up: 16 단계, 이미지 1/2 Pocophone F1 Battery Replacement, Pull the battery up: 16 단계, 이미지 2/2
    • Grab both ends of the orange sticker.

    • Pull both ends of the orange sticker straight up to lift the battery out of its recess.

    • If you're having a hard time removing the battery, the adhesive might be a little bit too sticky. You can place a heated iOpener on the screen or use a heat gun to soften the adhesive beneath the battery. Apply the iOpener for at least two minutes.

  17. Pocophone F1 Battery Replacement, Remove the battery: 17 단계, 이미지 1/1
    • Peel the remaining adhesive off the battery.

    • Remove the battery.

    • Do not reuse the battery after it has been removed, as doing so is a potential safety hazard. Replace it with a new battery.

    • You can reuse the old adhesive tape if it's still sticky. However if you want to replace your screen you need to remove it and replace it with new custom cut adhesive tape.

결론

If possible, turn on your device and test your repair before installing new adhesive and resealing.

Secure the new battery with pre-cut adhesive or double-sided adhesive tape. In order to position it correctly, apply the new adhesive into the device at the places where the old adhesive was located, not directly onto the battery. Press the new battery firmly into place.

To reassemble your device, follow these instructions in reverse order.

For optimal performance, calibrate your newly installed battery.

Take your e-waste to an R2 or e-Stewards certified recycler.

Repair didn’t go as planned? Try some basic troubleshooting, or ask our Answers community for help.

다른 25명이 해당 안내서를 완성하였습니다.

Dominik Schnabelrauch

회원 가입일: 11/23/16

203,329 평판

안내서 682개 작성하였습니다

iFixit iFixit 회원

Staff

135 회원들

안내서 16,817개 작성하였습니다

댓글 13개

I need advice wich battery to buy and from where.

I can't find a genuine or at least good replacement battery online.

Non of them have a working temperature sensor and most have a lower capacity than advertised.

Xiaomi isn't selling batteries directly to customers in germany.

Sam - 답글

Did you find any reliable alternative? Having the same problem at the moment. Thinking about going to one of those repair Shops but actually they probably use the same batteries, that I am finding online.

wtoepfer3636 -

Hey, the guide was awesome. I was able to remove the battery.

Thanks

vishal - 답글

Thanks for the awesome guide!

Joao Siqueira - 답글

I also am not sure about where to get a genuine battery from

Sahar Avni - 답글

댓글 쓰기

조회 통계:

24 시간 전: 12

7일 전: 116

30일 전: 556

전체 시간: 37,010