
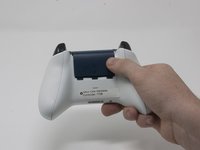
Xbox One Wireless Controller Model 1708 Joystick Cap Replacement
The Joystick caps on your Xbox Controller could become unresponsive or sticky. If this happens it could be necessary to remove the Joystick caps to either replace or clean them. This guide will teach you how to access and replace the Joysticks on your Xbox One Wireless Controller Model 1708.


-
-
Slide the battery cover toward the top of the controller to remove it.
-
Lift up the batteries or the battery pack from the battery compartment.
-
-
-
Insert a plastic opening tool into the top seam, and gently work the opening tool to the bottom of the controller.
-
Continue using the opening tool to gently pry the side plate off of the controller.
-
Repeat this process for the second side plate.
Only use a pry tool! The vibration motor wires are exposed and directly accessible from the side when opening. I attempted to open it with a small knife, expecting to be able to gently pry the clips open, accidentally sliced through my right motor’s wires.
Sawyer Coe - 답글
If you have some Guitar picks laying around they work GREAT!
Mike Beane - 답글
For some reason, the two closest hinges at the top of the two handle covers are extremely strong. I had to play around to get them off unlike several guides and video tutorials that, I don't know how, take them off without the slightest effort.
Controller wireless Xbox One Model 1708 -
-
-
Gently peel the battery label or punch a hole in the center of the sticker in the battery compartment to reveal the hidden screw.
-
Remove the five 9mm torx-9 security screws from the back of the controller.
Since mine is out of warranty I just broke out the security nib with a 2.0 standard bit. Then used a T8 torx.
-
-
-
-
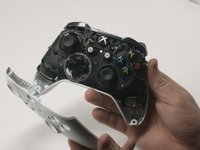
Turn the controller face down and gently lift the rear plate.
-
-
-
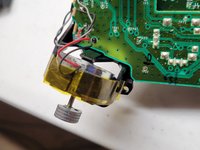
Tape the Rumbler/shock motors in place.
-
This will prevent the motors from falling out.
if you replace thumbsticks only, this step is NOT required and it is safer not to remove bottom cover, removing faceplate is sufficient to replace thumbsticks
-
-
-
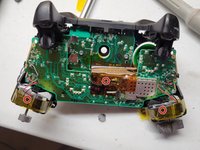
Pull the joysticks off of the controller.
Are the joystick potentiometers soldered to the mother board or just push fit, this guide doesn’t mention soldering so I’m assuming the latter?
Can you get genuine replacement joystick potentiometers as I’ve only seen cheap eBay type ones?
The actual joysticks themselves are soldered into the bottom motherboard.
-


To reassemble your device, follow these instructions in reverse order.
To reassemble your device, follow these instructions in reverse order.
다른 143명이 해당 안내서를 완성하였습니다.
팀

Cal Poly, Team S18-G3, Forte Fall 2017 Cal Poly, Team S18-G3, Forte Fall 2017 회원
CPSU-FORTE-F17S18G3
4 회원들
안내서 34개를 작성함
댓글 9개
How about the square thing with the stick and hinges that the joystick is attached to? I think it’s called the Module. I have a joystick drift / drifting problem and that may help me out. Thanks.
Agreed. That’s actually the part I need to replace too. The module.
followed this guide to take the controller apart because I had a joystick that was sticking, my solution was to put some 3in1 oil on the module that was sticking and it seems to be working a lot better now.
John Jaggi - 답글
@corytc and @tomchak I did replace the module, in general, you buy (Amazon or eBay) you will receive a module of 6 modules you need a multimeter and test each module interface, measure both resistances and subtract them, the one nearest zero is the module you will use since is the one with least drift from the factory.
Just disassemble it, turn upside down uses a solder remover and unsolder the old one, place the new one solder back, boom you are done.
Like you will need an iron solder with medium and thin tips, I used lead-free solder, so is a patience test, be careful with the wires from the rumbles, try not to unsolder them since is a thin wire and is difficult, like I have big hands so took me a while to solder back.
Just want to say the hardest part is carefully prying off the plastic covers on the handles. It’s also not necessary to remove the back cover for simply replacing the joysticks. Other than that, it’s very easy. I would guess this is rated at moderate difficulty simply due to the plastic covers.
Exactly! I just replaced thumbsticks without removing bottom cover. Prying grips not not break anything was the hardest part of this repair.
Where can one get the replacement joysticks ?
I used Ebay and found a few sellers in the USA that had replacement parts for the joystick caps. Color is not the same as the original, but I don't mind this. I recommend typing in your Xbox Controller model number (see inside the battery flap for this) into the online store to see what options are available.
Just used this guide, thanks @dygross! Some useful tips for others though:
-Torx T9 was not needed. On this model Xbox controller, I used a T8 and did not have any issues as the fit was snug.
-As @ottohahn stated, it is NOT required to take off the rear plate to access the joystick caps. Once you remove the screws on the back of the controller, simply lift the front face plate off and then you can access the joystick and front buttons.
-The plastic side plates are very breakable. They are attached with plastic teeth that need to be carefully pushed in. I thought I did this then realized a small part of one broke off while removing the right-side plate. Take your time and you can totally do this!