주요 콘텐츠로 건너뛰기

iMac G5 17" Model A1058 Inverter Replacement

단지 전제 조건
이 안내서는 다른 가이드의 선행 작업으로 사용하기 위한 것입니다. 그 자체로는 불완전합니다.

필요한 것

  1. iMac G5 17" Model A1058 Inverter Replacement, Rear Panel: 1 단계, 이미지 1/1
    • Lay the iMac display-side down on a flat surface.

    • Loosen the three Phillips screws securing the rear panel to the iMac.

    • These screws are captive in the iMac. The center screw will stop turning after about 3.5 turns and the outer screws will stop turning after about 5.5 turns. Do not try to remove these screws from your iMac.

  2. iMac G5 17" Model A1058 Inverter Replacement: 2 단계, 이미지 1/3 iMac G5 17" Model A1058 Inverter Replacement: 2 단계, 이미지 2/3 iMac G5 17" Model A1058 Inverter Replacement: 2 단계, 이미지 3/3
    • Lift the rear panel slightly from the bottom edge of the iMac.

    • Pull the rear panel toward yourself and remove it from the iMac.

  3. iMac G5 17" Model A1058 Inverter Replacement, Optical Drive: 3 단계, 이미지 1/1
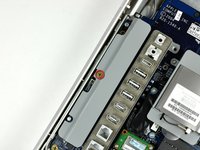
    • Remove the three 8 mm brass Phillips screws securing the optical drive to the midplane.

  4. iMac G5 17" Model A1058 Inverter Replacement: 4 단계, 이미지 1/3 iMac G5 17" Model A1058 Inverter Replacement: 4 단계, 이미지 2/3 iMac G5 17" Model A1058 Inverter Replacement: 4 단계, 이미지 3/3
    • Lift the optical drive near the connector to separate it from the logic board.

    • Lift the free end of the optical drive just enough to clear the fan cover. Lifting the free end of the optical drive too far may break the plastic positioning pins off the front bezel.

    • Lift the free end of the optical drive slightly, then pull it away from the edge of the rear case to clear the two plastic positioning pins.

    • Lift the optical drive out of your iMac.

    • When reinstalling your optical drive it may be necessary to set the bezel attached to the open end of the drive on the plastic positioning pins molded into the front bezel of the iMac and pull the connector side of the drive toward the edge of the rear case, bending it outward slightly, to properly seat the connector.

  5. iMac G5 17" Model A1058 Inverter Replacement, Inverter: 5 단계, 이미지 1/1
    • Slide the inverter-to-display cable connector from under the metal clip on the midplane.

  6. iMac G5 17" Model A1058 Inverter Replacement: 6 단계, 이미지 1/1
    • Disconnect the inverter-to-display cable connector by pulling it straight away from its socket.

  7. iMac G5 17" Model A1058 Inverter Replacement: 7 단계, 이미지 1/2 iMac G5 17" Model A1058 Inverter Replacement: 7 단계, 이미지 2/2
    • Remove the single Phillips screw securing the inverter to the logic board.

    • Lift the inverter straight up off the pins on the logic board.

    • Be sure to lift the inverter straight up off the logic board, as the connector pins are very long and easily bent. If the pins bend during removal, use the connector on the inverter as a guide to bend them straight.

  8. iMac G5 17" Model A1058 Inverter Replacement: 8 단계, 이미지 1/1
    • De-route the inverter cable connector from the channel in the logic board.

  9. iMac G5 17" Model A1058 Inverter Replacement: 9 단계, 이미지 1/1
    • Disconnect the inverter cable from the logic board by pulling it straight up from its socket.

    • Replacement note: it may be helpful to carefully reattach this connector before seating the midplane assembly, making sure the connector safely passes through the hole in the midplane assembly.

결론

To reassemble your device, follow these instructions in reverse order.

Walter Galan

694,850 평판

안내서 1,203개 작성하였습니다

댓글 0개

댓글 쓰기

조회 통계:

24 시간 전: 0

7일 전: 4

30일 전: 11

전체 시간: 1,268