이 버전에는 잘못된 편집 사항이 있을 수 있습니다. 최신 확인된 스냅샷으로 전환하십시오.
필요한 것
-
-
분해를 시작하기 전에 iPhone 전원을 끄세요.
-
Lightning 커넥터 옆에 위치한 3.6mm-길이 Pentalobe/펜타로브/별나사 두 개를 풀어주세요.
-
-
-
파란색 핸들을 뒤로 당겨 Anti-Clamp의 팔을 풀어 주세요 .
-
Anti-Clamp의 팔을 iPhone의 왼편 또는 오른편 가장자리로 밀어 주세요.
-
흡입 컵을 iPhone의 홈 버튼 바로 위 하단 가장자리 근처에 배치하세요—전면에 하나, 후면에 하나.
-
흡입 컵을 함께 눌러서 원하는 부위에 흡입하세요.
-
-
-
배터리 커넥터 브래킷을 고정하는 다음 Phillips/십자 나사들을 분리하세요:
-
2.2mm 나사 한 개
-
3.2mm 나사 한 개
-
-
-
전면 패널 어셈블리 케이블 브래킷을 고정하는 Phillips/십자 나사 다섯 개를 분리하세요:
-
1.2mm 나사 세 개
-
1.7mm 나사 한 개
-
3.1mm 나사 한 개
-
-
이 단계는 번역되지 않았습니다. 번역을 도와주십시오
-
Insert a SIM card eject tool or a paperclip into the small hole in the SIM card tray.
-
Press to eject the tray.
-
-
-
이 단계는 번역되지 않았습니다. 번역을 도와주십시오
-
Use the flat end of a spudger to disconnect the Lightning connector assembly cable and fold it out of the way of the speaker.
-
-
이 단계는 번역되지 않았습니다. 번역을 도와주십시오
-
Use the point of a spudger to lift the antenna cable connector up off of its socket on the logic board.
-
-
이 단계는 번역되지 않았습니다. 번역을 도와주십시오
-
Remove the following Phillips screws from the upper cable bracket:
-
One 2.9 mm screw
-
One 2.2 mm screw
-
-
이 단계는 번역되지 않았습니다. 번역을 도와주십시오
-
Use the flat end of a spudger to lift the power button and flash assembly cable connector up off of its socket.
-
Lift the volume control cable connector up out of its socket on the logic board.
-
-
이 단계는 번역되지 않았습니다. 번역을 도와주십시오
-
Remove the following four Phillips screws from the Wi-Fi antenna:
-
One 1.5 mm screw
-
One 1.4 mm screw
-
Two 2.1 mm screws
-
-
이 단계는 번역되지 않았습니다. 번역을 도와주십시오
-
Remove the following Phillips screws securing the angled logic board bracket.
-
One 2.6 mm screw
-
One 1.3 mm screw, located horizontally in the upper sidewall of the iPhone.
-
-
이 단계는 번역되지 않았습니다. 번역을 도와주십시오
-
Remove the single 1.2 mm Phillips screw securing the antenna interconnect cable to the logic board.
-
-
이 단계는 번역되지 않았습니다. 번역을 도와주십시오
-
Use the point of a spudger to fold the antenna interconnect cable up out of the way of the logic board.
-
-
이 단계는 번역되지 않았습니다. 번역을 도와주십시오
-
Use the flat end of a spudger to lift the camera cable connector straight up out of its socket on the logic board.
-
Fold the camera cable up out of the way of the logic board.
-
-
이 단계는 번역되지 않았습니다. 번역을 도와주십시오
-
Remove the following screws securing the logic board to the rear case:
-
Two 1.9 mm Phillips screws
-
One 2.3 mm standoff screw
-
-
이 단계는 번역되지 않았습니다. 번역을 도와주십시오
-
Use the flat end of a spudger to lift the battery connector end of the logic board up slightly, just enough to grab with your fingers.
-
-
이 단계는 번역되지 않았습니다. 번역을 도와주십시오
-
Lift the battery connector end of the logic board and pull it up and out of the rear case.
-
-
이 단계는 번역되지 않았습니다. 번역을 도와주십시오
-
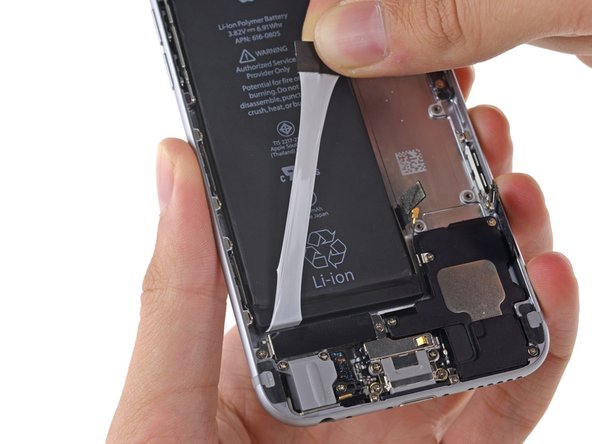
Peel back the first battery adhesive tab from the bottom right edge of the battery.
-
-
이 단계는 번역되지 않았습니다. 번역을 도와주십시오
-
Gently pull the battery adhesive tab away from the battery, toward the bottom of the iPhone.
-
Try not to pull against the battery or the lower components, or you may rip the adhesive strip.
-
Continue pulling, allowing the strip to slowly slip out from between the battery and the rear case. When you feel increased resistance from the strip, stop pulling and continue with the next step.
-
-
이 단계는 번역되지 않았습니다. 번역을 도와주십시오
-
When you feel increased resistance from the adhesive strip, pull it gently around the lower right corner of the battery.
-
Continue pulling the adhesive tab upward and away from the right edge of the battery, allowing it to slowly slide out from between the battery and the rear case, until the strip comes free from the iPhone.
-
-
이 단계는 번역되지 않았습니다. 번역을 도와주십시오
-
Peel back the second battery adhesive tab from the bottom left edge of the battery.
-
Again, gently pull the battery adhesive tab upward and away from the battery, allowing the adhesive strip to slowly slide out from between the battery and the rear case.
-
Continue pulling the adhesive tab until you feel increased resistance, and then stop.
-
-
이 단계는 번역되지 않았습니다. 번역을 도와주십시오
-
When you feel increased resistance from the adhesive strip, pull it gently around the lower left corner of the battery.
-
Continue pulling the adhesive tab upward and away from the left edge of the battery, allowing it to slowly slide out from between the battery and the rear case, until the strip comes free from the iPhone.
-
If you removed both adhesive strips successfully, skip the next two steps and continue on Step 46.
-
If either of the adhesive strips broke off underneath the battery and could not be retrieved, continue with the next step below.
-
-
이 단계는 번역되지 않았습니다. 번역을 도와주십시오
-
If any of the adhesive strips broke off and the battery remains stuck to the rear case, prepare an iOpener or use a hair dryer to heat the rear case directly behind the battery.
-
-
이 단계는 번역되지 않았습니다. 번역을 도와주십시오
-
Insert a plastic card under the logic board edge of the battery.
-
Press the card in at several points if necessary to break up the adhesive behind the battery.
-
-
이 단계는 번역되지 않았습니다. 번역을 도와주십시오
-
After peeling or prying out all adhesive, remove the battery from the iPhone.
-
-
이 단계는 번역되지 않았습니다. 번역을 도와주십시오
-
Remove the following Phillips #00 screws from the rear-facing camera bracket:
-
One 1.5 mm screw
-
One 2.1 mm screw
-
-
이 단계는 번역되지 않았습니다. 번역을 도와주십시오
-
Remove the single 1.2 mm Phillips #00 screw securing the flash bracket.
-
-
이 단계는 번역되지 않았습니다. 번역을 도와주십시오
-
Remove the two 2.2 mm Phillips #00 screws from the power button bracket.
-
-
이 단계는 번역되지 않았습니다. 번역을 도와주십시오
-
Use the point of a spudger to gently push the flash and microphone modules up out of their respective holes in the rear case.
-
-
이 단계는 번역되지 않았습니다. 번역을 도와주십시오
-
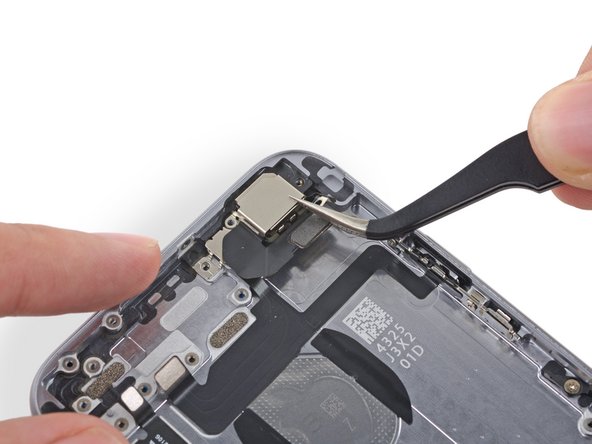
Begin to peel the flash/microphone/power button assembly cable up from the rear case starting from the connector end.
-
Continue to peel the cable up, being particularly careful of the narrow component ends of the cable.
-
Remove the flash/microphone/power button assembly cable from the phone.
-
-
이 단계는 번역되지 않았습니다. 번역을 도와주십시오
-
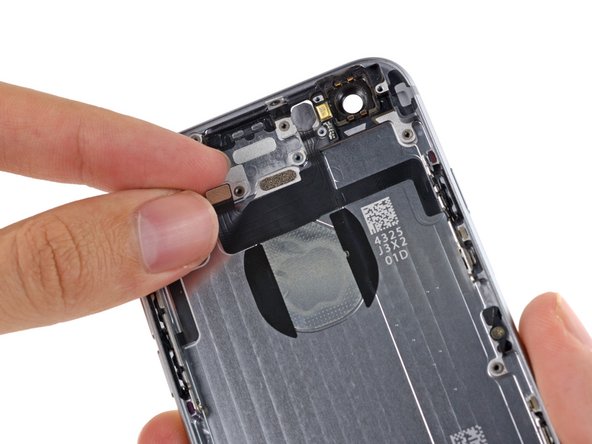
Grip the power button by the metal bar to pull it free from the rear case.
-
The power button is held to the case with an adhesive gasket, pull carefully to prevent ripping the membrane.
-


다른 90명이 해당 안내서를 완성하였습니다.


댓글 13개
Ive recently done a full housing change on my iphone 6 plus to a black one since doing it the power button doesnt work its rock solid i used original power button (space gray) and original flex cable once istalled it just wont press
The only way it works is if i leave the power button screws slightly loose which is a pain becasue the button loosens itself anyone had anything similar or is it the way its been installed ?? All other buttons work correctly mute switch and volume buttons
Hello marcusdean2009 this problem occurs because the new carcass have the power button screw hole a little bit long than the original one. And yes, you will have to let the power button screws slightly loose to make the power button work
My power button is a little bit loose. There's still clicking sound but not same as the other normal button,the button also seems 'into' or 'concave ' compare to normal button.while the power button with long shape also seems just have a clicking sound when I press the middle part of button but not the upper and lower part of button.when I press the upper and lower part,it is soft and without clicking sound and springing feel. I used to replace the flex cable, but it still loose,is it the matter of the quality for the flex cable or the improperly attach of rubber gasket or the scuffed of little metal tip of the power button? Please reply me.
Great job on this guide. What could have been a pain in the butt has been an easy fix/replacement thanks to this guide. Thank you for taking the time to do this. Just plain awesome.