소개
Follow the steps in this guide to replace the volume control cable in your iPhone 6s Plus.
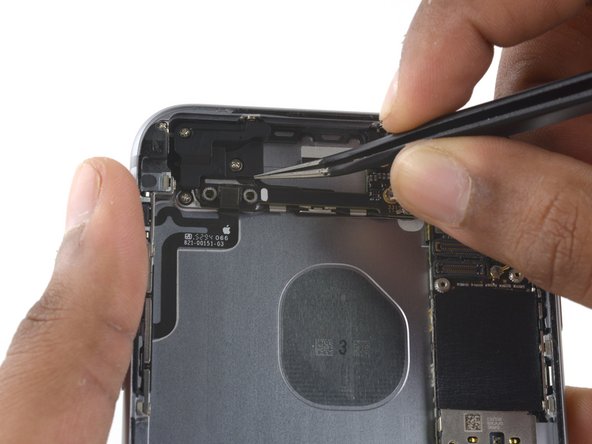
You can also use this guide to replace the audio control cable bracket.
필요한 것
-
-
Power off your iPhone before beginning disassembly.
-
Remove the two 3.4 mm Pentalobe screws on either side of the Lightning port.
-
-
-
Pull the blue handle backwards to unlock the Anti-Clamp's arms.
-
Slide the arms over either the left or right edge of your iPhone.
-
Position the suction cups near the bottom edge of the iPhone just above the home button—one on the front, and one on the back.
-
Squeeze the cups together to apply suction to the desired area.
I found that the single suction cup from the kit worked very well. It didn’t take that much force to separate the front panel from the phone. I think any suction cup that you are able to get a firm grip on will probably work as well. There isn’t any adhesive holding the front panel in. It just snaps in and out. If you have a cracked screen and no screen protector, it may be hard to get a good suction seal. If that’s the case, someone else here suggested applying clear tape to the front glass to get a good surface for applying the suction cup. In my case, I already had a screen protector that was still intact so the suction cup sealed easily.
WORKED PERFECTLY… easy, no harm at all…. thanks a lot
-
-
-
If you don't have an Anti-Clamp, follow the next three steps to use a suction handle.
-
Apply mild heat to the lower edge of the iPhone using an iOpener or hair dryer for about a minute.
This is important. I’ve serviced a lot of iphones/ipads for my family as a hobby in the past.
The adhesive was so tight, I cracked the screen trying to pull it/pry it off.
I highly suggest heating at least the bottom edge enough to soften the adhesive
I would suggest that you are not shy with the hairdryer. A high heat on the bottom of the phone for at least a minute, if not more, if required.
-
-
-
Apply a suction cup to the lower left corner of the display assembly.
take out screws first!!
Make sure you use the right screw driver tip for i phone 6s Plus, which is the P-2. If the screw will not come off once is lose, try using a magnet.
My cracked screen prevented the suction cup from sealing. SOLUTION: With a piece of clear packing tape across the screen, the suction cup will seal and pull.
Jim Cowles - 답글
I broke my iphone screen in the first step!
Ok - just got my battery replacement kit and even got the opening kit for added insurance just in case. Settled down to startwork after carefully cleaning my (immaculate) screen - no scratches or anything, with rubbing alcohol, removing screws and warming with a hair dryer, only to find the suction cup provided in the kit is worse than useless! It won’t stick to the screen well at all. When it does - it pops off at the lightest pull :-( Now what do I do to get this started?!
-
-
-
Pull up on the suction cup with firm, constant pressure to create a slight gap between the front panel and rear case.
I had a shattered front glass panel so I could not get the suction cup to seal properly. I tried a couple of different ways to get good suction but to no avail. I eventually used a Stanley knife to pry up the corner so I could get the spudger into the opening.
A really high quality packing tape over the entire screen will usually be enough to use the suction cup on a shattered screen.
djwooten -
This was by FAR the most difficult part of this whole thing. I confess the spudger was not cutting it so I used a butter knife to get into the small opening first, then used the spudger to go around the screen.
Hey everyone, if you never have done this part before be aware there is an extremely strong adhesive around the lip of the screen and once again is extremely strong. I had to get a friend to insert the pry/pick into the small gap while I used one hand to brace the phone down and the other to pull the suction cup without it digging into my hand. Go slow, it took me 5 tries because I didn’t realize how strong the adhesive was.
I also had a badly cracked lower screen - that glass was actually threatening to pull off the phone in chunks during this step, even with packing tape. Resorted to @j2arch’s tip and inserted a utility knife vertically into the seam between the display and phone body. Was able to lever the glass enough to get the spudger in there.
I have replaced sevrel screens for my sister in law and my niece. The packing tape has worked every time and that’s with it Shattered and pieces already falling out. You have to make sure the packing tape goes to the edge of the screen but doesn’t touch the frame. I have the plier like screen remover and use that it is much easier to remove the screen by your self with that tool. I also have the little finger suction cup that comes with the kit here. I bought the plier suction cup tool When I had to replace the screen that had the pieces of the screen missing and I don’t regret spending the extra money for that it has made a world of difference. I do this as a hobby it’s not a job for me. The electric divide repair kit from Lowe’s is also a very good kit to help. If you’re only going to do it once the kit that comes with the package is a great deal from ifixit. Well worth the money to spend the little extra to get the kit if you all ready don’t have the tools.
If you try to use the spunger near the home button and try to pry it can crack your screen. This happened to me.
Same thing happened to me. This should be a big warning in these steps. If you have a small to moderate crack in you screen, but you weren’t planning on replacing the screen at the same time as another repair inside, there’s a risk of damaging the screen further and making it inoperable.
DW7ACCT -
I found it easiest to use two suction cups. One on the front as directed, and a second one on the back. Give the spudger to your assistant, and have them slip it in place while you pull the display from the case.
I gave up with the suction cup as it wasn't working for me with a cracked screen. Having heated the bottom of the phone with a hair dryer with a high heat for a good minute or so, I used a safety scraper (essentially a razor blade in a holder) along the bottom of the phone to separate the screen from the body of the phone. I used the scraper vertically between the bottom of the screen and the phone body and levered it sufficiently so that I could fit the spudger between the screen and the phone body. My experience when I first used the spudger around the frame was that the cracks in the screen caused the screen glass to separate from the frame, so I had to re-do it and ensure that the screen frame was separated from the phone body.
Safety scraper:
-
-
-
The safest place to pry from is the notch in the front panel above the headphone jack.
-
While still maintaining pressure on the suction cup, insert the flat tip of a spudger into the gap, directly above the headphone jack.
For me this was the most time consuming task. I used a hair dryer for heating. I found a very tight adhesive. For a moment I thought of abandoning my efforts and take the assembly to a professional repairman. But as they say, patience is a virtue.
After fiddling for about 20 minutes, I achieved a barely noticable opening. So I decided to change the strategy. Instead of applying heat all over the base, I preceeded with small steps with heat concentrated near the opening. I applied intense heat only for about 15 to 20 seconds and immediately working with spudger. It took about an hour to completely open the case. It worked.
Thanks for reading.
- Mr Gamma
I also struggled with this step. Lots of heat, 3 different suction cups, I finally could see a small gap... much too thin to fit even a piece of paper into. A video on another site said it was the easy way. I used a sharp craft knife barely into the seam between metal and glass and pried slightly. And it started up. Still a pain freeing the rest of the adhesive. Perhaps the adhesive really sets up over the course of 5 years? I have it hinged open now, so onto the next steps.
-
-
-
Twist the spudger to widen the gap between the front panel and the rear case.
just changed the screen, but due to the tape along side the screen , it is best to heat a little so the glue losses and you can get the screen off better, like indicated
-
-
-
Pull up on the small nub on the suction cup to remove it from the display.
Remember to apply the screen gasket on the re-assemble. The gasket is provided in the kit but not mentioned here on the instructions.
There’s a link to the entire gasket replacement procedure in Step 21.
-
-
-
-
Gently grasp the display assembly and lift it up to open the phone, using the clips at the top of the front panel as a hinge.
-
Open the display to about a 90º angle, and lean it against something to keep it propped up while you're working on the phone.
-
Add a rubber band to keep the display securely in place while you work. This prevents undue strain on the display cables.
if the display cables are damaged how can you tell ?
In theory, I like the idea of propping up the screen with a rubber band and box/soda can like this, but after ripping the FaceTime camera cable twice, I realize that this method puts too much stress on the cable because it places the screen so far back. Even in this photo, you can see that the cable is taut. I’d recommend just holding the screen with your free hand to put the least amount of stress on that cable as possible.
-
-
-
Remove two Phillips screws securing the battery connector bracket to the logic board, of the following lengths:
-
One 2.9 mm screw
-
One 2.3 mm screw
FYI - I used some blue painters tape wrapped around a piece of cardboard to hold the screws and brackets in place, in order, so they did not get lost. Some of those screws are MICROSCOPIC so be careful!
I also suggest having very good lighting, even a camping headlight for hands-free well lit work space. You will thank me later :-)
Use the bit labeled “PH000”.
PH000 bit just wants to free-spin in the 2.3 mm screw. no bite in the head at all. had no difficulty removing the 2.9 mm screw with the same Phillips. had to abandon battery replacement effort.
For this part, neither PH000 or Y000 worked. Technically, it’ll set you back 31$ because you will need the PH00 screwdriver for this part, and the part where you need to open the screen. They have ph00 screwdrivers in every hardware store and even ifixit.com. just know that they put the wrong screwheads for you
Do not lose track of which hole these screws go into. They MUST be put back into the correct hole that they came out of. If not, you will get the dreaded “long screw damage” on the mainboard, and that will be the end of the show.
Just remember where these screws go, and it will be fine.
Ended up employing a Philips #0 from a regular jeweler/precision kit on the 2.3mm screw. Bits seem a bit off for this step.
Vance Bell - 답글
-
-
-
Remove the battery connector bracket.
Does it matter if the brackets arent put back in the phone? I bought a used phone and brackets are missing. Thanks!
Auch die Abdeckung ist angeklebt. Also mit etwas Vorsicht und Geduld rangehen.
If you have forgotten your High School German -
The cover is also glued. So take some care and patience.
My bracket actually has a black wire connected on the underside that is attached to the metal bracket (with screw) below it in the picture. I decided to leave it on and just move it to the side.
-
-
-
Bend the connector back to ensure it doesn't make contact and power the iPhone on while you're working on it.
When putting the new battery in, make sure to line up the plug and not to the top of the battery… our battery was smaller so the plug would NOT have lined up if we used the top of the battery. ALSO, the plug was NOT 90 degrees so we had to finagle the plug. Also, make sure there is a clear CLICK when you plug in the connector or it may not work. Ours went in but guess didn’t go far enough so we had to take the screen off and push it harder until we heard the “click” then it worked fine.
-
-
-
Remove the following Phillips screws:
-
Three 1.3 mm screws
-
One 1.6 mm screw
-
One 3.0 mm screw
I really don't see value in removing screen use box and rubber band keep at 90 degrees.
I leave screen on as well for this. - Tho I prefer a 45 degree lean.
Thor -
I just changed my battery and also left the screen attached. I was lucky enough to get all 3 adhesive battery strips out clean so I didn’t have a struggle with the battery coming out. If I was going to need to get rough with it I was going to take the screen off at that point.
To keep track of screws, draw a quick outline of the display cable bracket/cover, with five dots where screws should be. Drop the screws on the corresponding dot. Helps if you use magnet pad.
Better yet, print out the pictures from the iFixit website, and use clear tape (“Scotch tape”) to TAPE the screws onto the place in the picture where they belong.
Tom -
Which screwdriver from the kit do I use for which screw?
I made a mistake and unscrewed the screw just north north west of the one circled in yellow. Of course I lost the screw. Can anyone give me any guidance about this? what does the wire connected to it do? What is the size of the screw, in case I have to replace it?
P.S. This is another reason to consider the possibility of NOT removing the screen just to replace the battery: removing the screen presents a additional possible headache, especially for people like me with bad eyesight who probably shouldn’t be doing this in the first place.
It is a 1.4 mm Phillips screw holding the NFC bracket in place.
I didn’t think this was necessary, bit I see it relieves stress on the front-facing camera and sensor cable connector; I did not disconnect the display connector nor remove the display screen.
I second this finding. I too did not remove the screws nor the bracket. The cables look a bit stretched, but certainly not strained.
-Gamma
This step of separating the two parts of the phone deserves careful consideration. In my case, I had propped up the display assembly with a box and rubber bands. However, only 2 of the battery adhesive strips came off easily. The effort to remove the battery with the display assembly attached was not a good move on my part. I jarred the ear speaker cable and after reassembly I had no camera or working ear speaker. Taking off these 5 screws and removing the three cables is not difficult. My suggestion: is you have ANY trouble removing the 3 battery adhesive strips, STOP, separate the two components, and then continue with the battery removal. Don’t struggle removing the battery with the display assembly attached. (I replaced the ear speaker cable, and all is working now)
Thanks for this tip! I am having a really hard time removing this plate because one of the screw heads are stripped. So I’ll try removing the battery adhesive strips first to see if I can get the battery out without removing the screen.
Use dixie cups and label them for each part you take out. You can stack the dixie cups to keep them in order.
OMG…. SO excited! It works! Seems that missing screw wasn’t an issue. The reason I’m so excited is, I’m a senior and have bever attempted anything like this before and was worried I’d mess it up, or it just wouuldn’t work for whatever reason. I know I never would have tried if it weren’t for finding this site, the great service, parts to do it and the videos/guides. Thank you so much ifixit. :-)
-
-
-
Use a plastic opening tool to disconnect the front-facing camera and sensor cable connector.
FYI, in the video she uses the spudger for this but I think either one will work.
I don’t recommend using the spudger for this as you can do more damage that way. I scratched the black square thing underneath.
-
-
-
Use a plastic opening tool to disconnect the digitizer cable by prying it straight up from its socket on the logic board.
“When reconnecting the digitizer cable, do not press the center of the connector. Press one end of the connector, then press the opposite end. Pressing in the center of the connector can bend the component and cause digitizer damage. “
The following note above was so helpful. I was speeding through the process of getting things back together, since it seemed easy to connect the digitizer cable, but I kept pushing it in the middle and I wouldn’t connect. Until I read through this step and realized it was easier if I would’ve connected one side and then the opposite side right after.
Don’t be too shy when pushing the ends of the digitizer connector back to place. If it does not connect properly, you might face the “half backlight” problem, even if you did not kill any LCD filter. Also check carefully, that you don’t clamp parts of the sticky sealing material placed around the connector inside the connection area.
This part was a very frustrating experience for me. I thought that my replacement screen was just poor quality, as it worked when it wanted to work. Pressing home/power repeatedly sometimes brought it back, charging to 100% also brought it back. The actual problem was that it is very easy to get some of the gasket material caught in the connector, which I couldn’t see until I used my jeweler's loupe. I used 91% alcohol to carefully clean all of this off until all pins were shiny, and it took about 6 tries to get it right. However, the screen’s been running well for 2 days now. I already bought another screen replacement which I have for a spare as it was 100% not the problem.
I followed all the steps, so the sound is missed. What could be happened? thanks a lot. Fabio Balbino
-
-
-
Disconnect the home button/fingerprint sensor cable by prying it straight up from its socket on the logic board.
How much is this to replace?
And where could I buy from?
You can buy these at iFixit: iPhone 6s LCD and Digitizer - Original LCD
After finishing the assembly I got the message “Touch ID cannot be enabled on this phone”. I found this connector was loose. Plugged it back in and that fixed it.
Thanks for the tip. Same thing happened to me, some leftover adhesive was in the way!
Always make sure to disconnect the battery before you do any work on the phone replacing any parts the digitizer or anything. And before you start make sure the phone is turned off you don’t want any power surges. If you also have a static electricity bracelet that also is a plus to use but isn’t a necessity just a nice piece of mind. Some cases you do need to use one so you don’t discharge static electricity to an electrical component and mess it up.
What is the cable and how is it connected/fixed to the motherboard between the bottom socket and the screw hole.
Mine came loose somehow?
I figured out my own question its the Wi-Fi diversity antenna cable. But how is it connected/secured to the motherboard?
i pressed on the center of the digitizer connection. and the bottom half of my screen didnt work. i then took that same front panel assembly and tried to install it on another old iphone 6s+ and i had the same issue.
can i still fix it?
what exactly is broken now?
@mynameisoli Honestly this just sounds like a defective screen to me, but it’s hard to say for sure. Look closely at the connector at the end of the ribbon cable and check it for damage. If it’s slightly bent/curved, all the pins won’t make good contact in the socket. You can try bending it back so it lays flat, but you have to be very careful not to damage the connector or contaminate the pins with skin oils, so it’s tricky—and it may be harder to return as “defective” if you mess up the connector. So try this at your own risk. Apart from that, I would just return it and try a different display. Good luck!
The 6s plus screen repair kit i bought has the wrong size cable here on the replacement part. SOL.
I changed the battery on my iPhone and put all together again and charged it. When I pressed the home button the lock screen with my picture appeared and when I pressed it again the screen with the digits from 0 to 9 appeared. I was asked to enter my passcode, but when I did that nothing happened, the phone did not open.
What could be wrong? Is the home screen cable not fully connected or what could be the reason for this?
-
-
-
Remove the display assembly.
For instructions on home button swap out to the new screen you just installed, go here
Do you know whether the adhesive contributes to waterproofing, or just for stability/adhesion?
@kitabel The iPhone 6s case isn’t waterproof, so I don’t think adhesive around the display is contributing anything other than stability. The 6s series does have some water resistance, but it’s mostly internal and not something Apple advertises.
If you have a replacement adhesive for the display, you may need to install it before reconnecting cables to the components. If the adhesive wraps all the way around the display, it will be impossible to install it once the display is reconnected.
These instructions worked great for me. Thank you!
-
-
-
Use tweezers, or your fingers, to peel up the black pull tab on one of the adhesive strips.
OK - second most challenging part of the swap. TAKE YOUR TIME! It is hard to pull the strips out without getting them caught on the metal edge parts inside which can tear them, but do them one at a time, pull slow but steady, and as it stretches, grab the tape closer down near the body of the phone. You will not believe how far these things can stretch!
I was successful with getting 2/3 of them out but the one closest to the guts - the first one I tried to hurry - broke off. I got the other two out then needed to use a credit card to get up & under to loosen the battery. Another video I saw showed slightly warming up the back of the phone using a hair dryer set on low which would loosen the adhesive, but I did not do that. I was able to get the battery up far enough to use the tweezers to grab the adhesive and then pull it out.
Slightly warming up the back of the phone using a iOpener, just before pull the strips, is definitely a good solution for me :)
I agree, pulling one at a time worked for me. I think pulling all at the same time may be faster but pulling one at a time may be safer because you can react to each single strip as it tugs and releases and then tugs again. Just pull slowly and when it tugs (stops releasing) just maintain a slight tension until it releases again. At one point, one started to tear so I eased up and slowly continued with what was left and it eventually released enough so I could continue with the whole strip. Good practice for patience! XD
kevin -
I’m absolutely stuck here. I don’t see the adhesive strips at the bottom of the battery. I only see the flat cable that wraps around the bottom of the battery, which is now separated. I don’t think it was supposed to separate like that.
Because of the Taptic engine assembly, it is almost impossible to pull the adhesives at the optimal, less-than-60-degrees; even when I removed the two-piece assembly, two of the adhesives — middle and the one adjacent to the battery connector — on my wife’s 4-y/o 6s Plus broke.
I would definitely recommend either iFixIt’s “Opening Picks” or “Plastic Cards”; an old driver license (CA) or drive license would work. Just be aware that the edge of the plastic will show some wear and some sharp edges. I was able to loosen about a quarter of the batter from the bottom left, enough to lift (and slightly deform) the old battery to be able to use the tweezers to grab the broken end and pull along the long-edge of the old battery to remove.
Finally, do a check by positioning the battery, with the adhesive film still in place, and make sure the battery connector is lined up with the port on the iPhone: use the spudger to gently crease, if needed, the battery connector “flexible arm” so that the connector lies flat.
Not mentioned in main steps, it may be helpful to apply some heat to back of phone (put face down on a table and use a hair dryer. Be sure not to heat too much, just enough so it is still touchable and can be held. My center strip tore and had to slowly work from the side and was finally able to tweezer in to grab last tape strip to remove. Caution as battery punctures could lead to a fire!!
Never could get a finger hold. Why, Because there were two, not three strips and the tabs were way too small to finger-grab. Tweezer-pulling always tore the tabs and adhesive before I could get enough to finger-grab. However, even with a adhesive-shred-tweezer-hold I could wind until there was enough that I could pull with the tweezers.
-
-
-
Pull the strip out slowly and steadily at a low angle. Give it plenty of time to stretch and un-stick from under the battery.
-
Repeat the process for the remaining stretch release adhesive strips.
When I did this, the 5 inch strip stretched to about 3 feet.
I found it easier to pull out one strip at a time. There really isn’t need to pull all three at the same time.
Starting from the left, pull the strip to the center strip with tweezers, then punch together with left fingers. Next, pull the right strip with the tweezers to the two already together. Grab all three with left fingers. It is a little difficult, but just do as common sense tells you.
Grabbing them separately was also easier for me and always going to the newly appearing material. You will also hear very strange noise…
I would absolutely NOT try to pull all three simultaneously. You’re sure to break at least one of them off. Do them one at a time, slowly, and don’t pull acroo the others as you do: just pull straight down.
-
-
-
If you're still having trouble removing the battery, apply a few drops of high concentration (90% or higher) isopropyl alcohol under the edge of the battery in the area of the broken adhesive strip(s).
-
Tilt the phone up so the isopropyl alcohol can flow toward the adhesive strip.
-
Hold for 1–2 minutes to allow the isopropyl alcohol to weaken the adhesive.
-
Use an opening pick or the flat end of a spudger to slowly pry up the battery.
Use a set of curved tweasers to pull each strip clear of the bottom left corner of the battery. Then the strips will pull out alongside the battery and the frame almost effortlessly. Do this for each strip and your battery should almost fall out.
I found it better to pull one strip at a time
Do them separately or they will probably rip like mine did :(
Pulling them separately is a good idea especially if it’s your first time. My middle strip tore at the beginning and I had to pry the battery up and then I was able to remove the remaining strip of adhesive. While prying the old battery in an upward angle it did start to bend I believe I achieved a 35 degree angle
Definitely agree one at a time - see my comment above for more detail. Also possible to slightly warm the back of the phone first using hair dryer set on low. This loosens the adhesive if for some reason you break a strip off & have to pry the battery out (CAREFULLY)
I used a hair dryer to warm the back of the phone, and I still broke two of the three “taffy stickers”. If I did it again, I would keep the back warm with a hair dryer, and gradually pull one piece straight out at a time at as low an angle as possible. Unfortunately, the small backers came off my perimeter adhesive, so as I pulled the taffy stickers out, it stuck to the perimeter adhesive and messed it up. Perhaps remove the battery before applying the new adhesive around the edge of the phone? Everything was going well for me until this step.
Nightmare. All three strips broke. I did get the battery out with a combination of dental floss, a guitar string, and a few cut-down credit cards. But the adhesive is very strong even when warmed, and the outer wrapper of the battery tore during removal. I was afraid of it heating up and sparking, as I have seen other damaged lithium ion batteries do.
If your battery is bend, DO NOT TRY TO RE-FLATTEN it again cause my battery were BURNT. luckily i’ve drain the battery beforehand till <28% but next time i’ll drain it until <5% to reduce the energy if it catch fire, i believe if the battery is in full charge it will explode. Dont try to extinguish the battery since it will not until it all the energy is burnt. Just keep it controlled. And REMEMBER TO DRAIN YOUR BATTERY BEFORE DETACH.
Pull all three steadily at an angle just above the metal components below the battery. Wrap the strips, in a looping motion, around your finger to take up the slack, similar to winding dental floss - they stretch far, as stated, and circulation in your will be to be cut off - get through it with out too much dilly-dallying.
I put my phone on a heating pad while extracting the tape. Worked like a charm.
afelton414 - 답글
Pull the strips really slowly. The glue itself will just flow away with constant force, whereas increasing the force will tear the tape. Once you have got to the force where the tape is slowly peeling away, try to keep that force constant as far as possible.
All three strips broke off for me (this is my 3rd time replacing the battery), even after using an iOpener to apply heat to the bottom of the device. What works for me best is to use a few drops of 90% isopropyl under the battery. I let it soak for about 10-15 seconds, then with a plastic credit card, slide it under the battery until eventually the strips let go.
-
-
-
Remove the battery.
-
Adhere the battery, disconnect it, and continue reassembling your device.
I recommend putting the battery in place BEFORE putting the new adhesive strips to make sure you know for sure that the battery connector lines up with the socket. I ended up with a battery wire that was just a bit too long and I mounted the battery way at top of the pocket (big mistake). Even after moving the battery down, the connector wire was still a little too long, so I had to connect the battery and shove the wire between the battery and logic board as much as I could. Checking the battery beforehand could save some adhesive strips from going to waste.
Thanks for the tip, joetalaga!
I would recommend using a little grease on the tip of the screwdrivers to stick the screws to the driver (even thought they’re magnetic). Commonly, dielectric tune-up grease from automotive stores - it did WONDERS in not fumbling or losing screws.
I also recommend a test-fit of the battery before applying the adhesive strips to be familiar with the needed battery location i.e. where the connector needs to be placed.
Note: the connectors DO snap in place.
Where the heck do you put the replacement strips, how do I know which way to put them. How do I know where to place them?
Hi, refer to our iPhone Battery Adhesive Strips Replacement guide for instructions on where to place the adhesive strips.
I can’t believe they left this part out. It’s not in the video either
What about Nohon Batteries? it is good, or no?
“temporarily reconnect the battery connector to the logic board socket” This is key!
can i use wd40 spray instead of isopropyl alcohol to soften the gasket under the old battery
-
-
-
Remove the two 2.7 mm Phillips screws over the audio control cable bracket.
-


다른 14명이 해당 안내서를 완성하였습니다.

Make sure you use the correct screw driver tip to remove these screws, which for the iPhone 6s Plus is the P2, otherwise you may strip the tip of the screw making it 10 times harder to remove. If once the screw is lose, it will not come off, use a magnet to remove it.
Miguel Perez - 답글
If I do it by myself, will it damage the water resistant strip?
I know iphone 7 have it ,but I am not sure 6s plus have it.
Ganqian Zhu - 답글
iPhone 6s has an adhesive gasket under the display, similar to the iPhone 7—however, it doesn’t add much in the way of waterproofing since the 6s has non-sealed openings in other parts of the phone. Water resistance on the 6s is primarily internal (seals around the logic board connectors, etc.). It may still be worthwhile to replace the adhesive on the 6s in order to help keep the display firmly seated so it doesn’t move/wobble at all under pressure, but the phone will continue to work fine whether you replace the adhesive or not.
Jeff Suovanen -
Salve nella procedura iniziale di smontaggio display con la ventosa non è menzionato il fatto di scaldare i lati del display per “ammorbidire” la striscia che incolla il display alla scocca.
Non è necessaria la cosa o è consigliabile ?
grazie
Hello, in the initial disassembling procedure with the suction cup, it is not mentioned how to heat the sides of the display to "soften" the strip that glues the display to the body.
Is not the thing necessary or is it advisable?
thank you
Daniele - 답글
You’ve probably received your answer by now but for future enquirers, it does help the process of taking the screen off if heat is applied to the screen. If you have a hair Dryer use that on a low setting to heat the edges of the screen until it’s almost too hot to touch then slip very thin metal spudger around the edge to cut the adhesive. The carefully lift the screen with the help of the spudger and continue with your repair
Cheers Wayne
Wayne Lyell -
How do I know that the Battery has ZERO Charging Cycles on it when it arrives ? Is there a (downside) to Higher Capacity batteries ? It is INCREDIBLY DIFFICULT to maintain a “Zero Chinese Products Lifestyle”, so how do I know that I’m not getting a deficient Chinese battery, potentially a refurb. battery ?
integritybuilders - 답글
When your repair is complete, you can use coconutBattery to check your new battery stats and cycle count. (A properly tested battery may already have a charge cycle or two on it.) Avoid higher capacity batteries on iPhones—they’re generally either gimmicks, unsafe, or both. As far as the quality of the part, that comes down to how much you trust your supplier and whether they guarantee the product.
Jeff Suovanen -
So I need to empty the battery to zero percent?
johnpatrickanat - 답글
Below 25%, exactly as stated in the instructions. There’s no benefit to draining it further than that, and in fact you’ll slightly shorten the service life of the battery by draining it all the way to zero. Follow the instructions exactly as written—if you go off-script, you’re a lot more likely to break something.
Jeff Suovanen -
So my screen shattered completely and the screen first had colored lines on tge while right side then it went out completely. If i get an lcd and digitizer replacement I'd that oing to fix it
shellietheleo - 답글
I would initially recommend a well-lit, comfortable area and placing the screws on a white piece of paper with the screw sizes written down (apparently there are magnetic mats, also). Also, I found placing the phone on a paper towel is good so that if a screw is dropped, it will lessen the likelihood of bouncing away.
Lou Fazio - 답글
I recommend that, before you even lift a screwdriver or plug in the hair dryer, get a piece of paper and a pencil. As you unscrew and remove the parts, write the size and/or number for that step and put them by their label. I also used a microscope to identify the screw heads (I'm 75 and my vision is not what it used to be). Laying them out in order, I just went backwards when putting them all back in. I used an anti-static cleaning cloth instead of paper, but I should think they both will work.
N.B.: my kit had a nice pretty blue plastic sheet with a black outline on it. It was only when I put the whole phone back together and was packing up the supplies and tools that I realized it was a replacement gummi seal. A LABEL WOULD BE VERY USEFUL HERE!
I am a retired engineer, and aside from the size of the bits and bobs, it was a piece of cake! Thanks...you saved me $75!
P. Roberts - 답글