이 버전에는 잘못된 편집 사항이 있을 수 있습니다. 최신 확인된 스냅샷으로 전환하십시오.
필요한 것
-
-
분해를 시작하기 전에 iPhone 전원을 꺼주세요.
-
iPhone 하단 가장자리에 위치한 3.5mm-길이 pentalobe/펜타로브 나사 두 개를 빼주세요.
-
-
-
iPhone 스크린 전체가 덮일 때까지 투명 포장 테이프를 겹쳐 붙이세요.
-
만약 다음 몇 과정에서 흡입 컵이 스크린에 잘 붙지 않으면, 강력 테이프(덕트 테이프 등)를 접어 손잡이 형태로 만들어 붙이고 들어 올리세요.
-
-
-
파란색 손잡이를 뒤로 당겨 안티-클램프의 팔을 잠금 해제하세요.
-
팔을 휴대폰의 왼편 또는 오른편 가장자리 위로 밀어 주세요.
-
흡입 컵을 휴대폰의 하단 가장자리 홈 버튼 근처에 배치하세요—전면에 하나, 후면에 하나.
-
적절한 위치에 컵을 함께 꽉 쥐고 흡착하세요.
-
-
-
iOpener를 가열하여 안티-클램프의 팔에 끼워 넣습니다.
-
iPhone 하단 가장자리에 놓이도록 iOpener를 접으세요.
-
접착제가 풀려서 틈이 생길 때까지 1분 정도 기다리세요.
-
안티클램프가 충분히 큰 틈을 만들면 스크린 밑에 여는 픽을 끼우세요.
-
다음 세 단계는 건너뛰세요.
-
-
-
-
하단 디스플레이 케이블 브래킷을 로직 보드에 고정하는 다음 길이의 Phillips/십자 (JIS) 나사 네 개를 풀어주세요:
-
1.3mm 나사 두 개
-
1.4mm 나사 한 개
-
2.7mm 나사 한 개
-
-
이 단계는 번역되지 않았습니다. 번역을 도와주십시오
-
Remove the two Y000 screws securing the rear camera connector cover bracket:
-
One 1.4 mm screw
-
One 1.4 mm (nonferrous) screw
-
-
이 단계는 번역되지 않았습니다. 번역을 도와주십시오
-
Remove the two screws securing the rear camera module cover plate:
-
One 1.8 mm Phillips screw
-
One 2.7 mm (nonferrous) standoff screw
-
-
이 단계는 번역되지 않았습니다. 번역을 도와주십시오
-
Use an iFixit opening tool or a fingernail to disconnect the two camera cable connectors by prying them straight up from their sockets.
-
-
이 단계는 번역되지 않았습니다. 번역을 도와주십시오
-
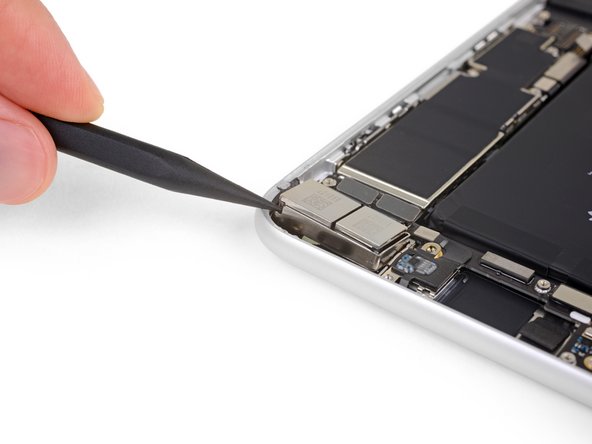
Use the flat end of a spudger to pry up the rear-facing camera assembly from the top edge of the iPhone.
-


다른 46명이 해당 안내서를 완성하였습니다.


댓글 5개
Worked Amazing! I feel so accomplished doing this myself! Thanks for the Step By Step guide! I can’t wait to fix something else now!
I completed this repair on this iPhone 8 Plus after I damaged the cameras myself. I managed to succeed in chipping off all of the back glass panel of the phone successfully. Removing this shattered panel was the hardest iPhone repair job I have ever done. At the very end, I attempted to wiggle off the metal housing over the cameras that was originally part of the back glass. After removing this housing, I discovered that I had damaged both cameras. In retrospect I should have removed the cameras from the inside of the phone before prying off this housing.
The back glass removal is the most impossible task for this phone and should be attempted only by crazy people with an appetite for pain. I will document with a “repair story.” —CW
Any idea on what the cable running beside the camera to the right is for? Mine is broken and can’t seem to figure out what it is for.
I'm also wondering what that cable running beside the camera to the casing is used for. I can't find the correct screw to fix the cable to the casing as I have purchased a replacement cable and want to install it correctly. What screw dimensions and type of screw fits that cable to the casing?
ahjohl -
Does anyone know if you can 'extend' the camera connector cables? I'm trying to make a bespoke CCTV system from old iPhone I have lying around using manythings...