이 번역은 원본 안내서의 최신 업데이트를 반영하지 않을 수 있습니다. 번역 업데이트를 돕거나 아니면 원본 안내서 보기를 참조하세요.
소개
이 안내서를 따라서 iPhone XR 이어피스 스피커와 전면 센서 어셈블리를 분리, 이동 및/또는 교체하세요. 이 어셈블리는 이어피스 스피커, 마이크, 주변 광 센서, 플러드 일루미네이터 및 근접 센서를 포함합니다.
이 어셈블리는 개별 iPhone과 페어링되어 출고됩니다 그러므로 디스플레이를 교체할 때 기존 디스플레이에서 새 디스플레이로 옮겨야 합니다.
플러드 일루미네이터는 생체 인식 Face ID 보안 기능 중 하나이며 원래 부품을 손상하거나 잘못 설치하면 Face ID 작동이 중단됩니다. 새 부품으로 교체할 경우 Face ID 작동이 중단될 수 있으므로 이 과정에서 이러한 부품이 손상되지 않도록 특별히 주의하여 주세요. 손상된 경우 Apple 만이 Face ID 기능을 복원할 수 있습니다.
필요한 것
-
-
분해를 시작하기 전에 iPhone 전원을 꺼주세요.
-
iPhone 하단 가장자리에 위치한 6.9mm-길이 pentalobe/펜타로브 나사 두 개를 빼주세요.
-
iPhone 디스플레이를 열게되면 방수 봉인이 손상됩니다. 이 단계를 수행하기 전에 교체용 봉인을 준비하거나 봉인 없이 iPhone을 재조립할 경우 액체에 노출되지 않도록 주의하세요.
-
-
-
iPhone 스크린 전체가 덮일 때까지 투명 포장 테이프를 겹쳐 붙이세요.
-
만약 다음 몇 과정에서 흡입 컵이 스크린에 잘 붙지 않으면, 강력 테이프(덕트 테이프 등)를 접어 손잡이 형태로 만들어 붙이고 들어 올리세요.
-
-
-
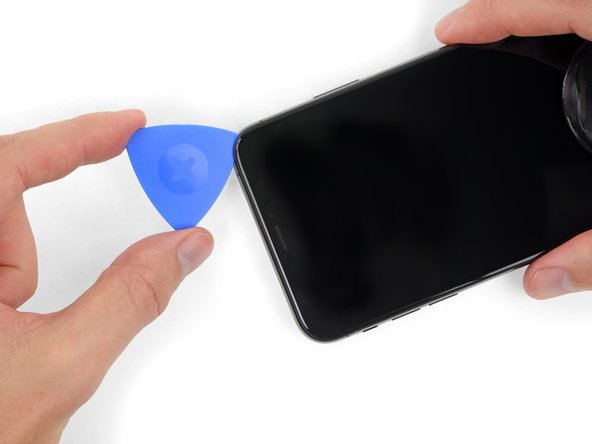
파란색 손잡이를 뒤로 당겨 안티-클램프의 팔을 잠금 해제하세요.
-
팔을 휴대폰의 왼편 또는 오른편 가장자리 위로 밀어 주세요.
-
흡입 컵을 휴대폰의 하단 가장자리에 배치하세요—전면에 하나, 후면에 하나.
-
적절한 위치에 컵을 함께 꽉 쥐고 흡착하세요.
-
-
-
iOpener를 가열하여 안티-클램프의 팔에 끼워 넣습니다.
-
iPhone 하단 가장자리에 놓이도록 iOpener를 접으세요.
-
접착제가 풀려서 틈이 생길 때까지 1분 정도 기다리세요.
-
스크린 자체가 아닌 스크린과 플라스틱 베젤 밑의 틈에 여는 픽을 끼우세요.
-
다음 세 단계는 건너뛰세요.
-
-
-
헤어 드라이어 또는 열선총, 혹은 iOpener를 준비하여 iPhone 하단 가장자리를 약 1분 동안 가열하면 접착제가 부드러워집니다.
besteht da die Gefahr das sich das Displayglas vom lcd löst?
Besteht da die Gefahr das sich der Kleber vom Displayglas löst?
-
-
-
흡입 컵을 확실하고 일정한 압력으로 위로 당겨 전면 패널과 후면 케이스 사이에 약간의 틈을 만드세요.
-
스크린 자체가 아닌 스크린과 플라스틱 베젤 밑에 여는 픽을 끼우세요.
-
-
-
-
로직 보드 커버 브래킷을 고정하는 Y000 나사 네 개를 풀어주세요:
-
1.1mm 나사 두 개
-
1.5mm 나사 한 개
-
3.7mm 나사 한 개
-
-
-
디스플레이 커넥터 브래킷을 고정하는 Y000 나사 세 개를 풀어주세요:
-
1.1mm 나사 두 개
-
1.5mm 나사 한 개
I am replacing the screen for the 2nd time - the first repair was done by someone else, and the first 2 screws are 1.5mm and the last screw is 1.1mm… If I put the screw back in am I risking Long Screw Damage?
Thanks for all your comments! I'll amend this step.
Arthur Shi - 답글
Hi, I just changed the screen on my XS Max and for this bracket I used 2 x 1.1 mm and 1 x 1.5 mm.
Starting from left to right:
- left 1.1 mm (I tried with 1.5 mm like in the above picture but I felt that it didn't wanted to go deeper so I didn't forced and I tried it in the middle and it fit perfectly)
- middle 1.5 mm
- right 1.1 mm
For the two brackets I had 7 screws, I aligned them on the desk by length and I had 2 x 1.5 mm, 4 x 1.1 mm and 1 x 3.7 mm.
Good luck and I hope it will help someone!
-
-
-
접착제가 분리될 때까지 케이블을 조심히 들어올리세요.
-
-
-
스피커/센서 어셈블리를 고정하는 Y000 나사 세 개를 빼주세요:
-
1.4mm 나사 한 개
-
1.5mm 나사 두 개
Ciao @max94949 Quale lunghezza stai cercando? Il passo menziona che si tratta di una vite Y000 da 1,4 mm e di due vite Y000 da 1,5 mm.
-
-
-
Spudger/스퍼저를 사용하여 스피커 어셈블리 상단 가장자리를 살짝 들어 올리고 나서 디스플레이 상단 가장자리에서 멀리 젓혀주세요.
If you are using a refurbished display, check for dirt in the earpiece speaker cutout.
If you have poor quality or low sound after changing the display, use a cotton bud and isopropyl alcohol to clean the earpiece cutout.
-
-
-
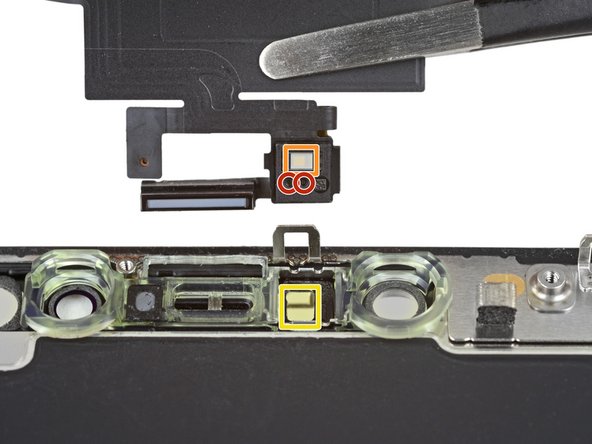
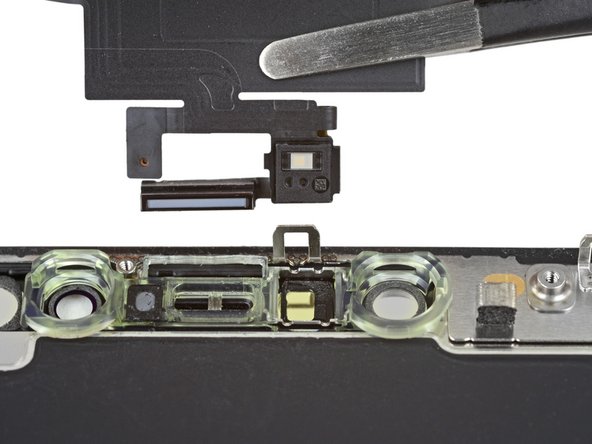
핀셋을 사용하여 주변 광 센서를 흔들고 디스플레이 노치에서 들어 올려 주세요.
This was the most difficult part for me so i erred on the side of caution. I reheated the display in the oven at 85 degrees celsius. Like in the third picture in the next step, i got a razor into the slot below, to get the diffuser a little loose before wiggling the sensor out. I didn't understand the wiggling until i simply rocked it like a boat would side to side like to the top of the display to the bottom on the display, and voila, all came out easy and in one piece with the diffuser still attached.
-
-
-
첫 번째 사진과 같이 전체 주변 광 센서를 성공적으로 분리한 경우 다음 단계로 진행하세요.
-
두 번째 사진과 같이 흰색 디퓨저 스트립이 떨어져서 디스플레이에 박혀 있는 경우 상단 가장자리를 따라 얇은 날 또는 비집어 올리는 도구를 사용하여 조심스럽게 빼내야합니다. 먼저 다시 열을 가하면 이 작업은 더 수월해질 수 있습니다.
I have accidentally damaged flood illuminator will it affect the face id also or if I just replace the Earpiece Speaker and Sensor Assembly it will get fixed.
-
-
-
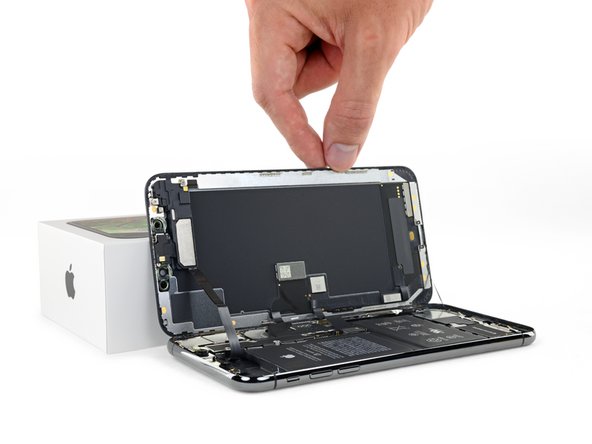
이어피스 스피커 및 전면 센서 어셈블리를 분리하세요.
-
근접 센서
-
플러드 일루미네이터
-
이런 부품이 접착제에 막히지 않도록 모듈을 배치하여 주세요.
Do you have to remove the earpiece speaker and front sensor assembly. If you are taking a screen from another Xs max with it already attached?
The front sensor assembly is part of Face ID, so you must transfer the original assembly to the replacement screen in order to maintain Face ID functionality.
No, you just take the whole unit. Warm it up and remove the glued sensors like described. Handle it carefully, the speaker cable is quite thin. If damaged, you might loose your face-ID functionality.
Does the screen need a reprogamation onto the new screen?
if the pentalope screws are rusted and the driver can’t fit in it to remove them is there any other way to remove them to replace screen?
-


새 교체 부품을 원래 부품과 비교하세요—설치하기 전에 원래 부품에서 남은 부품을 옮기거나 새 부품에서 접착 뒷면을 제거해야 할 수도 있습니다.
기기를 재조립하려면 위의 절차를 역순으로 따르세요.
전자 폐기물을 R2 또는 e-Stewards 인증 재활용 업체로 가져 가세요.
수리가 계획대로 진행되지 않았습니까? 문제 해결 도움말은 Answers 커뮤니티를 확인하세요.
새 교체 부품을 원래 부품과 비교하세요—설치하기 전에 원래 부품에서 남은 부품을 옮기거나 새 부품에서 접착 뒷면을 제거해야 할 수도 있습니다.
기기를 재조립하려면 위의 절차를 역순으로 따르세요.
전자 폐기물을 R2 또는 e-Stewards 인증 재활용 업체로 가져 가세요.
수리가 계획대로 진행되지 않았습니까? 문제 해결 도움말은 Answers 커뮤니티를 확인하세요.
다른 27명이 해당 안내서를 완성하였습니다.
다음 번역가들에게 특별히 감사 드립니다:
91%

Christian Kim님은 저희가 세상을 수리하는데 동참하신 분입니다! 기여하시겠습니까?
번역 시작하기 ›


댓글 10개
Similar but not identical. You can find instructions for the standard XS model over here.
I’m looking for a replacement earpiece speaker, with the ribbon cable that has all the sensors already on it. Seems that all the sensors aren’t removable, specifically the flood illuminator. Any advice? Thanks
Rewa and HCQS uploaded some videos on YouTube. I’m also looking for the whole assembly and wanted to transplant the flood illuminator. It can be done with some soldering. You need microscope, solder gun, and PCB cleaner paste. The replacement must have the flood illuminator. It can be done, but probably you will end up loosing Face ID. It is hard.
I replaced earpiece speaker assembly.
And the new part works well.
But Face ID is not working.
I can not activate Face ID.
What do i do?
Unfortunately, the original front sensor assembly is paired to the phone. Replacing the part will render Face ID inoperable.
So basically, if you do an “at-home”, normal, speaker repair to the ear speaker, you are going to lose FaceID capabilities, period?
Correct. The entire front sensor assembly is replaced together. You may be able to replace the earpiece speaker alone, but it would require very advanced soldering.