이 번역은 원본 안내서의 최신 업데이트를 반영하지 않을 수 있습니다. 번역 업데이트를 돕거나 아니면 원본 안내서 보기를 참조하세요.
소개
iPhone XS Max 스크린이 깨지고 터치에 반응하지 않거나 휴대폰의 전원이 켜졌는데도 화면이 나오지 않는 경우 이 안내서를 사용하여 디스플레이 어셈블리 조립품 같은 새로운 스크린으로 iPhone을 복원하세요.
디스플레이 뒷면에 부착된 이어피스 스피커 결합체 + 센서 어셈블리는 개별 iPhone과 페어링되어 출고됩니다, 따라서 디스플레이를 교체할 때 원래 디스플레이에서 새 디스플레이로 옮겨야합니다. 이 어셈블리는 생체 인식 Face ID 보안 기능 중 하나 flood illuminator/플러드 일루미네이터를 포함하고 있습니다. 손상되었거나 교체된 경우 Face ID 작동이 중단됩니다 그러므로 이 과정에서 부품들이 손상되지 않도록 특별히 주의하십시오. 손상된 경우 Apple 만이 Face ID 기능을 복원할 수 있습니다.
참고: 정품 Apple 스크린을 사용하는 경우에도 True Tone 기능은 화면 교체 후 비활성화됩니다.
필요한 것
동영상 개요
-
-
분해를 시작하기 전에 iPhone 전원을 꺼주세요.
-
iPhone 하단 가장자리에 위치한 6.9mm-길이 pentalobe/펜타로브 나사 두 개를 빼주세요.
-
iPhone 디스플레이를 열게되면 방수 봉인이 손상됩니다. 이 단계를 수행하기 전에 교체용 봉인을 준비하거나 봉인 없이 iPhone을 재조립할 경우 액체에 노출되지 않도록 주의하세요.
-
-
-
기기를 다시 조립하려면 위의 단계를 역순으로 수행하십시오.
-
스크린 전체를 덮을 때까지 iPhone 디스플레이 위에 포장 테이프 스트립을 겹쳐 놓아 주십시오.
-
유리 파편으로 인해 다음 몇 단계에서 흡입 컵이 붙지않는 경우 강한 테이프를 (예: 강력 접착테이프) 접어서 손잡이를 만들어서 디스플레이를 들어 올려주십시오.
-
-
-
iPhone 스크린 전체가 덮일 때까지 투명 포장 테이프를 겹쳐 붙이세요.
-
만약 다음 몇 과정에서 흡입 컵이 스크린에 잘 붙지 않으면, 강력 테이프(덕트 테이프 등)를 접어 손잡이 형태로 만들어 붙이고 들어 올리세요.
-
-
-
파란색 손잡이를 뒤로 당겨 안티-클램프의 팔을 잠금 해제하세요.
-
팔을 휴대폰의 왼편 또는 오른편 가장자리 위로 밀어 주세요.
-
흡입 컵을 휴대폰의 하단 가장자리에 배치하세요—전면에 하나, 후면에 하나.
-
적절한 위치에 컵을 함께 꽉 쥐고 흡착하세요.
-
-
-
iOpener를 가열하여 안티-클램프의 팔에 끼워 넣습니다.
-
iPhone 하단 가장자리에 놓이도록 iOpener를 접으세요.
-
접착제가 풀려서 틈이 생길 때까지 1분 정도 기다리세요.
-
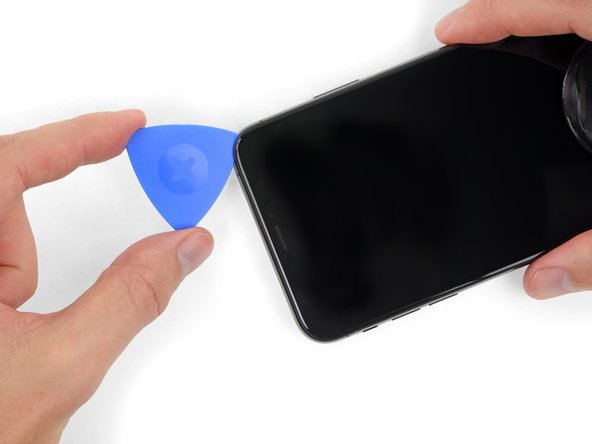
스크린 자체가 아닌 스크린과 플라스틱 베젤 밑의 틈에 여는 픽을 끼우세요.
-
다음 세 단계는 건너뛰세요.
-
-
-
헤어 드라이어 또는 열선총, 혹은 iOpener를 준비하여 iPhone 하단 가장자리를 약 1분 동안 가열하면 접착제가 부드러워집니다.
besteht da die Gefahr das sich das Displayglas vom lcd löst?
Besteht da die Gefahr das sich der Kleber vom Displayglas löst?
-
-
-
흡입 컵을 확실하고 일정한 압력으로 위로 당겨 전면 패널과 후면 케이스 사이에 약간의 틈을 만드세요.
-
스크린 자체가 아닌 스크린과 플라스틱 베젤 밑에 여는 픽을 끼우세요.
-
-
-
-
로직 보드 커버 브래킷을 고정하는 Y000 나사 네 개를 풀어주세요:
-
1.1mm 나사 두 개
-
1.5mm 나사 한 개
-
3.7mm 나사 한 개
-
-
-
디스플레이 커넥터 브래킷을 고정하는 Y000 나사 세 개를 풀어주세요:
-
1.1mm 나사 두 개
-
1.5mm 나사 한 개
I am replacing the screen for the 2nd time - the first repair was done by someone else, and the first 2 screws are 1.5mm and the last screw is 1.1mm… If I put the screw back in am I risking Long Screw Damage?
Thanks for all your comments! I'll amend this step.
Arthur Shi - 답글
Hi, I just changed the screen on my XS Max and for this bracket I used 2 x 1.1 mm and 1 x 1.5 mm.
Starting from left to right:
- left 1.1 mm (I tried with 1.5 mm like in the above picture but I felt that it didn't wanted to go deeper so I didn't forced and I tried it in the middle and it fit perfectly)
- middle 1.5 mm
- right 1.1 mm
For the two brackets I had 7 screws, I aligned them on the desk by length and I had 2 x 1.5 mm, 4 x 1.1 mm and 1 x 3.7 mm.
Good luck and I hope it will help someone!
-
-
-
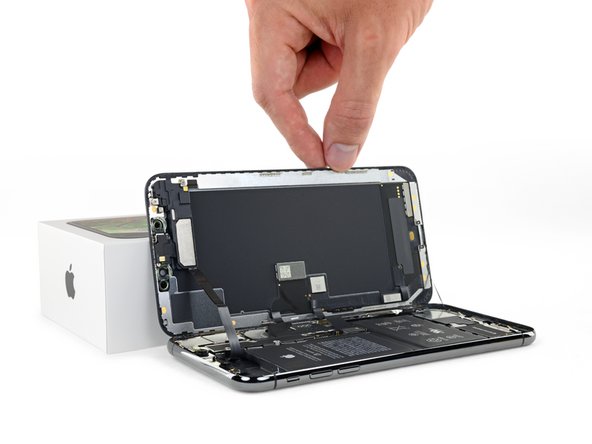
접착제가 분리될 때까지 케이블을 조심히 들어올리세요.
-
-
-
스피커/센서 어셈블리를 고정하는 Y000 나사 세 개를 빼주세요:
-
1.4mm 나사 한 개
-
1.5mm 나사 두 개
Ciao @max94949 Quale lunghezza stai cercando? Il passo menziona che si tratta di una vite Y000 da 1,4 mm e di due vite Y000 da 1,5 mm.
-
-
-
Spudger/스퍼저를 사용하여 스피커 어셈블리 상단 가장자리를 살짝 들어 올리고 나서 디스플레이 상단 가장자리에서 멀리 젓혀주세요.
If you are using a refurbished display, check for dirt in the earpiece speaker cutout.
If you have poor quality or low sound after changing the display, use a cotton bud and isopropyl alcohol to clean the earpiece cutout.
-
-
-
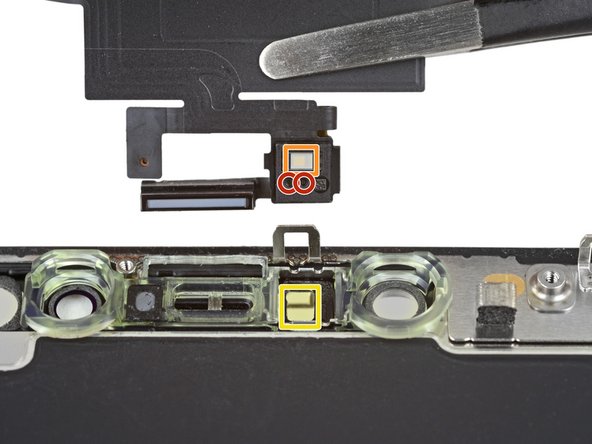
핀셋을 사용하여 주변 광 센서를 흔들고 디스플레이 노치에서 들어 올려 주세요.
This was the most difficult part for me so i erred on the side of caution. I reheated the display in the oven at 85 degrees celsius. Like in the third picture in the next step, i got a razor into the slot below, to get the diffuser a little loose before wiggling the sensor out. I didn't understand the wiggling until i simply rocked it like a boat would side to side like to the top of the display to the bottom on the display, and voila, all came out easy and in one piece with the diffuser still attached.
-
-
-
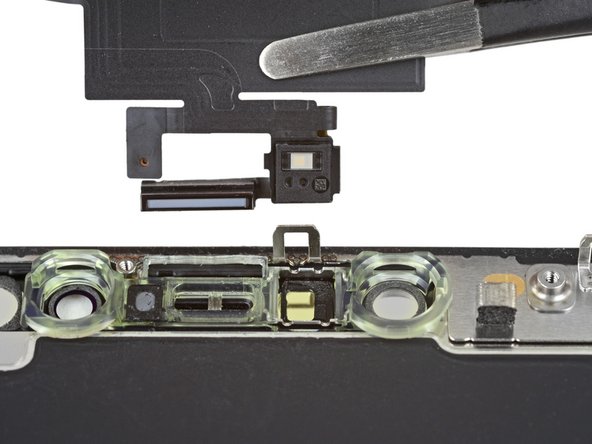
첫 번째 사진과 같이 전체 주변 광 센서를 성공적으로 분리한 경우 다음 단계로 진행하세요.
-
두 번째 사진과 같이 흰색 디퓨저 스트립이 떨어져서 디스플레이에 박혀 있는 경우 상단 가장자리를 따라 얇은 날 또는 비집어 올리는 도구를 사용하여 조심스럽게 빼내야합니다. 먼저 다시 열을 가하면 이 작업은 더 수월해질 수 있습니다.
I have accidentally damaged flood illuminator will it affect the face id also or if I just replace the Earpiece Speaker and Sensor Assembly it will get fixed.
-
-
-
이어피스 스피커 및 전면 센서 어셈블리를 분리하세요.
-
근접 센서
-
플러드 일루미네이터
-
이런 부품이 접착제에 막히지 않도록 모듈을 배치하여 주세요.
Do you have to remove the earpiece speaker and front sensor assembly. If you are taking a screen from another Xs max with it already attached?
The front sensor assembly is part of Face ID, so you must transfer the original assembly to the replacement screen in order to maintain Face ID functionality.
No, you just take the whole unit. Warm it up and remove the glued sensors like described. Handle it carefully, the speaker cable is quite thin. If damaged, you might loose your face-ID functionality.
Does the screen need a reprogamation onto the new screen?
if the pentalope screws are rusted and the driver can’t fit in it to remove them is there any other way to remove them to replace screen?
-


새 교체 부품을 원래 부품과 비교하세요—설치하기 전에 원래 부품에서 남은 부품을 옮기거나 새 부품에서 접착 뒷면을 제거해야 할 수도 있습니다.
기기를 재조립하려면 위의 단계를 역순으로 따르세요.
전자 폐기물을 R2 또는 e-Stewards 인증 재활용 업체로 가져 가세요.
수리가 계획대로 진행되지 않았습니까? 문제 해결 도움말은 Answers 커뮤니티를 확인하세요.
새 교체 부품을 원래 부품과 비교하세요—설치하기 전에 원래 부품에서 남은 부품을 옮기거나 새 부품에서 접착 뒷면을 제거해야 할 수도 있습니다.
기기를 재조립하려면 위의 단계를 역순으로 따르세요.
전자 폐기물을 R2 또는 e-Stewards 인증 재활용 업체로 가져 가세요.
수리가 계획대로 진행되지 않았습니까? 문제 해결 도움말은 Answers 커뮤니티를 확인하세요.
다른 175명이 해당 안내서를 완성하였습니다.
다음 번역가들에게 특별히 감사 드립니다:
50%

Christian Kim님은 저희가 세상을 수리하는데 동참하신 분입니다! 기여하시겠습니까?
번역 시작하기 ›


댓글 37개
Nice guide. I could be wrong but for the first time in a while, changing a display on an Apple phone looks like it’s not anymore difficult than previous models.
John K
the-screen-savers.com
John Knirr - 답글
If you remove the screen but then apply the same screen back on the phone, will True Tone still be disabled?
@onslivion Nope! It'll continue to work fine, so long as you didn’t damage anything.
Hi i broke the Flex cable of the Part.
what i can do now.
is their some Parts for sale?
murtasa972 - 답글
I just switched the screens from 2 phones and both are unresponsive, if put them back to its original logic board the work again, any idea why they dont work? both are original.
Why is True Tone disabled afterwards? Even with an Original Screen how is that possible?
That's normal. There's a chip in the screen that has info that is specific to the original logic board so unless you have a special machine to read/write to that chip, truetone will not work.
This was perfect. It definitely helped me replace the screen on a friend IPhone XS Max!
Every authoritative source (such as Apple Support, Wikipedia) that I read about the iPhone XS Max display states that it has an OLED display - not an AMOLED display, and not an LCD display (such as on the XR model). Yet the parts associated with this guide are LCD (website quirk?) and the written text for XS Max mention AMOLED. Isn’t this important to get right when replacing? The model I have is A1921.
Hi Mark,
The iPhone XS Max uses an AMOLED display. Active Matrix OLED (AMOLED) is a subcategory of the general OLED tech—AMOLED displays contain circuitry which allows them to switch each OLED pixel on or off. Compared to Passive Matrix OLED, AMOLED displays have a higher refresh rate and are more energy efficient . However AMOLED displays are complex, difficult to source, and very expensive to replace (think $200-400 for the part!) Hardware manufacturers sought to resolve this problem by producing LCD replacement screens. These screens are made to be completely compatible with the iPhone XS Max, but are significantly cheaper to replace. They do look slightly different compared to the original screen. Check this link out for a more in-depth review of the differences.
Where is the INSTALL GUIDE this is just removal? And don’t tell me it’s the reverse. I have a small gasket that’s not mentioned in this and it doesn’t explain how to remove the main old gasket or install the new gasket
Where is the installation guide? This is just a removal guide. Don’t tell me that it’s the opposite of removal to install because I have a small gasket that is not mentioned in the YouTube video or on this site in my package
I would like to echo this comment. It is extremely disappointing to see a guide this comprehensive and detailed stop short of reassembly. Especially because some parts need to be transferred from the original display to the replacement one.
Completed the Repair with the more Expensive alternative - the OLED display.
The guide is very comprehensive and covered all the points including looking out for bits left behind!
- I noticed a tiny piece of conductive foam on the old display which i moved to the new one.
The OLED display is top quality, but a little darker due to losing the “True Tone” no doubt.
The Adhesive kit is very good, but separating the two films was a little difficult and messed up the alignment slightly, however I managed to recover!
One more addition I had to make after undertaking this repair.
I had noted that after swapping the display the earpiece was very quiet. I thought that I had missed a gasket, misaligned the earpiece speaker or not plugged in the leads correctly.
Nope. Much simpler than that. CLEAN THE EAR PIECE CUTOUT! *Eeeewwww* After putting up with this for about 4 weeks, I happened to get out the Cotton Buds. A quick wipe revealed someone elses EAR GUNK was clogging up the ear piece cutout !
Disgusted, I got out the Isopropyl and cleaned it (carefully) about 10 times, the audio is now crystal clear.
@ifixit - Please ensure your “Refurbished displays” have a clean earhole. It was pretty gross that it was clogged to the point that I could not HEAR!
Great guide, completely worked for me!
This guide worked perfectly for my iPhone Max XS screen replacement. This is only my second “project” from iFixit (the first was a replacement display screen for my Canon 6D) and both times, miraculously, everything worked. I’m really not sure if it is my skills or the details in the guides (it’s definitely the latter and a tiny bit of the former). The replacement parts are reasonably priced and the toolkits are VERY GOOD in quality.
For this iPhone screen fix, I used a previously purchased toolkit and “borrowed” suction handles (yes, definitely makes a difference and better than the tape alternative—I tried both) from a bathroom rack.
It took me about 3 hours to get this done. I rushed on step one and stripped the first pentalobe screw. Luckily, one stripped pentalobe screw is still OK. I managed to pull it apart by wiggling the screen around (without too much force). I used a hair dryer to heat the frame/adhesive.
Follow the instructions closely and don’t lose the tiny screws. A magnetic screwdriver helped.
I have accidentally damaged flood illuminator will it affect the face id also or if I just replace the Earpiece Speaker and Sensor Assembly it will get fixed.
Step 1: Remove pentalobe screws…is very careful to NOT STRIP THE SCREW…tools provided/metal is not hard enough and is unable to take out the screw in Step 1 and am now currently going out to buy better pentalobe screw driver. THANKS. Why don’t you just provide better tools and increase the cost……………………………………………
Michael Wu - 답글
for me at least once you get use to repairing this it can take around 30 min too an hour but i also repair all devices even phones for living so i do have experience with repairing these
Zach Mentz - 답글
Changing just the glass screen on my iphone xs max and the black part behind the screen is cracked what do I do ?
Executed this repair almost flawlessly. The FaceID flex cable is very fragile and glued down very well. I advise you be careful when removing is as not much pressure at all can cause it to break (Speaking from experience). Other than that the guide was very easy to follow.
This was an incredible guide! With the video, it was the perfect guide and I managed to complete the fix in less than 2 hours.
Can water damaged iphone be restored by replacing screen?
Hey Team iFixit, vielen dank für diese ausführliche Anleitung. Einfach richtig lesen dann macht man auch keine Fehler haha
Last month I ordered and received a new screen/digitizer for my iPhone XS max. Installation was easy and the phone was back on-line in half ah hour. Not for long unfortunately. A week after the replacement, the digitizer became irresponsive. I had to let the battery die and subsequently reboot my phone.
It fixed the problem for one day. Then the digitizer froze up again. I decided I was going to open the phone to check the ribbon cables for faulty connection. Alas, when opening the iPhone,one of the cables between the screen and the main board tore.
I resorted to re-installing my old cracked screen that now has been working flawlessly for one week.
Is there a fix for the broken ribbon cable, or can I return the screen for credit or repair?
Hey, I'm thinking on fixing up my Iphone Xsmax screen will the Face Id still function after replacement
Hello oguntayo tosin, as mentioned in the introduction, for Face ID to work you have to transfer the earpiece speaker + sensor assembly as they are paired to your individual iPhone.
I cant put the display on the iPhone and I dont know why.It just doesn't fit right and rises about 2mm higher than it should.What can I do?
Hello Robin, did you already go through the recommended troubleshooting steps? It sounds like it could be a bracket or elements of the earpiece speaker and front sensor assembly that are not seated correctly or that there is some issue with the clips holding the display. You could also try checking whether your replacement part deviates from the original screen as discussed here. Hope this helps!
If purchasing the OLED option from here, would I be able to use a programmer to enable back True Tone?
There's a couple extra chips near the bottom of the original screen that aren't on the replacement. Are they surplus to requirement?
after re assembly the screen is loose I attempted to open it and re sitting but still loose!!! why???
PLEASE HELP! I have an IPhone XS Max with a cracked screen. It has loads of irreplaceable information on it. I can’t afford to buy a screen right now but I have a brand new screen for a IPhone 6 Plus, I don’t want to install it onto the XS but I was wondering if it could be hooked up long enough to type the passcode and trust a computer so I can download the phone’s contents? Pretty much I just need to know if the cables for the display are compatible.
This is the only thing I could think of that might possibly work and not cost me a bunch of money. I was recently attacked, robbed and assaulted. The IPhone XS Max was recording during the assault but couldn’t back up because I didn’t have any Icloud storage available. If anyone has any other suggestions please help me out. P.s. I have went to the police and they couldn’t care less, I live in a small town and my abuser is a prominent member of the community so I am on my own.