이 안내서에는 최근 변경 사항이 더 있습니다. 최신 비검증 버전으로 전환하십시오.
소개
Follow this guide if you are unsure how to apply custom-cut adhesive to your device. The adhesive could be for a screen, back cover, battery, etc. Read through the entire guide before applying any adhesives.
If the device’s repair guide has specific adhesive instructions, those instructions precede this guide.
For Samsung Galaxy S phones, follow this guide instead.
For iPhones, follow this guide instead.
For iPads, follow this guide instead.
If you are using general Tesa adhesives, follow this guide instead.
필요한 것
-
-
Look over your pre-cut adhesive strips and figure out what they are used for.
-
Screen or back cover adhesives—usually the shape of the device
-
Back cover support adhesives—these will match the contours of components pressed against the back cover
-
Battery adhesives—normally a rectangular perimeter roughly the shape of the phone's battery
-
Component adhesives—they will be contoured to match the various components such as cameras and fingerprint sensors they are designed for
-
-
-
Remove large chunks of adhesives with your fingers, spudger, plastic opening tool, or tweezers.
-
Use adhesive remover or high concentration (>90%) isopropyl alcohol to remove residue from metal surfaces. Wipe in one direction with a lint-free cloth or coffee filter until all the adhesive residue is gone.
-
-
-
-
Before you peel any liners, locate the surface the non-colored side should stick to.
-
To make adhesive application easier, you can align the strip to its intended position on the phone, then tape one edge down to hold the strip in place. This will allow you to peel away the liners and expose the adhesive without losing alignment.
-
Once you have a good idea how the adhesive strip fits on the surface, peel the non-colored liner off.
-
Carefully peel away the center portion of both the white (paper) and black (adhesive) layers, starting with the U-shaped cutout (if present).
-
Peel off and discard the remaining paper liner, exposing the adhesive underneath.
-
-
-
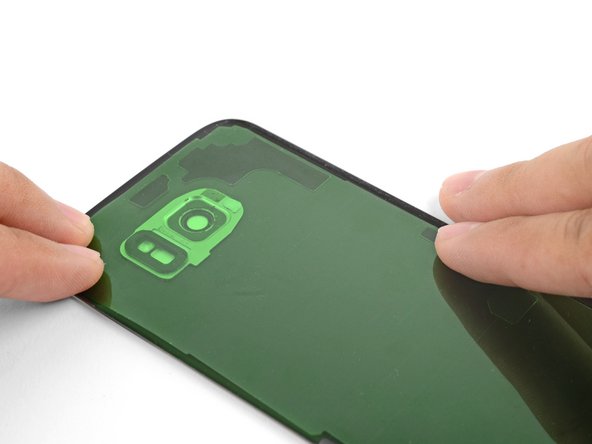
Hold the exposed strip by its tabs and carefully line up a long edge of the adhesive to the edge of the back cover.
-
Set the adhesive onto the surface and press it firmly onto the surface with your fingers.
-
Peel away the colored liner from the adhesive strip to expose the remaining adhesive side.
-


If properly applied, the adhesive should work reliably for a long time.
The repair may not restore the device’s water resistance. Be careful not to expose the device to liquids.
If properly applied, the adhesive should work reliably for a long time.
The repair may not restore the device’s water resistance. Be careful not to expose the device to liquids.
다른 97명이 해당 안내서를 완성하였습니다.


댓글 8개
Diese Anleitung sollte im Akku-Tausch Tutorial verlinkt sein und auch in der Produktbeschreibung. Ich habe diesen Artikel erst gefunden, nachdem ich die Rückseite schon befestigt hatte (zum Glück richtig).
Although obvious to anyone who has used this type of strip, I didn't realize it until my first experience gluing a screen into my phone: the adhesive is ONLY the black goo attached to the strips. Once you peel off the clear side, place the strip and then peel off the coloured side, all that's left is the black goo, hopefully exactly where it needs to be. Mine could be carefully re-aligned with tweezers as necessary before setting the screen into place.
What's the popular recommendation regarding how long to leave weight on these pre-cut adhesive strips?
It merely says 'a few hours'?
Is it okay to check on it or is it like opening the oven door?
It's okay to check, and 2 hours is usualy plenty enough.
If you have any OLED display, DO NOT put books on it!!! Unlike LCDs, some Hard OLEDs cannot handle the pressure. If you have bought a display from ifixit they will also not warranty it and consider it user damage!!! That last section need to put in a warning for OLEDs.