
Samsung Galaxy S III Headphone Jack/Speaker Assembly Replacement

Use this guide to replace the headphone jack/speaker assembly.


-
-
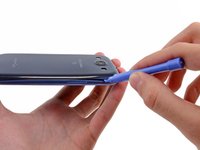
Insert a plastic opening tool or fingernail into the notch in the gap between the rear case and the rest of the phone, located at the top of the device.
-
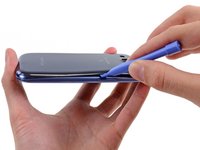
Gently twist the opening tool to disconnect the clips securing the top of the rear case.
-
-
-
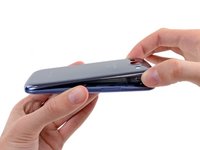
Lift up and remove the rear case from the phone.
-
-
-
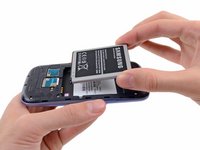
Wedge a plastic opening tool into the small notch above the battery.
-
Pry the battery up out of its recess.
-
-
-
-
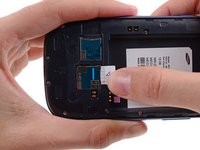
Using your fingernail, push the SIM card slightly deeper into its slot, until you hear a click.
-
After the click, release the card and it will pop out of its slot.
-
-
-
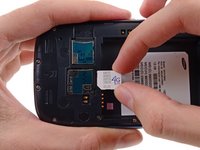
Using your fingernail, push the microSD card slightly deeper into its slot, until you hear a click.
-
After the click, release the card and it will pop out of its slot.
-
-
-
Remove the ten 4.0 mm Phillips screws securing the midframe to the front panel assembly.
What would you use to remove the screws
I used both P#000 and J#00 precision bits to good effect. I tend to prefer the Japanese Standard bits in place of Philips, as the JIS bits seem not to cam out and strip screws as easily.
E West -
-
-
-
Grasp the left side of the plastic midframe with your thumb and forefinger and lift it away from the phone.
I had to use a guitar-pick to pry that section off of the frame. Start at the front-facing camera edge and run the pick underneath the plastic cover. The catches should release.
READ ME!
For a guide that takes you step by step on how to remove the SIM and microSD, I'm surprised they didn't mention the top part of this midframe (still attached, in the pictures). This top part of the midframe also needs to be removed before you can take out the motherboard.
You need to disconnect a ribbon not listed in these directions first, then pry that midframe up with the help of a guitar pick. This ribbon is located by the back-camera, next to the digitizer ribbon. This ribbon is connected to the midframe so it is essential you disconnect this before lifting the frame up.
The frame is really snapped in there so don't be afraid to use a little force - for reference, you will use more force to pull this frame off than you did to pull off the back-cover of the phone. Once this piece is off, your phone should look like the picture in step 14.
-
-
-
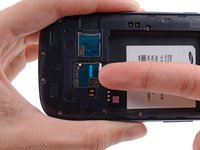
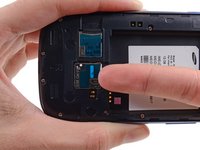
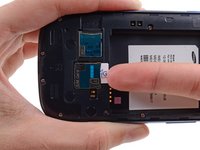
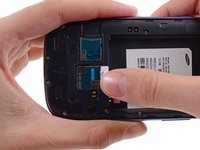
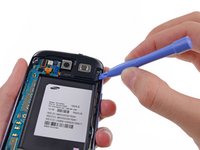
Use a plastic opening tool to pry the rear-facing camera connector up from its socket on the motherboard.
This is not a rear facing camera connector. This is the connector for the lHeadphone Jack/Speaker Assembly
You're right I
-


To reassemble your device, follow these instructions in reverse order.
To reassemble your device, follow these instructions in reverse order.
다른 98명이 해당 안내서를 완성하였습니다.

댓글 11개
Thanks for the guide. It's the most detailed that I have seen so far. I'm looking for a headphone jack assembly replacement part that is compatible with a verizon s3 (i535), but they are difficult to find. Some of the sellers on ebay are advertising that their replacement for the i9300 is compatible with the i535, but I am not sure. Can you please tell me where you purchased your headphone jack assembly replacement?
Thanks!
Wendy
i had the same problem (no sound through the right ear)
i followed the repair guide, teared it apart and then, when i had the jack out of it i used a flashlight and a soldering iron
my guide:
use a very thin soldering iron, make it really hot, put very much solder on it
then stick it in the jack you have to be VERY FAST!!! otherwise the plastic will melt
now you have solder on the contacts and they touch the headphone plug again :)
worked fine for me, but only do this when you know how to solder!
it's a little risky but it's worth it
cheers
Markus
Thanks for the guide. We just replaced speaker assembly in my son's S3 with a $9 part off ebay, and it's working perfectly. Everything went like the pictures except there was slight difference between original and replacement. The hole next to the speaker in the replacement was a full circle, as in the last photo above, but the original was just a half-circle. We had to trim and file the replacement to match. Once we did that, it all snapped back together like new.
Great guide, took onlz 5 minutes. And part from ifixit worked fine.
well done i like
Thank you very much sur
Same , I too have this
PROBLEM
Zaid Ahmed - 답글
I used this guide to repair a Samsung GT-1819ON which is a very similar, possibly UK spec of the phone. With this I was able to remove an obstuction from the audio jack which prevented me selling it on. The problem I was having was removing the plastic midframe Step 12. Once I had done this I was able to access the obstruction, remove it and reassemble. Thanks.