이 버전에는 잘못된 편집 사항이 있을 수 있습니다. 최신 확인된 스냅샷으로 전환하십시오.
소개
iPhone 11 스크린이 꺠졌거나, 터치에 반응하지 않거나, 전원을 켰을 때 사진이 나타나지 않는 경우 이 안내서를 사용하여 새 스크린으로, 일명 디스플레이 어셈블리, iPhone을 다시 작동시키세요.
새 스크린의 후면에 얇은 금속 LCD 실드 플레이트가 이미 포함되어 있다면 대신 이 짧은 안내서를 따라서 더 쉽게 수리하세요. 그러나 플레이트가 없다면 계속 읽으세요. 이 안내서는 화면을 교체하고 기존 LCD 실드 플레이트를 사용하는 방법을 알려줍니다.
스크린 후면에 부착된 이어피스 스피커 + 센서 어셈블리 결합은 공장에서 출고할 때 개별 iPhone에 페어링되어 있으므로 아래 지침을 따라 이전 스크린에서 새 스크린으로 옮겨야 합니다. 여기에는 생체 인식 Face ID 보안 기능의 일부인 플러드 일루미네이터가 포함되어 있습니다. 손상되거나 교체되면 Face ID가 작동하지 않으므로 이 절차 중에 이런 부품이 손상되지 않도록 각별히 주의하세요. 손상된 경우 Apple "공인" 기술자만이 Face ID 기능을 복원할 수 있습니다.
참고: 화면을 교체하고 나면, 정품 Apple 스크린을 사용하더라도, True Tone 기능은 작동하지 않습니다.
필요한 것
동영상 개요
-
-
분해를 시작하기 전에 iPhone 전원을 꺼주세요.
-
iPhone 하단 가장자리에 위치한 6.7mm-길이 pentalobe/펜타로브 나사 두 개를 분리하세요.
-
-
-
iPhone 스크린 전체가 덮일 때까지 투명 포장 테이프를 겹쳐 붙이세요.
-
만약 다음 몇 과정에서 흡입 컵이 스크린에 잘 붙지 않으면, 강력 테이프(덕트 테이프 등)를 접어 손잡이 형태로 만들어 붙이고 들어 올리세요.
-
-
-
파란색 손잡이를 뒤로 당겨 안티-클램프의 팔을 잠금 해제하세요.
-
팔을 휴대폰의 왼편 또는 오른편 가장자리 위로 밀어 주세요.
-
흡입 컵을 휴대폰의 하단 가장자리에 배치하세요—전면에 하나, 후면에 하나.
-
적절한 위치에 컵을 함께 꽉 쥐고 흡착하세요.
-
-
-
iOpener를 가열하여 안티-클램프의 팔에 끼워 넣습니다.
-
iPhone 하단 가장자리에 놓이도록 iOpener를 접으세요.
-
접착제가 풀려서 틈이 생길 때까지 1분 정도 기다리세요.
-
스크린 자체가 아닌 스크린과 플라스틱 베젤 밑에 여는 픽을 끼우세요.
-
다음 세 단계는 건너뛰세요.
-
-
-
흡입 컵을 확실하고 일정한 압력으로 위로 당겨 전면 패널과 후면 케이스 사이에 약간의 틈을 만드세요.
-
스크린 자체가 아닌 스크린과 플라스틱 베젤 밑에 여는 픽을 끼우세요.
-
-
-
Opening pick/여는 픽을 iPhone 하단 왼쪽 모서리부터 왼쪽 가장자리를 따라 위로 밀어서 디스플레이를 제자리에 고정하는 접착제를 잘라주세요.
-
-
-
-
Y000 드라이버를 사용하여 배터리 커넥터 브래킷을 고정하는 1.1mm 길이 나사 세 개를 빼주세요.
-
-
-
Spudger/스퍼저 또는 깨끗한 손톱으로 배터리 커넥터를 로직 보드의 커넥터 소켓에서 들어올리세요.
-
수리 중에 실수로 배터리가 소켓에 닿지 않도록 커넥터를 로직 보드에서 바깥쪽으로 약간 구부려 주세요.
-
-
-
Spudger/스퍼저 끝을 사용하여 스피커 상단 가장자리를 조심히 들어올리세요.
-
스피커 어셈블리를 뒤집어 주세요—디스플레이 상단 가장자리에서 멀리하며.
-
-
-
센서를 고정하는 접착제를 부드럽게하기 위하여 헤어 드라이어, 히트 건 또는 iOpener를 준비하여 디스플레이 상단 전면에 약 1-2분 동안 사용하세요.
-
-
-
마이크 아래에 위치한 플렉스 케이블 밑으로 여는 픽의 가장자리를 조심스럽게 밀어주세요.
-
플렉스 케이블을 압박하거나 손상하지 않도록 주의하며 스퍼저를 조심히 비틀어 주세요.
-
필요한 경우 spudger/스퍼저의 끝을 사용하여 마이크를 전면 패널 노치에서 분리를 완료하세요.
-
-
-
이어피스 스피커 및 전면 센서 어셈블리를 분리하세요.
-
근접 센서
-
플러드 일루미네이터
-
이 부품들이 접착제에 막히지 않도록 모듈을 배치하세요.
-
-
이 단계는 번역되지 않았습니다. 번역을 도와주십시오
-
Use a Y000 driver to remove the 1.1 mm screws securing the LCD shield:
-
Three screws on the side nearest the display cables
-
Two more screws on the opposite side
-
-
이 단계는 번역되지 않았습니다. 번역을 도와주십시오
-
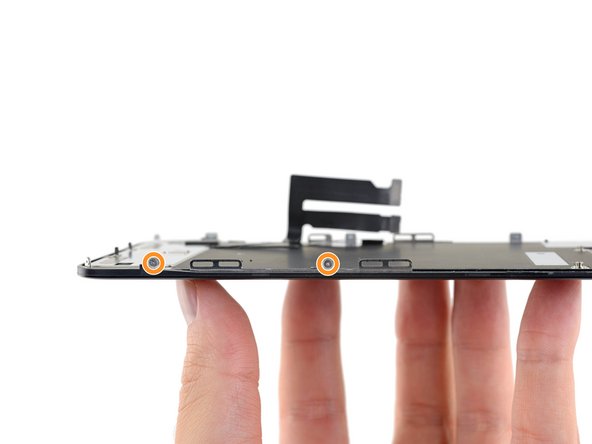
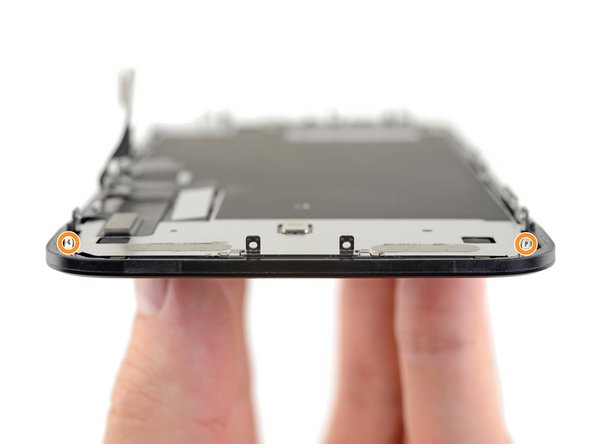
Remove the remaining 1.1 mm Y000 screws from the top and bottom edges of the LCD shield:
-
Two screws near the camera cutouts
-
Two screws at the bottom corners
-
-
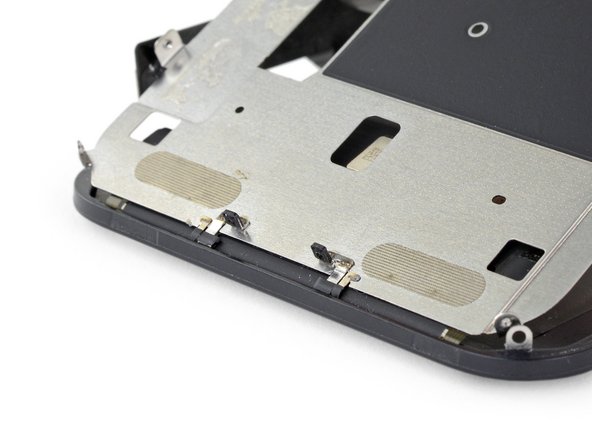
이 단계는 번역되지 않았습니다. 번역을 도와주십시오
-
Apply a little heat from an iOpener (or hair dryer / heat gun) to the back of the display, in order to soften the adhesive securing the display cables to the LCD shield.
-
-
이 단계는 번역되지 않았습니다. 번역을 도와주십시오
-
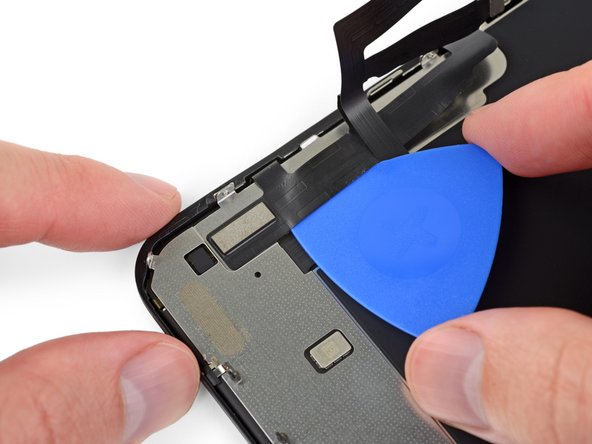
Insert an opening pick between the display cables and LCD shield.
-
Slide it toward the bottom edge of the display to begin separating the cables.
-
Stop when you reach the end of the first cable.
-
-
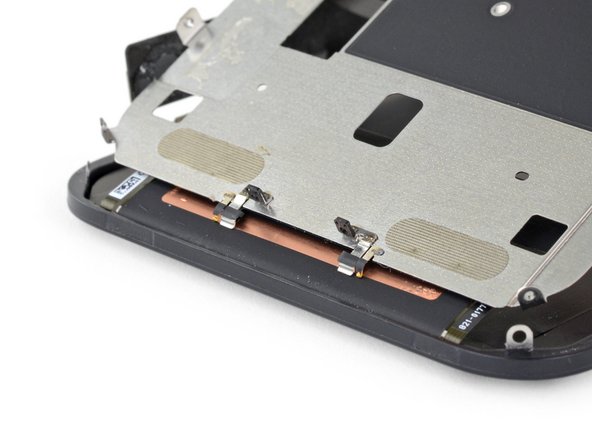
이 단계는 번역되지 않았습니다. 번역을 도와주십시오
-
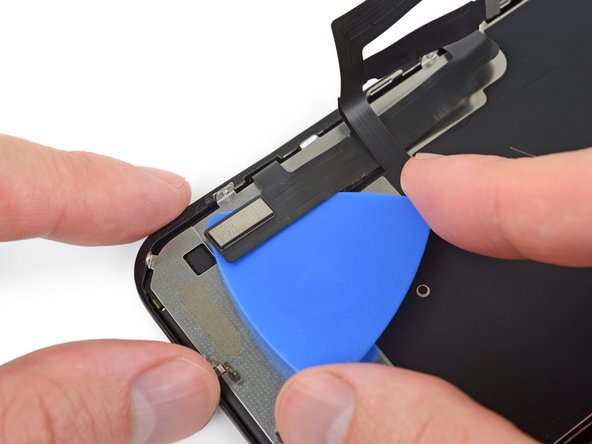
Re-insert your opening pick, this time between the two cables.
-
Slide the pick to the bottom edge of the display to separate the cables from each other.
-
-
이 단계는 번역되지 않았습니다. 번역을 도와주십시오
-
Peel the entire digitizer cable away from the LCD shield, and fold it aside.
-
-
이 단계는 번역되지 않았습니다. 번역을 도와주십시오
-
Insert an opening pick under the top edge of the LCD shield, and twist to separate it from the display.
-
-
이 단계는 번역되지 않았습니다. 번역을 도와주십시오
-
Grab the LCD shield by its top edge and swing it upward a few degrees.
-
Using your spudger, press gently on the lower part of the display cable, pushing it through the cutout in the LCD shield.
-
-
이 단계는 번역되지 않았습니다. 번역을 도와주십시오
-
Raise the top edge of the LCD shield a bit higher, and feed the rest of the display cable through the cutout in the shield.
-
-
이 단계는 번역되지 않았습니다. 번역을 도와주십시오
-
Raise the LCD shield up at a higher angle, until you can see the rest of the display cable stuck to the back.
-
Slide a spudger between the LCD shield and the display cable, and separate them completely.
-


새 교체 부품을 원래 부품과 비교하세요—설치하기 전에 남아있는 부품을 옮기거나 새 부품에서 접착 배킹을 제거해야 할 수 있습니다.
기기를 재조립하려면 위의 단계들을 역순으로 따르세요.
전자 폐기물을 R2 또는 e-Stewards 인증 재활용 센터로 가져가세요.
수리가 계획대로 진행되지 않았습니까? 기본 문제 해결을 이용하거나 자사의 답변 커뮤니티에 도움을 요청하세요.
수리가 계획대로 진행되지 않았습니까? 광범위한 iPhone 문제 해결 자료들, 또는 특히 iPhone 11이 켜지지 않음 페이지를 참조하세요. 기본 문제 해결 팁을 참조하거나 iPhone 11 답변 커뮤니티에 도움을 요청하세요.
다른 173명이 해당 안내서를 완성하였습니다.
다음 번역가들에게 특별히 감사 드립니다:
100%


이 번역자 분들은 저희가 세상을 수리하는데 동참해 주시는 분입니다! 기여하시겠습니까?
번역 시작하기 ›


댓글 23개
I am a repair technician from California, and I use your company’s tools and I gotta say that I love them. Very sleek, and the powerful magnetic bits help me get the job done. I did 5 repairs yesterday and each one finished was a good feeling of satisfaction. In the future, if you guys decide to make some sort of in-depth manual for the newer iPhones, that would be great because diagrams are not only a great way for me to sharpen my own skills, but will help make training new techs a breeze.
Cheers all the way from Fresno!
Hi, I replaced the display independently, not in the Apple service, to my disappointment I found a message in the device that warned me that the part is not original, consequently the FaceID was disabled. Can you tell me about ear? Thank you
Getting a message saying not genuine is known issue. there is no workaround yet. as far as face ID not working, you need to check for tear on the flex as you probably damaged it during transfer. If it’s broken, there is no way to fix.
The Important Display Message can be removed, check here: https://www.youtube.com/watch?v=bLo0_p7O...
Ricky LV -
Great repair guide. My only issues:
1. There are no instructions for removing the metal panel from the back of the old screen (nor how to reinstall it).
2. There are no instructions for removing the old, black adhesive from around the edge of the old case (nor the much needed instructions for reinstalling the new adhesive without damaging it or compromising the purpose of replacing this adhesive). This info is also missing from the adhesive replacement page for the iPhone 11.
I was able to patiently work my way through both of these issues and complete the repair on an iPhone 11. Covering these issues as additional steps of the repair guide would be very helpful for future iFixers.