소개
이 안내서를 사용하여 새 배터리로 iPhone 5s를 되살리세요. 배터리가 부풀어 오른 경우 적절한 예방 조치를 하세요.
이 안내서는 전면 패널 어셈블리를 분리하라고 지시합니다; 이는 디스플레이 케이블 손상을 방지하기 위함입니다. 디스플레이에 무리를 주지 않으며 iPhone에서 배터리를 안전하게 분리할 수 있다면 디스플레이 분리 단계를 건너 뛰고 배터리 분리 단계로 진행하세요.
최적의 성능을 위해, 이 안내서를 마친 후, 새로 설치한 배터리를 교정하세요: 배터리를 100% 충전하고 최소 두 시간 더 충전하세요. 그런 다음 배터리 방전으로 iPhone이 종료할 때까지 사용하세요. 마지막으로, 중단없이 100% 충전하세요.
필요한 것
동영상 개요
-
-
분해를 시작하기 전에 iPhone 전원을 끄세요.
-
Lightning 커넥터 양옆 3.9mm Pentalobe/펜타로브/별나사 두 개를 풀어주세요.
-
-
-
iPhone 스크린이 깨진 경우 유리에 테입을 붙여서 더 이상의 손상을 막고 신체적 상해를 방지하세요.
-
스크린 전체를 덮을 때까지 iPhone 디스플레이에 투명 포장 테이프 스트립을 겹쳐 붙이세요.
-
-
-
사용하는 도구와 관계없이 전체 디스플레이를 위로 당겨야 합니다.
-
첫 번째 이미지와 같이, 유리가 플라스틱에서 분리되기 시작하면 플라스틱 여는 도구를 플라스틱 프레임과 금속 휴대폰 몸체 사이로 밀어서 금속 클립을 케이스에서 떼세요.
-
-
-
파란색 손잡이를 뒤로 당겨 안티-클램프의 팔을 잠금 해제하세요.
-
팔을 휴대폰의 왼편 또는 오른편 가장자리 위로 밀어 주세요.
-
흡입 컵을 휴대폰의 하단 가장자리 홈 버튼 근처에 배치하세요—전면에 하나, 후면에 하나.
-
적절한 위치에 컵을 함께 꽉 쥐고 흡착하세요.
-
-
-
한 손으로 iPhone을 잡고 흡입 컵을 위로 당겨 전면 패널 홈 버튼 끝 부분을 후면 케이스에서 약간 분리하세요.
-
흡입 컵을 위로 당기며 플라스틱 여는 도구로 후면 케이스 가장자리를 비집어 전면 패널 어셈블리에서 멀어 지도록 누르세요.
-
-
-
홈 버튼 케이블을 덮고 있는 금속 브래킷이 보일 정도만 휴대폰을 여세요.
-
Touch ID 기능은 휴대폰의 원래 홈 버튼 어셈블리만 사용할 수 있습니다. 케이블이 찢어져서 새 홈 버튼을 설치하는 경우 Touch ID 기능이 아닌 일반 홈 버튼 기능만 복원합니다.
-
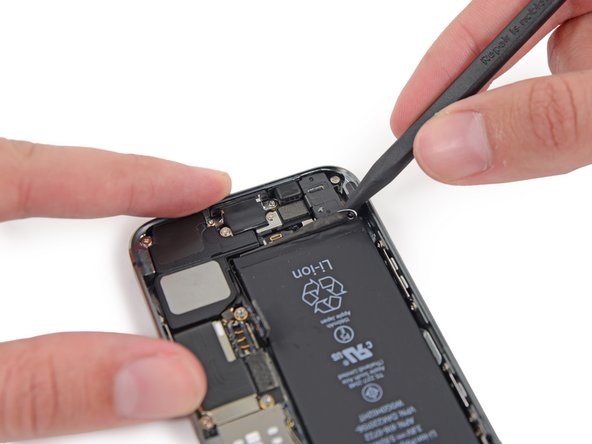
Spudger/스퍼저의 뾰족한 끝을 사용하여 브래킷을 자유롭게 밀고 핀셋으로 분리하세요.
-
-
-
-
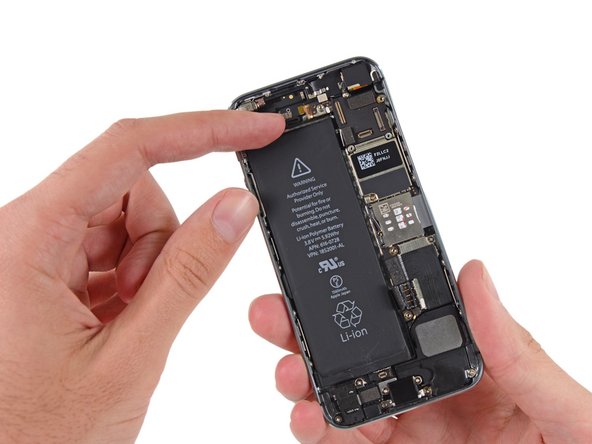
커넥터가 빠졌으면 휴대폰 상단을 hinge/힌지처럼 사용하여 어셈블리 홈 버튼 쪽을 후면 케이스에서 당겨 빼세요.
-
휴대폰을 작업하는 동안 디스플레이를 약 90º 각도로 열어서 어디에 기대어 놓으세요.
-
작업하는 동안 디스플레이를 안전하게 고정하기 위해 고무줄을 사용하세요. 이렇게 하면 디스플레이 케이블에 과도한 무리를 주지 않습니다.
-


새 교체 부품을 원래 부품과 비교하세요—설치하기 전에 남아있는 부품을 옮기거나 새 부품에서 접착 백킹을 제거해야할 수 있습니다.
기기를 재조립하려면 이 지침을 역순으로 따르세요.
전자 폐기물을 R2 또는 e-Stewards 인증 재활용 센터로 가져가세요.
수리가 계획대로 진행되지 않았습니까? 자사의 Answers 커뮤니티에서 문제 해결 도움을 받으세요.
새 교체 부품을 원래 부품과 비교하세요—설치하기 전에 남아있는 부품을 옮기거나 새 부품에서 접착 백킹을 제거해야할 수 있습니다.
기기를 재조립하려면 이 지침을 역순으로 따르세요.
전자 폐기물을 R2 또는 e-Stewards 인증 재활용 센터로 가져가세요.
수리가 계획대로 진행되지 않았습니까? 자사의 Answers 커뮤니티에서 문제 해결 도움을 받으세요.
다른 2080명이 해당 안내서를 완성하였습니다.
다음 번역가들에게 특별히 감사 드립니다:
100%


이 번역자 분들은 저희가 세상을 수리하는데 동참해 주시는 분입니다! 기여하시겠습니까?
번역 시작하기 ›


댓글 224개
If the adhesive breaks without releasing, and you need to use a spudger or similiar to remove the battery, be VERY careful not to damage the Upper Component Cable.
This should've been included in the repair guide, as the adhesive tabs seemed designed to break. My phone is now in worse shape than it was and I'm facing what seems to be an extremely difficult repair, which I will probably not undertake.
A couple of additional pointers might be helpful...
1: I did not get all of the adhesive out from under the battery. As a result, I bent the heck out of the battery & ordered a new one, not trusting a bent one. A mention of whether it would be safe would be nice.
2: I found it impossible to get the clip from step 7 back on. I left it off. If there's a trick to this, it would be nice to have that extra instruction with the reassembly instructions, rather than "reverse order."
3: While this is always a good idea, in the process of trying to get something done, it's easy to forget that you need to remember which screws go back where, especially the 3 different-sized screws from step 10. What an evil thing Apple did there! I laid the bracket upside-down on a piece of tape, and oriented the screws around it so I'd know where they go back upon reassembly a week later. A suggestion of doing something like this might be helpful.
4: I love my iFixit toolkits! But including a pair of tweezers in it would be helpful.
2. I found this piece "snapped" into place reasonably easily, but I was careful to get the orientation correct & make sure the edge against the battery pull was "in under" (for lack of a better term) and not trying to squash the battery pull down.
Hope this helps.
Dave -
1. With regards to the bent battery, you were right to replace it. LiOn Batteries are very dangerous when the cells inside are compromised. Even though the good ones have circuit breakers built in to prevent fire, they can fail. A LiOn battery - even a small one in an iPhone - can go "high order" and cause a fire that is next to impossible to extinguish. A brief search on YouTube for Lithium Ion Battery fires will quickly convince even the skeptical.
2. The way I keep track of screws... Get a complete set of all colors of Sharpie pens. When disassembling, I touch the screw head with the same color pen as the circle in the iFixit Guide. Then when reassembling I know where the green, orange, red, & blue screws go!
Pete H -