이 번역은 원본 안내서의 최신 업데이트를 반영하지 않을 수 있습니다. 번역 업데이트를 돕거나 아니면 원본 안내서 보기를 참조하세요.
소개
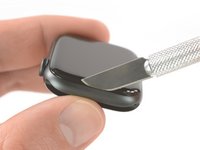
이 안내서를 사용하여 고장난, 금이 간 또는 불량 Apple Watch Series 4 디스플레이를 교체하세요.
디스플레이 교체 후 페어링 문제를 방지하려면 Apple Watch를 watchOS 5 또는 이후 (그리고 페어링한 iPhone은 iOS 12 이후) 버전으로 업데이트해야 합니다.
디스플레이를 교체하면 Apple Pay에 문제가 발생할 수 있습니다. 문제 발생 가능성을 줄이기 위해서, 가능하다면, 디스플레이를 교체하기 전에 모든 Apple Pay 계정 정보를 삭제하고 새 디스플레이를 설치한 다음에 계정 정보를 다시-입력하세요.
이 안내서는 표준, GPS-전용 버전 시계에 대한 절차를 보여 주지만 셀룰러/LTE 버전도 비슷합니다.
필요한 것
-
-
수리를 시작하기 전에, 시계를 충전기에서 분리하고 전원을 끄세요.
-
터치스크린이 고장나서 시계의 전원을 끄지 못하는 경우, 이 대체 방법을 사용하여 전원을 끄세요.
-
-
이 단계에 사용된 도구:Safety Glasses$3.19
-
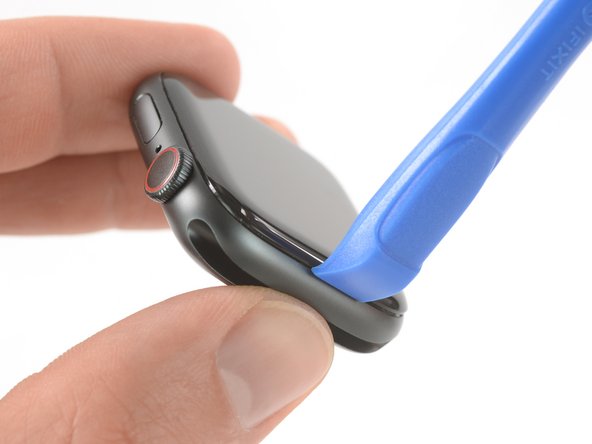
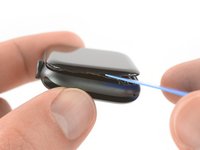
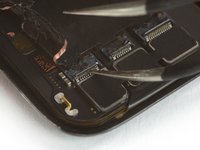
스크린과 시계 본체 사이의 간격이 아주 얇기 때문에 둘을 분리하려면 날카로운 칼날이 필요합니다. 계속 진행하기 전에 다음 경고를 주의 깊게 읽으세요.
-
-
-
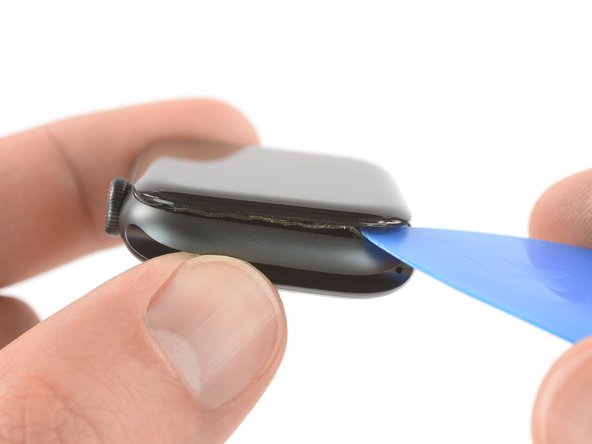
iOpener를 준비해서 (또는 헤어 드라이어 또는 히트 건을 사용하여) 시계 표면을 가열하여 디스플레이 접착제를 느슨하게 하세요.
-
iOpener를 시계에 2분 이상 올려놓고 스크린에 완전히 열을 가하여 스크린을 케이스에 부착하는 접착제를 부드럽게 하세요.
-
-
-
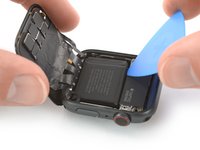
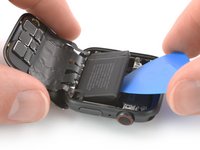
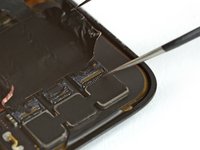
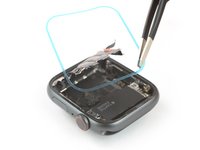
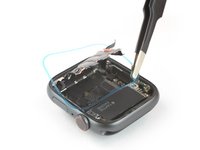
칼날의 굽은 면 가장자리를 디스플레이와 외부 케이스 사이의 얇은 틈으로 넣으세요. 디스플레이의 짧은 면, 디지털 크라운에서 가장 먼 곳에서 시작하세요.
-
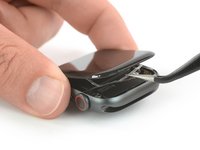
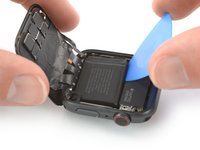
틈 사이로 단단히 똑바로 눌러 넣으세요.
-
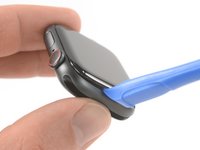
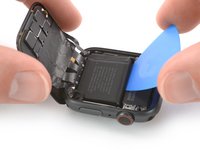
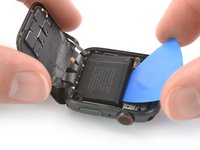
들어간 칼날을 기울여 디스플레이를 비틀어 약간 여세요.
This part is REALLY hard! Even after using the iOpener to warm the watch I had to use A LOT of force to get the blade in between the glass and the case. Be very careful when prying the display. I applied way too much force and my blade shot into the case under the display. I don’t think I damaged anything, but I did replace the force touch gasket to be sure.
I have a stainless steel case, not sure if that makes a difference, and was unable to do this without breaking the screen. Be very careful. Followed instructions but could not get the screen to release no matter how hot I got the watch.
I am moderately experienced at opening Apple devices having replaced batteries in several iPhones, iPods, and an iPad. I could not get the watch open with the x-acto knife blade as shown. I found other sites showed using a 0.1mm thick tool. I bought one and found it relatively easy to open the watch. It has the advantage of going in horizontal rather than vertical so it went between the glass and the force sense gasket. Force sense gasket wasn't disturbed at all. iFixit should add this type of tool to their offering.
-
-
-
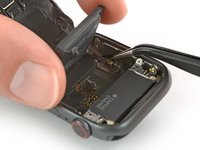
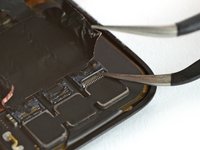
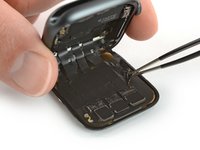
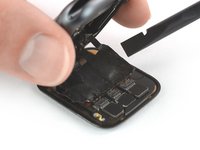
포스 터치 센서는 시계 본체 대신 디스플레이 프레임에 붙을 가능성이 있습니다. 이 경우, 디스플레이 밑으로 여는 픽을 넣고 디스플레이에서 Force Touch 개스킷을 조심히 분리하세요.
-
디스플레이 주위로 픽을 밀어서 Force Touch 개스킷과 디스플레이 사이의 접착제를 분리하세요.
This impossible for me. I just left the force touch gasket attached to the display side. I was able to bend the display back with the gasket still in place.
See first the instructions for replacing the force touch gasket to familiarize yourself with parts that need separating. These instructions will seem unclear if you don't know what the force touch gasket looks like.
-
-
-
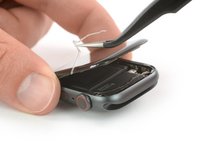
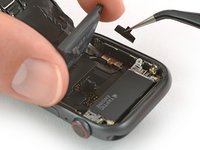
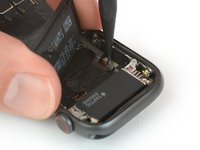
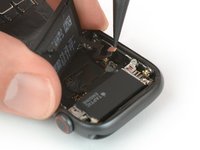
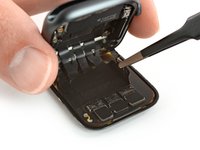
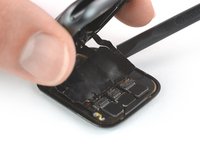
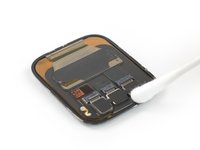
배터리를 들어낼 만한 충분한 공간이 생길 때까지 스크린을 뒤로 조심히 접으세요.
-
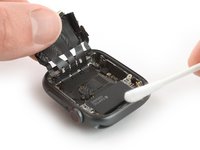
배터리와 Taptic Engine/탭틱 엔진 사이로 여는 픽을 넣으세요.
If you are just replacing the screen then there is no need to remove battery.
When removing the screen I tore the two outer cables attached to the lcd screen. What are their purpose? I read somewhere they are just some sort of shield. Will my watch function normally without them?
thanks
-
-
-
이 단계에 사용된 도구:Tesa 61395 Tape$5.99
-
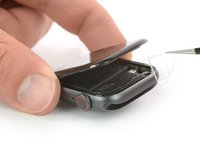
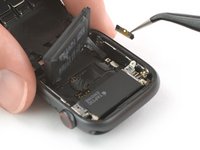
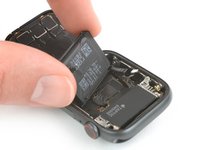
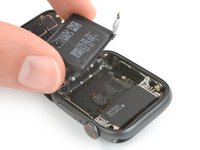
배터리를 분리하세요.
When installing the new battery be aware that the sidewall of the watch directly above the contacts and cover screw hole is magnetized. This was shock to me and a little frustrating. Every time I attempted to place the cover with a tweezers it was pulled toward the sidewall. I pushed the plate in place with a spudger, then attached the screw to the tip of the screwdriver. I was then able to insert the screw with minimal disturbance to cover plate.
-
-
-
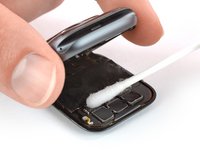
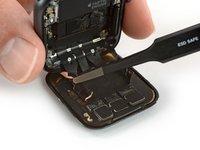
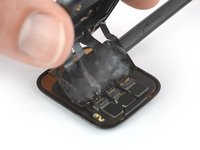
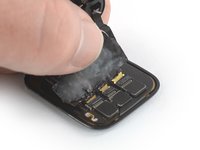
고농도 이소프로필 알코올 (>99%)을 Q-tip에 약간 바르고 검정색 접착 호일에 바르세요. 접착제가 스며들도록 약 2분 동안 기다리세요.
-
대안으로 스크린 상단에 가열한 iOpener를 놓아서 접착제를 느슨하게 할 수 있습니다. iOpener를 2분 이상 적용하세요.
-
-
-
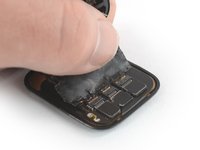
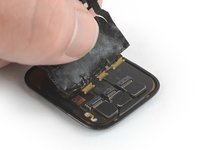
무딘 핀셋을 사용하여 케이블을 스크린 후면에 부착하는 검정색 호일의 측면을 벗기세요.
Be very careful not to damage the copper-colored ribbon cables at either end of the display flex cable. I found it impossible to remove the black foil without tearing these ribbons, and as my repair was ultimately unsuccessful, I have no doubt that this mistake was the cause of my failure. I wish this step had emphasized how difficult removing the foil could be. If you make the same mistake as I did, it will require advanced soldering to replace the display flex cable. That's a bridge too far for me with a 5+ year old watch, so it's off to the trash bin for it. Shame...
-
-
-
Spudger/스퍼저의 뾰족한 끝을 사용하여 최종 위치를 조절하고 접착제를 제자리에 누르세요.
Don’t remove the blue protective film until you’ve got the screen connected to the ribbon cables. You’ll almost guaranteed to need a third hand to get the ribbon cable back in. Don’t forget to flip up the connector locks on the case side and flip them back down after inserting the cable.
-


Apple Watch Series 4를 재조립하려면 이 지침들을 역순으로 따라서 스크린과 배터리를 재부착하세요.
전자 폐기물을 R2 또는 e-Stewards 인증 재활용 센터로 가져가세요.
수리가 계획대로 진행되지 않았습니까? 자사의
답변 커뮤니티에서 문제 해결 도움을 살펴보세요.
Apple Watch Series 4를 재조립하려면 이 지침들을 역순으로 따라서 스크린과 배터리를 재부착하세요.
전자 폐기물을 R2 또는 e-Stewards 인증 재활용 센터로 가져가세요.
수리가 계획대로 진행되지 않았습니까? 자사의
답변 커뮤니티에서 문제 해결 도움을 살펴보세요.
다른 34명이 해당 안내서를 완성하였습니다.
다음 번역가들에게 특별히 감사 드립니다:
87%

Christian Kim님은 저희가 세상을 수리하는데 동참하신 분입니다! 기여하시겠습니까?
번역 시작하기 ›


댓글 17개
Can you tell me what the black adhesive tape with flex ends that covers the flex ribbons is used for and can it be replaced ?
That is for shielding and grounding purposes. If you get a spare you can of course replace it. But be careful not to damage the display cables.
Sheila, this you can purchase on Aliexpress. i tried to get it elsewhere, seems noone else stocks it. cost approx $10. i found it here: https://www.aliexpress.com/item/10050019...
I have replaced an original screen from another apple watch and everything seems to have gone well. But when I try to pair with the iphone it doesn't succeed. Is it because I didn't put the NFC chip from the original apple watch? What can be?.
It is an apple watch series 4 44 mm + cellular.
Thank you very much.
Do you have to replace the black flex ribbons when preparing the apple watch or can you leave them out?
Very difficult repair, indeed. Be very careful about the side wires, they can be very easily be cut when opening the screen. I just hope having a contact supper to supper will be enough… Response in some hours.
This tutorial could be completed with an advice about how to bring the screen wires back to their connectors. That was the most difficult part for me. I was afraid to cut or destroy them.
Concerning the parts, I found the adhesive ring very thick compare to the adhesive I had to remove. What I had as parts did not correspond to what was shown in the repair tutorial. The watch is getting pressed now so I can’t judge if the adhesive is ok or too thick.
It was also very difficult to separate to only get the ring.
Anyway, thanks for this tutorial. Without it, impossible to repair the first time.
Sorry for replying after such a long time: I have cut the smaller side wires (both, I'm very proud of myself ;) ), did you have any problems using the watch with such wires cut? It seems very difficult to find replacement parts for such components.
Replaced screen and testing before closing everything back up. Screen comes on, but it doesn’t respond to touch. Is this due to a cable not connecting properly, or is this a bad screen? Comes on and looks great, but not touch responsive. -dw
Hi Andrew, yes, there might be a cable not sitting correctly in its connector. Those tiny cables are hard to handle and need to be inserted all the way in their connectors. Hopefully that solves the issue.
Quick question: the two wire cables at the sides of the black foil (Step 18) are of any use? I have broken mine (both) while opening the watch, and I am wondering if I have to throw everything in the garbage (I was replacing the battery) or I can still use the watch after battery replacement (I have to order the battery yet)
Pareil les 3 connecteurs impeccable mais un des deux stickers aux extrémités s'est cassé ... Est-ce pour cela que ma montre ne s'allume pas ?
Bonjour, j'ai respecté toutes les étapes une par une ... Et rien ne se passe dans ma montre ... Montre non utilisée pendant plus d'un an du coup j'ai choisi de changer la batterie ... Rien de plus ... La montre "chauffe" donc la charge semble fonctionner mais l'écran est noir et aucun éclair ou autre a l'écran ^^
Are there any news on Apple Pay function after replacing the screen? As I can remember at some time there was a disclaimer at this guide that there is currently no easy fix to get NFC and Apple Pay working after replacement. I thought if only changing the screen it's 100% not working but now it sounds like it could succeed or not. Is that right?
We haven’t tested it recently. So all we can say is in the introduction:
"Replacing the display can cause issues with Apple Pay. If possible, to reduce the likelihood of problems, delete all your Apple Pay account info before the replacement, and then re-enter it with the new display installed."
Oh boy I'm not exited for this repair... Hopefully it goes well...
Hi. I changed the screen on an apple watch series 4, now the screen works, whcih is great, but when I charge it, the green snake comes on but never charges. It heats up the bottom, gets very warm. Could it be the battery itself? Maybe needs a new one? Is rthere anything else that woudl be causing the battery to not charge and or heat up on the bottom when chaging the screen?
Derrick Brewer - 답글