소개
Use this guide to safely remove the glued-in battery from your MacBook Pro with the help of an iFixit battery replacement kit. The adhesive remover in your kit will dissolve the adhesive securing the battery, allowing you to remove it with ease.
iFixit adhesive remover is highly flammable. Perform this procedure in a well-ventilated area. Do not smoke or work near an open flame during this procedure.
To minimize risk of damage, turn on your MacBook and allow the battery to fully discharge before starting this procedure. A charged lithium-ion battery can create a dangerous and uncontrollable fire if accidentally punctured. If your battery is swollen, take extra precautions.
Note: The solvent used to dissolve the battery adhesive may damage your speakers if it comes in contact with the plastic speaker enclosures. This guide instructs you to remove the speakers before proceeding to the battery.
If you're using the old-style iFixit adhesive remover with separate bottle and syringe (no longer sold), click here for a slightly modified set of instructions.
필요한 것
-
-
Remove the following P5 pentalobe screws securing the lower case to the MacBook Pro:
-
Eight 3.0 mm
-
Two 2.3 mm
-
-
-
Lifting from the edge nearest the clutch cover, lift the lower case off the MacBook Pro.
-
Set the lower case aside.
Does anyone noticed that the bottom cover and the bottom case is actually linked with the black plastic near the battery?! After the first time you open the cover, it will be impossible to put it back to the original place. Does the critical?! Thanks a lot for informing
I was able to simply push and click those clips back into place before I did the screwing.
Tim Peat -
I truly believe this is placebo and the 10*C difference is because in the process the dust was removed from the fan/heat sink rather then the thermal "magic" paste.
This is a "PC" habit.
On the other hand, all the cases and protections out there have a bad effect on cooling (not sleeves or pouches) because the whole aluminum body helps dissipate heat.
I've never had any problems with any mac regarding heat (they do get hot, but it is OK).
Whenever you feel heat from electronic device means the heat radiates away from it.. which means the cooling is doing a good job :).
Hey,
Writing about dust and dirt, do you know any cleaning products for the interior of the mac. i mean how do you clean your laptop, pc, etc..
Regards
This is untrue. Over time thermal paste will dry up and crack and not provide good coverage between the device and the cooler. The paste massively improves the thermal transfer between the chip and the heatsink. If you do not believe in the magic paste then you should wipe it all off and apply just a little bit or none at all and then compare temperatures. You will see the paste is responsible for a big reduction in temperature.
If you are following this how-to because liquid/coffee splashed in through the back vents, WAIT UNTIL THE END to clean any liquid spills on the bottom panel. Use them as your map for cleaning and QA guide for checking until you are finished with your cleanup of logic board and other items.
auntialias - 답글
-
-
-
Peel back the warning label covering the battery connector.
Have laptop charging issues after this. When fully charged and i plug in magsafe it starts with green, then turns red and stays red (like if it was charging). Status bar says NOT charging. If i use battery a little bit (down to 69%) magsafe does the same (green then stay red). Status bar says battery 69% NOT charging. and it seems to be true. Any suggestions?
Double check the connection from the battery to the logic board and the logic board socket itself... Might have damaged by disconnect/reconnect.
This step is necessary to prevent any discharging, arcing, friction/static charges from damaging any of the extremely delicate and intricate parts of this (or most any) electrical system. In practice, you should even be wearing an anti-static band or be working on an anti-static bench even with the battery disconnected so your body doesn't create any unintentional charges.
One of the first things you should learn in electronics repair and and electrical in general is to cut the power source whenever possible before performing any work. Some systems have schedulers/triggers set that will wake the system up (even when closed) to perform updates and other maintenance tasks as to not eat up CPU and RAM during 'peak hours'. The last thing you need is to have your $2,000 laptop turn on while pulling an SSD (which, correct me if wrong, isn't a plug-and-play based device) which could do some serious corruption and/or damage; when all you had to do was peel a sticker and plug.
Hope that helps!!
~the more you know~
I did not peel back the sticker. It is probably there to help unplug the battery. You can apply a gentle constant pull while you use spudger to lift the battery connector out of the socket as per the next step. It made this very easy.
I've found that it's actually better to NOT remove the sticker. I wish I had skipped that 'peel off the sticker part' ugh
Let me stop you guys here. You can skip steps 5-35.
That’s what I did without a problem.
Go directly to step 35 after the next step. 5-35 is only so you have more room to pry the old battery off.
If you are not keeping the old battery, then just pry it off with a flathead screwdriver.
This is not a difficult fix.
Chris,
Thank you for providing the advise to skip several steps. I agree that you will have ample space to remove the old battery without removing everything else. I would like to provide a small correction in your directions. You will need to go to step 34 to remove the two screws holding the battery cable versus directly to step 35. You will not be able to completely remove the battery without this step.
I successfully followed all the instructions and all the steps in this guide. I installed the new battery successfully. However, looking back at the process now, I have no idea why I had to take out the memory, air card, speakers, fans, and motherboard to change the battery. None of that was necessary. I did it, and it worked out for me, but honestly, if you just want the battery out, do what Chris and Laurence said above me. Go straight to step 34.
Again, that label will loose its stickyness... order B09WMWH3LM from Amazon so you can reglue - a little smear on both parts, let it dry a few seconds and join them. Done. ... a little will go a long way.
I agree that this entire procedure is unnecessarily complex, unless you’d like to disassemble your entire laptop for the sheer fun of it. The point of all the disassembly is to avoid damage to other components from the adhesive remover. So what I did was not to pry at all, no leverage whatsoever, no strain on the battery cells. Instead, I simply slid the provided plastic scraper cards underneath the batteries from every side possible to begin removing the adhesive. Then I put one drop of the remover on each side of the card at the front edge so it was barely wet, slid it in and worked it deeper bit by bit…. When I got near the speakers, I pulled the screws, lifted them slightly, and wedged one of the picks under the long arm coming off each speaker to give it a few mm clearance from the case, so no remover/alcohol could wick underneath. That worked well for me; the hardest part was getting all the old adhesive off the case, which just took some careful soaking. Good luck! .
Tor Matson - 답글
-
-
-
Using the flat end of a spudger, gently pry the battery connector straight up out of its socket on the logic board.
-
Bend the battery cables back and out of the way, ensuring that the battery connector doesn't accidentally make contact with the logic board.
I ordered the whole kit, but seeing how much tedious effort it was to take out so many parts so they wouldn't be damaged by the solvent, I skipped from here to step 34 and only used the supplied cards (credit-card sized) with patience and persistence to free the battery sections from the backing. Success! Then I used a q-tip to apply the solvent to remove the remnants of the adhesive from the aluminum case. My battery was very swollen, so it was like removing little pillows. I think the swelling may have helped to give me additional access with the cards to free it. Success! My MBP is back up and running, and now the trackpad clicks again and it sits flat on a table!
So no need basically to unscrew all the mac
Bert0ld0 -
The best tool for battery removal for any glued in Apple batteries is a 6" PLASTIC puddy knife 1.5" or 1" in width. It is strong. It has a bit of a sharp edge to cut the glue. It is long enough to slide all the way from top to bottom on the middle cells and from the side to get the 2nd from the right and 2nd from the left out. Wear gloves doing this and eye protection. I've use the Nylon twine method also without removing the logic board, but that is a pain to get started. I just take the screws of of the speaker, lift them up, don't remove and go to work with the puddy knife.
Joel - the purpose of all of the trouble in removing the logic board is to make sure that you don’t damage anything when you start pull out the battery. After this step - it’s true, you have about 12 connectors and dozens of screws to unplug, but I didn’t have any major problems.
REASSEMBLY - I had to use alot of force to get the official IFIXIT battery connect to push into place to actually connect. I was worried that one of the wires would stress and break. It worked, but it was not super easy this part.
I also skipped down to step 50. I stuck a piece of 1/2 inch weather stripping across the middle of the top cover of the laptop to maintain a pitch on the unit so the adhesive remover stayed away from the other components. I applied the remover and used a piece of string to cut through the adhesive strips. I owed the plastic tool from the kit to position the string behind the top of each cell and cut through one ata a time. The battery came out in about 15 minutes. The directions were very informative and useful but I thought the risks associated with dismantling the laptop and reassembling it again were greater. I could not have done it without the details presented. Thank you.
Couldn't agree more: use a wire to cut the glue. No need to remove anything else (I did remove the SSD for peace of mind). I used a thin metal wire, without the help of adhesive remover, wrapping it around two sticks to hold it (as pulling with your fingers is painful!). Took longer to clean the residue than to cut the glue!
I'm not so mad with Apple's repairability considering that this method is viable.
Having broken a connector on a logic board in the past, I worried about all the steps. But I understand the disaster that can occur if cleaning fluid contacts the logic board. Weighing costs and benefits, I also did not remove the logic board. I loosened up the speakers (since only two screws could be removed) to give me space to slide the cards under the battery cells. Using the two cards, sometimes sliding one over the other, I was able to remove the battery in 15- 20 minutes. Removing the remaining adhesive was VERY tedious. Eventually I settled on CAREFULLY applying small amounts of remover with the syringe and using the spudger (both pointy and broad ends) to scrape the remainders off. I cleaned the residual with Q-tips dipped in remover (buy a big box of Q-tips), refastened the speakers, installed the new battery, closed the case and voila.
I too found the need to completely teardown the laptop onerous and risky. I’m not certified in anything hardware but I’ve been doing my own repairs for a while. I watched the video referenced above and read the comments there. With some changes, here is what I did, which worked perfectly and minimized the risk, for a whole additional $3 in parts, just myself and in under an hour:
1. Go to hardware store and get 2 4” bolts ($1 each) and a coil of 20 gauage galvanized wire.
2. Wrap one end of the wire a few times around one bolt, then tie it off with a knot. Do the same with the other bolt, leaving about 10” of wire between the two.
3. Follow steps 1-4 in this guide
4. Slip the wire under one of the outer batteries (use a card or spudger to help get the wire underneath
5. Grip both bolts with one hand and rock them back and forth, pulling the wire under the battery, using your other hand to hold the case. This should take about 2 seconds (seriously). Repeat for other outer batteries
(continued)
6. Pull the plastic frames away from the left and right sides of the center batteries.
7. Repeat steps 4 and 5 for the two center batteries.
8. Jump to step 55, then reassemble.
Note: when installing the new battery, ensure the part closest to you is UNDER the two plastic tabs.
Worked perfectly.
Link to video: https://www.youtube.com/watch?v=fupkPz55...
Note: using the nylon thread with that much effort is crazy. Use the wire or fishing line.
cool.
removed everything and have now 88% after 2 times calibrating and smc reset
wouldn’t have liked to do everything again, but this seems like a possible solution :)
i just got my Kit and started the procedure, i decided to try if i can get the bulged batteries out with a fishing line, which worked fine. No need to use any solvent and even not too much force was needed to get the line under the batteries. I was able to remove the batteries in about 5min, used another 10min to clean the case from the residue, and put in the new battery. All togehter about 20min of work. I´m very happy with the result, Macbook stays now back on its feet, closes correctly and trackpad works as expected.
Also departed from procedure immediately after STEP # 4 as per JOEL’s recommendation …used a small chunk of fishing line and it worked sans solvent…easily ! Spudger worked quite well to initially position the string /line & the ifixit ( ‘credit’ ) cards were nice for final dislodging of each battery segment from the last bits of residual gooey adhesive , AFTER working the fishing line back & forth down the length of the battery as much as possible. With the old battery out of the way, I used a razor blade to clean out the remaining bits of adhesive gunk. ( Decided NOT to use solvent here, either.) Took me every bit of 1-hour.
One thing that helped ,too, was a cheap pair of cotton gloves coated on the palm side w/ latex. This kept my fingers comfortable from the pressure of the fishing line & allowed more of a range of force …since I wasn’t wincing from saw-cutting myself !
I skipped steps from 5 to 33 and directlychanged the battery (before disassembling all). Worked fine.
I also skipped all the additional disassembly. I used cards and wire to cut through the adhesive quite easily. I also did not apply any tape on the new battery. The Mid-2014 laptop seems slim and tight enough to keep the cells from moving and the two screws at the power connector area seem to stabilize the connection and battery as a whole. Such STRONG tape seems unwarranted for the amount of squirm room in such a tight compartment.
P.S. Remember, while you have it open, clean, clean, clean!!!
Speaking of the power connector screws, I accidentally screwed down the R speaker flat cable on reassembly, which caused the speaker to malfunction. On finding that, I re-routed slightly and the speaker worked fine, this time, but I recommend being extra careful with that cable when putting things back together. You really do have to remove most everything to replace speakers!
Thanks guys for all the tips. I followed the pragmatic way of cutting short and really taking battery out only. Thanks to the cards it worked well and none of the liquid made it to any other part of the computer. Put some efforts in to properly clean the remaining glue after battery was out - but looked good and this message comes from the old mid 2012 15” Retina modell - but with the new battery in - and all is fine. I am happy - thanks to the short cut encouragement.
Also skipped steps from 5 to 32. I used the supplied cards and a piece of string, i.e. braided nylon twine, (thickness 24). and used supplied acetone sparingly, mostly to the middle section. It took one and a half hours and another half hour or so for removing the leftover goo. It was demanding but not challenging, just take it slow and steady.
Learnt a lot from former comments. Also skipped steps from 5 to 54. Used fishing line to cut through adjective by myself easily, but needed to put on glove to protect hands. I didnt order full package, so used nail polish remover and eraser to clean the base. Looks good and all is fine! Thanks to the short cut method!
If you decide to skip to Step 34 or 52 or whatever, at least take note of Step 50. This is the only place I saw reference to the thin metal plate protecting the trackpad. I also skipped to just pulling out the batteries, but this plate came out with the them. I had to carefully pry it off the old batteries, reinstall it, and clean the adhesive residue off it.
Also, YMMV, but I did not bother with delicately removing the old batteries with fishing line, loosening with solvent, or whatever. They’re going in the trash (ahem, recycling) anyway, so I pried them out with a screwdriver, using the neighboring cell as a fulcrum. 98% of the adhesive remained with the batteries, leaving very little residue in the case.
I also forwent the many steps to protect components from the isopropyl alcohol. Blocking the back of the computer up an inch or so meant that any spill would run down and away from the logic board, which actually helped loosen the adhesive. I felt that disconnecting so many parts was a greater risk with no real benefit so long as care was employed in the use of the alcohol. Using some twine in a sawing motion behind each battery got through the adhesive without trauma. The entire repair was actually very simple and fast. The toolkit is excellent and well worth buying from iFixit. The machine is now working really well again. Worth fitting a new SSD now.
Success! I ordered the whole kit and thought I would do all these steps below. But instead I just unplugged the battery and skipped all the steps up to step 36. For getting loose the old glued in battery I used waxed dental floss, it is strong and easily available. I strung it around two wood pieces and wired it around the underside of the batteries, then slowly pulled it downwards till the end. This worked quite well and after 10 minutes all the 6 batteries were free. Now the ‘fun’ part, cleaning up the old adhesive strips. I used the little bottle of alcohol from the kit but found this not the best cleaning solution. Be warned, dont forget that in this position, directly under your downpressing fingers there is the glass trackpad and the display!! I really was scared to break them during this cleaning process. Because of this I switched to LIGHTER FLUID , which is stronger and the process quickly proceeded. Thanks ifixit for your great support.
I had to replace my replacement battery ... luckily the ifixit adhesive isnt that overpowered ... ehem ... I just pulled the old one out softly ... used the plastic card, some force ... and build the hopefully-this-time-lasting-longer-than-4-month-new-battery in ... it saved my evening.
I just finished doing my second battery replacement on one of these. If you're replacing a battery that came from iFixit you can skip straight to step 34 and use cards/spudgers/guitar picks to remove the batteries. The adhesive on the iFixit batteries isn't nearly as tenacious as the original Apple adhesive (though it's plenty to keep the battery stable) and it was easy to pop the battery segments out with a spudger and peel up most of the excess adhesive strips. What little was left came off easily by putting small amounts of the solvent on paper towel and rubbing - no need to pour any amount of solvent into the case.
When it's time to install the new battery, bend the wires a little more to make a "U" shaped down curve...
The acetone bottle shown runs the risk of dispensing a lot of solvent - which may well damage the speaker plastic. I used a 5 ml plastic pipette to deliver small controlled amounts and had no problems removing the battery without having to take everything else out :-) I also used propanol (isopropyl alcohol) on some kitchen towel to remove the adhesive residue from the case - slightly less effective than acetone, but doesn't dissolve the plastic :-)
Jon Harris - 답글
I used a guitar string ( high e 9 gauge) and a pair of thin leather gloves (to protect hands ) and after using tweezers to get it behind the batteries I was able to pull thru/ cut thru the adhesive with relative ease .
-
-
-
Use a spudger or tweezers to pry the three AirPort antenna cables straight up off of their sockets on the AirPort board.
will this procedure remove my warranty? I have applecare for another 2 years, Laptop was dropped on the side, there is a very small dent on the side of I/O.
Oleg Babko - 답글
Yes, this voids your warranty.
These are notoriously difficult to remove. I actually damaged 2/3 of the connector pins during the process. Thankfully i was still able to fit them in place. This step should not be underestimated.
Alvin Chua - 답글
If you are not replacing the display case assembly, you can opt to leave all 3 connectors attached and remove the Airport card with them connected. You will need to carefully manage the card and attached cables so as not to damage them(masking tape) as you proceed with disassembly/reassembly. Step 6 will need to be done carefully (camera cable connector). I did it after step 8. I took a picture of routed cables as well before I removed them from channel.
unless you have really tiny fingers, a tweezer helps, just be careful not to damage the wires or the board as your holding each cable in place. Oh and take your time - this is like the most frustrating step in the process, imo.
Definitely the hardest step (when putting it back together). The three pins were on progressively longer plugs, so I put the shortest one on the left and so on. This helps with getting the right angle. I used my fingers and the spudger to guide them back in. It took me easily 10-15 minutes to do this. The pattern that worked eventually was to first adjust the angle of the pin head so that it's x/y/z axes would line up perfectly with the connection if you are able to bring it together just so. If you're off on any of these while you try to bring it together, you won't be able to just click it down at the end. Good luck!
Agreed, for some reason, the middle one was stubborn — and I was worried the amount of force I applied to push it back on was going to break something - but it did pop back on.
Jer -
I would never remove those tiny plugs unless I absolutely have to. And we do not have to remove them, just the card itself…
Jurgen -
I looked at these plugs under a 8X lupe, since my 56-year-old eyes are not what they used to be. They are circular, so it’s more a question of just aligning the bottom with the top of the plug rather than angle. If I can do it, someone with better eyes can definitely do it.
Removing these 3 tiny cables is completely unnecessary. I removed my fan last week to clean and it slips by these cables. For some dumb reason i wanted to follow this "correct" procedure and now one of the gold connections detached from the wire like it was nothing. Seriously, dont do this. I used a spunger and was very delicate putting it back on... And look what happened. SKIP!
Yeah, I agree, just leave the airport card attached to the pins and remove the card itself. Then you won’t have to fuss with these connectors.
Jer -
@tmm Your right on! Just finished replacing my right fan and your tip saved me from messing with these tiny cables. I totally understand your frustration as I was too just about to stick to the procedure, but if it’s any comfort your tip helped someone… so don’t be surprised being rewarded by some good karma :)
IT’S UNNECESSARY TO DETACH THE 3 TINY CABLES FROM THE CARD, JUST DETACH THE AIRPORT CARD WITH IT’S CABLES ATTACHED BY GRABING IT FROM BOTH SIDES USING TWO FINGERS AND GENTLY SHAKE IT UNTIL IT DETACHES. THEN MOVE THE WHOLE THING A BIT ASIDE.
THIS STEP IS ONLY NECESSARY TO MAKE WAY TO THE FAN CONNECTOR UNDERNEATH.
There is one thing though I find missing which concerns:
1)The rubber heat sink cover
2 The AirPort/Camera cables
3)The IO board cable
All these are “glued” to the fan and you need to peel them off gently using the spudger, now while I noticed that some glue remains on each cable so they will kinda stick again, I wonder what kind of glue is this and where one can buy it?
Itai -
These individual instructions are re-used across multiple tutorials. If you are replacing the battery, you probably won’t need to remove the three connections from the Airport card; if you are replacing the display, you definitely need to replace them, because they are connected to the display. I just replaced the battery and the display in a single activity, so I pretty much had to remove everything. Also agree with a previous commentor that it’s easier to reconnect the cables before the card is reconnected to the system board.
ChrisMBP -
travismlive is right, you do not need to remove these cables or the airport card. Just remove the I/O board cable, undo the screws, and detach the antenna cables from the fan where they are glued with a spudger. Unlock the ZIF-socket and the you can wriggle the fan out. Probably saved my airport card, thanks travismlive!
I only successfully reattached 1 of the 3 AirPort cables, I just taped the other two. But the AirPort seems to work fine. Do these also have anything to do with Bluetooth though? I do seem to have trouble with Bluetooth after this operation. In any case, it was worth it... I replaced the screen with a new Apple screen for less than 1/2 the Apple Store wanted! Thanks!
Would soldering them back in place be better than taping? I certainly don't want spare solder on my motherboard, so I figure that'd be a last resort only if I lose AirPort connectivity.
Assembly is a nightmare. If rightmost cable is not connected, BT will not work.
the hardest step is reconnecting the airport antenna cables. just have patience< and use tweezers, spluger and a q-tip.
tweezers to hold the cable and the flat part of the spudger to push down on the connectors is the easiest way to re-assemble
Jon Ocampo - 답글
Replacing these were the most difficult step I encountered. I finally determined that it took slight back and forth twisting of the cable (from left to right as viewed from above) to cause the connector on the cable to twist into position so it could be pressed down.
I read your step and you are 100% correct. This helped me tremendously. Thanks!
Achilles -
Several of the people above mentioned not disconnecting these three wires. You must remove and replace these if you are replacing the entire display which is what these instructions are about. This is the most difficult step as others have noted. Just be careful and make sure you have the cable level before you start pushing down.
Walt Goede - 답글
If you are not replacing the display case assembly, you can opt to leave all 3 connectors attached and remove the Airport card with them connected. You will need to carefully manage the card and attached cables so as not to damage them(masking tape) as you proceed with disassembly/reassembly. Step 6 will need to be done carefully (camera cable connector). I did it after step 8. I took a picture of routed cables as well before I removed them from channel.
Reassembling: What makes this so hard? From all appearances I’m just pressing a squat sleeve-and-pin connector down onto the female counterpart. It appears to be circular and therefore not needing to be oriented radially in any particular angle. It doesn’t look hard at all! Does anyone understand what the subtlety is that causes everyone so much grief?
Reassembling: as so many as commented, this is incredibly hard - and inexplicably so. From all appearances I’m just pressing a squat sleeve-and-pin connector down onto the female counterpart. It doesn’t look hard at all! But I couldn’t do it.
Here’s what seems to have worked for me: with my left fingertip on the cable holding the connector directly above the female, I used the spudger to press down the flat back of the connector, initially at the top and then sliding along toward the neck. I used normal pressure, and voila, when I lifted the spudger away the wretched wire didn’t spring up again. It was like it wanted to be rocked, or stroked, once, from top to neck, rather than pressed straight down.
I skipped to step 34. Just pushed up the speakers so that they don’t touch the body.
Can anyone help me? I would like to replace my speakers. Which steps can i skip?
I have completed replacing my speakers and this step was not needed at all.
I just completed the full screen assembly replacement with 90% success I guess. Like many others noted, this was the hardest step, and one them (leftmost) was extra hard, but I eventually got them all back in. However, I don’t have 5G wifi anymore. 2.4 g works fine, bluetooth works fine, and the screen, camera, and mic are all perfectly functioning. I just can’t connect to 5G wifi. Is there a fix for this?
Absolutely no need to take apart the whole thing, get some strong fishing line and slowly saw the adhesive away. Once the battery is out, (if you are prone to be clumsy just cover/ shield the rest of the computer, than use GOO GONE or the like waiting a couple minutes to scrape out the old adhesive. The only reason they make your take everything out is that they assume you are lazy and will be using the adhesive remover which could damage the rest of the computer if allowed to splatter etc. Just save your self some time and stress, get strong braided fishing line ( works way better than floss or string as it is of a smaller diameter and isn’t smooth and helps the sawing action), and work your way around each cell. This is still way shorter than removing the entire computer and much less likely hood of damaging sensitive connectors.
Agreed! Especially if you replace the batttery a second time with a less Apple-like adhesive.
To prepare for a third time I actually covered parts of the adhesive pads with plastic film on the new battery. I figured that gluing it to the base where it is actually hooked behind the frame makes little sense.
Cheers to everyone repairing good old things and keeping them alive!
Jörg -
I did a screen replacement recently using this guide and the disassembly/assembly was fine - very good instructions. But when I turned on the machine there was a very fine flickering, snow-like interference, especially noticeable on black backgrounds. I assumed it was a faulty replacement screen and continued to use it. Recently, I had to change out the battery so I dissasembled the screen again to see if reconnecting it would fix the problem. Now it is perfect. I think the problem was that the left-most (shortest) airport cable connector was touching the black screw next to it on the board and shorting out. Be careful to position this connector well away from that screw.
rumblefish - 답글
I read the note above and managed to fold the card out of the way. I’d put it in a paper envelope to stop it touching anything as it flaps around. The bag also stops static build up and reminds you it’s there ! The wires on mine were held down with two strips of tape, the pointed spudger? pushed along the length of the wires widened the tape loop when I pushed firmly but carefully. Once widened, tweezers can open it fully .
I skipped the step of removing the airport antenna cables and removed the airport card with the cables since so many users said it was extremely hard to get the airport cables back on properly. By skipping the airport cable removal I save a lot of potential headaches and performing this task was not any more difficult to do.
I skipped steps 5 - 40 and removed the old battery with the plastic card and a palette-knife after heating the adhesive strips cautiously with a hair dryer. After that removing the adhesive strips with the solvent was by far the most time consuming part.
so what happens if you damage 1 of the 3 connectors because you didn’t read all the comments first? Does it work at all or just diminished wifi reception?
Can someone at ifixit update the main instruction page to advise removing the airport card instead of the super fragile cables?
YOU DONT NEED ANY OF THIS!
it is SO stupidly risky to remove all this. Who the HECK wrote this guide?!? Thank God I checked on youtube and found guys who did NOTHING of these steps and simply removed the battery in under 1 h.
Steps 5-33 are not really needed if you are careful with the speakers, not to spill the fluid onto them. It saves a lot of time and potential dangerous operations. I did it without any problem.
Please be extremely careful, I just ripped out one of the sockets for the cables. I fixed it with Tesa until I can buy a new Airport-Card.
BE EXTREMELY CAREFUL WITH THIS STEP both when disconnecting the cable connection points and while doing the reconnection. I damaged the J2 connector (Wi-Fi and Bluetooth are working just fine, though) while trying to reconnect it to the AirPort card. I’ll suggest, as others have here as well, to not disconnect the cables and just have them connected to the card the entire time as this is, IMHO, a completely unnecessary step to take while doing this whole procedure.
Well, this is the step that (just through reading these comments) I decided NOT to fix my right speaker. Anytime I have to remove these delicate Airport and Camera wires and connections, I get very nervous. (I've done it before, successfully, on a MacMini [ugh; never again!] - just to replace the two slow HD with SSDs! What a hassle!
I'll just my headphones or computer speakers through the headphone jack.
Why this step of unplug the AirPort/Camera Cable
Surtout ne pas démonter les 3 connecteurs. Extraire la nappe camera/wifi sans enlever le 3 connecteurs. Les 3 connecteurs sont fragiles et très difficile à remettre. Dans mon cas, 2/3 des connexions sur la nappe sont HS.
This is the point where you should say "No freaking way" and go watch this youtube video and save yourself a nightmare: https://www.youtube.com/watch?v=rfHHIERH...
There is absolutely no need for this repair to be this insanely convoluted.
-
-
-
Use the tip of a spudger to push the camera cable's plug toward the fan and out of its socket on the logic board.
Same for me too just take the socket from your broken screen and cut it off and solder it onto the new screen. It was really hard because it's so small but I did it.
Hi! Camera flex cable is from MBP Retina Mid 2012 & Early 2013. Not Late 2013 :) Edit it please.
kramerigor - 답글
the tip of the middle 3 wire was broken on the replacement screen. I didn't connect it and everything seems to work fine, mac hardware test says everything is fine... Is it possible?
Yes. They are wifi antenna cables. Missing one antenna won't affect much, and won't show up in any hardware test.
Push on the little wings, from right to left.
This is the hardest part of disassembly! Arguable hardest part of re-assembly too, other than the airport cables
Jon Ocampo - 답글
This came off for me - now my computer’s fan is running high constantly, and “Kernel_task” is using 500% of the CPU even though nothing else is running - what can I do?
Ryan Brown - 답글
Did you ever get the fan to stop? how?
It is very important to note here that you are NOT pushing up. You are pulling the cable back toward the fan. Doing step 7 first makes that easier. I misunderstood the instruction here (as others seem to have as well) and broke this part. I’m fine with not having a camera on this computer so I’ll leave it or ask my son to help me solder it later.
can you give guidance on the soldering? Im new to it and dont want to burn anything / especially the wrong thing!
The wing closed to the edge of the chassis is completely stuck. I’ve worked on it for an hour. The other wing moves freely. I’m not sure what to do now.
The connector is very tight - I couldn’t even see the join between cable end and the socket and couldn’t see the “ears” on the end of the socket. And, of course, pulling didn’t help. I eventually used tweezers to start things off, gripping on the metal of the socket right where the invisible join was. What a delight to have the join open enough to see! After that, it was easy.
Thank You Jerryl - The tweezers did the trick. They want to pop out so you can use your other hand to apply slight downward pressure to keep them in place. Work both ends of the tweezers gently back and forth and you should start to see the gap get bigger.
I used tweezers and the spudger. Take the point of the spudger and push on one side of the “dog ear” while supporting the other side with the closed tweezers on the cable side of the dog ear. (Could use a second spudger) work one side the move to the other repeatedly until the connection disconnects.
This is allows You to push and support simultaneously and minimize the chance damaging the connector.
Removed cover (Step 7). Released adhesive. Pulled directly out of socket to the left.
Pushing out of this connector is ill advised, as no mechanical ledge to push.
I found this step to be difficult due to the picture and instructions being incorrect for MacBook Late 2013. Unfortunately, I damaged the pins during this step and my camera no longer works. :^( Please update this step.
@xtstoll I looked at two separate Late 2013 units today, and both are indistinguishable from what’s shown in the instructions. Are you sure you’re working on the right model? A photo of what this cable looks like on your laptop would be helpful.
Tweezers saved me on this one! Take your time and keep trying (gently) if you're still struggling
I have jewellers glasses and they were so helpful. Without them I would have broken plenty of bits. I really recommend getting some magnification for this job, some of the bits are sooooo small!
The way I did it took less than a minute. Ensure the AirPort card is not in place on the board. Get a pair of tweezers to squeeze the ends of the cables into each holder on the card. Apply pressure on the back of the card and the cable end at the same time. If it works, the cables will swivel easily in their slots. Then put the AirPort cable into the board.
I did it in less than a minute. Used a pair of tweezers. First thing is to take out the AirPort card from the slot. Hold it in one hand while using the tweezers to squeeze each of the cable ends into their sockets. Ensure that you are squeezing the back of the card at the same time as you are clipping in the cable ends. You will see that each cable end will swivel around and not come out of their sockets.
As per other comments, recommend referring to steps 7 and 10 before attempting step 6.
I found it helpful to remove the airport card first, then use tweezers to gently pull cable 0.5 m from socket, then use pointy end of "spudger" to push connector out of socket.Tim Telcik - 답글
This is the point where you should say "No freaking way" and go watch this youtube video and save yourself a nightmare: https://www.youtube.com/watch?v=rfHHIERH...
There is absolutely no need for this repair to be this insanely convoluted.
I got to this point on the reassembly only to realise that i was missing the camera cable! Trapped under the motherboard. Decided i dont need the camera that much to warrant reversing everything again
-
-
-
Insert the flat end of a spudger underneath the rubber heat sink cover on the right fan.
-
Slide the spudger underneath the length of the cover, releasing the adhesive.
-
Lift the cover and flip it back so that you can access the cables underneath.
True @cahcadden.
Worst case you could accidentally tear it off
(thank god, that didn’t happen to me, but belive me —> it was a close call)
The glue will be gone, don't fret about it. You can just let it flap back when you are done, you can order this item from Amazon: B09WMWH3LM - contact shoes glue.. A little smear on both parts goes a long way. In my case I already had the stuff from other things I fixed for my wife.
-
-
-
Use your fingers to pull the AirPort/Camera cables up off the fan.
-
Carefully de-route the cables from the plastic cable guide.
It's a bit tricky to re-route the cables when you're installing the new display, so pay close attention to how they're originally routed, to make sure you don't pinch them or torque them.
-
-
-
Using the flat end of a spudger, pry the I/O Board connector straight up out of its socket on the logic board.
-
In a similar fashion, remove the I/O Board cable connector from its socket on the I/O Board.
-
Remove the I/O Board cable from the MacBook Pro.
When reinstalling the io board cable make sure it is the correct way round as in the photo, it fits the wrong way round as well, which results in the MacBook not starting at all.
ABSOLUTELY ! I found out the hard way. I took a break, came back to me dead computer and wondered - if - this cable would fit the other way round - and voila ! I wish I had read this note first :-)
i did exactly the same mistake! Same procedure as well: keep calm, and start again the tutorial.
every thing work find now
Guigui -
Sockets are ZIF with releasing levers on the top. If you pull up on the top padding, you will reveal silver lever handels facing the rear of the machine. Pry up on the LEVER to release the pressure, then pull the lever straight up to release the connector from the socket. DO NOT pry under the edge of the connector to remove these or you may damage the ZIF socket. They may have changed these connectors between models, otherwise I don’t know how this was overlooked in the guide.
Confirming, these are indeed zifs for me too. My padding has notches indicating location of lever needing to be raised. Obviously lever is tiny, look closely. If your padding is a clean rectangle as shown in guide, you may not have zif sockets here
Confirmed; if the foam pieces are not perfectly rectangular, you should be able to pry back the side of the foam with the cut-away. It folds in half. You can see the lever under the foam. Lift the handle with the spudger, then when it’s pointing straight up (it flips up), you can lift up on the lever (straight up). This should be done for both ends.
Patryk -
Confirmed. These instructions (and photos) should definitely be added to the guide!
While putting back the I/O cable, I assumed that it just connects back in place with pressure, kind of like Velcro. I just pushed the one on the left down first as instructed, and, while doing so, folded down the tiny wire lever under the padding (As someone stated earlier, the wire lever isn’t on all models) along with it. It seem to go back in place fairly easily if you’re careful to align the two sides (the part under the cable with the part on the logic board). A a novice, I think this warrants being addressed in more detail. Kinda had to do this intuitively.
There is adhesive under the cable. I twisted the cable parallel to the flat fan surface to break it without bending the cable.
Yeah, and a strong adhesive.
throughout all the repairs i have on my MacBook, I have put changing the right fam on the side, just because I was thinking there will be no way of removing the cable without damaging it.
I hope I didn't mess up (I'm still dismantling my MBP) but I didn't detach the cable from the fan housing. Disconnected from both ends, and it appeared contented to flop there in space. Fan was then removed without incident
you need to lift one side of the rubber/foam cover to reveal the lock
-
-
-
Remove the single 2.9 mm T5 Torx screw securing the AirPort card to the logic board.
-
-
-
Grasp the sides of the AirPort card and lift it up to a shallow angle (5-10˚) to separate the light adhesive adhering it to the logic board.
-
Pull the AirPort card parallel out of its connector on the logic board to remove it.
There might be a touch of adhesive, lift first – a gentle touch with the spudger helps.
Yes. Slight lift to release adhesive and then pull out.
David Choy - 답글
I don't see why this is necessary just to remove the logic board...
I found it helpful to use the flat end of a "spudger" to gently lift airport card from the main board prior to unplugging.
Tim Telcik - 답글
-
-
-
Use the tip of a spudger to flip up the retaining flap on the right fan ribbon cable ZIF socket.
-
Starting at the top of the cable, slide a plastic opening tool under the right fan cable to free it from the logic board.
I was able to flip the retaining flap while removing the damaged fan but accidentally dislodged after installing the replacement fan. Again, be very careful at this stage. Thankfully my new fan appears to function normally.
Alvin Chua - 답글
My retaining flap just came off. Can you confirm your fan doesn't need it to function??
ZIF = Ziero Insertion Force. Once the tiny retaining flap is up, it should slide out easily toward the back. There was no adhesive on my machine, so the cable slid out easily. But be careful if yours is glued down.
Don Steele - 답글
The pictures were confusing to me so let me add some more context. There is a ZIF socket (Zero insertion force) being addressed in the first picture. This socket has a black top that is currently closed down on the socket. Using your tool you need to lift this flap up to release the wire underneath (This release happens in the second step). Hence only pull up on the black flap enough to make it go from horizontal to vertical (Swing flap). Neither picture shows it in the up position. Step 2, Picture 2, Then gliding your flat spudger, you goal is to lift the wire that was in the ZIF socket out by lightly lifting up on both the wire and the rubber cushion on top of it. Make sure you lift both. You are successful when both are lifted up and out and facing vertical instead of horizontal.
Great clarification, thank you.
To really see which part of the ZIF socket has to be lifted up you should compare the pictures of step 10 and of step 12, preferably in its original size.
Then you can see that the inner part of the ZIF has to be moved up, away from the batteries.
I managed to broke the side, thought this was pulling on sides mechanism to release, not just upwards. Luckily I managed to attach it and the fan is working.
Here is video how to open the ZIF socket. https://youtu.be/MQbqpWkCz94?t=360
Many thanks Ketut, that vid clip really helped!
very appreciated!
Thank you… that vid is crisp!
Incredibly poor instructions!!! Thanks to the incorrect wording, I have just ruined the fan connector. There is NO lever. The cable gently slid out, after I borked it. I’m done with IFIXIT and the $@$*!& information. How about a little video clip inserted here. You guys can do better!
Can anyone share how to put the retaining flap back onto the connector? Has anyone’s fan worked without it? My hinged retaining flap just slid off and it's extremely difficult to place it back on.
I found it easier to slide the flat end of the spudger tool in from the left side of the cable, near the 90 degree bend.
Aimee Ness - 답글
There’s no need to take off all this stuff. I’ve just disconnected the battery, used the glue remover and a dental floss to pull off the battery ✌?
These instructions are pretty lacking for this step. In my case, for both the left and right fans, I did not need to flip up a retaining flap. I did not need to remove the airport card as I could sneak the ribbon cable out from underneath the airport card. There was a tiny bit of adhesive on the ribbon cable. Once that was worked free, I could slide the ribbon cable out of the connector (toward the screen hinge).
I can recommend, after lifting ZIF clip, gently slide cable out of socket using "spudger" and/or need nose pliers.
Tim Telcik - 답글
Took me step 28 to figure out the latch. its the rear of the connector
-
-
-
Remove the following three screws securing the right fan to the logic board:
-
One 4.4 mm T5 Torx screw
-
One 3.9 mm T5 Wide Head Torx screw
-
One 5.0 mm T5 Torx screw with 2 mm collar
What I did to separate the different screws, is to take the top of the ifixit essentials-kit (which has lots of small spaces to hold screws) and picked a row of these spaces, which I marked for the cooling-fan screws. So basically I just sort them by lenth: The 5 mm on the top space, underneath it the 4,4mm, and at last the 3,9mm. That way I didn’t loose track, because I was working in tandem with this instruction.
In my case, the 3.9mm screw was connected to a spacer that sat flush to the motherboard. I misplaced this spacer and had to take the computer apart twice to find it… Make sure not to lose it if you have one!
I was able to stop at this step and jump ahead to removing the battery. I did this based on the fact that the batteries were extremely swollen and I could see that the adhesive strips below were already separated from the bottom quite a bit. In retrospect my wife had complained that the computer ran very hot in the vicinity of the batteries (not sure why) but that heat apparently diminished the adhesive properties and allowed me to slowly pry the cells up while using a spudger to push between the case and batteries. Saved twenty some odd steps by doing it that way. If the batteries weren’t swollen I could not have done it this way. NOTE: When ordering just the battery adhesive remover is NOT included. I did not order it because I have acetone here and felt I did not need the iFixit remover.
-
-
-
Use the flat end of a spudger to lift the rubber heat sink cover up off the left fan.
This came of super easy as the glue seemed to have dried up or something of that nature; anyone know if this is an issue?
Also it seemed like there are clips on sides of the rubber heat sink which I couldn't work out how to clip it back on, so I placed it back where it was after and it seems to be ok; maybe it isn't meant to clip on hard and rather just to be a security measure. Anyone else had this?
I have this feeling that my “noisi fan” was actually the loose end of this rubber cover. So verify that you insert rubber clips back to its slots on under the edge of the sink.
-
-
-
Remove the following three screws securing the left fan to the logic board:
-
One 4.4 mm T5 Torx screw with 2 mm collar
-
One 5.0 mm T5 Torx screw with 2 mm collar
-
One 3.9 mm T5 Wide Head Torx screw
One 3.9 mm T5 Wide Head Torx screw
what exactly do you mean by wide head torx screw? Is that another torx screw i should buy?
best regards,
Seth
“Wide Head” just refers to the head of the screw being a bit wider than the others. It shouldn’t affect the size of the tool needed. That said, I also was unable to remove this screw with a T5. The screw on mine looked corroded. I ended up using Vampliers (great tool).
seems like T5 is the wrong screwdriver for the "3.9 mm T5 Wide Head Torx screw"
T4 seems to have worked for me
The nut of the 3.9 mm T5 screw (marked with red circle) seams to be glued or soldered onto the pcb. On my laptop, the connection broke so the nut is rattling on the pcb making a sick noise.
Does anybody have an idea, how to best fix the nut on the pcb again?
Marcel: The 3.9mm screw threads into a metal standoff (not a nut) that's glued to the logic board. If this standoff comes off of the board, a drop of superglue may allow it to stay in place, but to position the standoff properly while re-gluing it, first reattach it to the fan with its screw, then place a drop of superglue on the bottom end of the standoff, then drop the fan back into place and apply a little pressure to the top of the screw to help the superglue stick to the logic board.
"One 4.4 mm T5 Torx screw with 2 mm collar" (red) .. mine had no collar; I noticed on closing up.
-
-
-
Use the tip of a spudger to flip up the retaining flap on the left fan ribbon cable ZIF socket.
-
Starting at the top of the cable, slide a plastic opening tool under the left fan cable to free it from the logic board.
-
Lift the left fan out of the device.
a question out of curiosity is it possible to remove that left fan completely and use and external fan instead of it?
and what is that fan for? is it for CPU or VGA? i noticed someone was referring to that fan as vga's fan.
I can't imagine any scenario why one might want to do that Einstein. An external fan on a laptop? Seriously?
maccentric - 답글
be nice, silly
Couldn’t manage to “flip up the retaining flap on the left fan ribbon cable ZIF socket.”, in fact think I may may broken a piece off. In the end just pulled out the cable by sliding it down and out (maybe I did manage to loosen it after all). Cable didn’t appear to be glued down thankfully.
That happened to me too! Little pieces of copper came off but I couldn’t see where from . I hope it’ll work after I reassemble.
Holes on the new fan did not exactly match up and ribbon cable has more tension as a result -
I had to cut the loop on the mount for the 4.4 mm T5 Torx screw. Not ideal.
So, what do I do if I break the connector on the board? Serious question, yes I did it. Now, how do I get the replacement part?
The retaining flat is super fragile. And I doubt there’s any practical way to replace it. Don’t know if the connector still works ok without the flap.
After I exchanged the fan it‘s super noisy. I ordered at the ifixit shop and it seems it works but it‘s just super noisy. Does anyone know why?
Thanks
I have the same issue with my newly replaced fan…sounds worse than the broken one - will need to check with the ifixit team…
reported this to the support team and got a replacement within one day. The new part works fine - no noise at all, old one is on the way back. Thank you iFixit!
Left fan was 400% harder to remove due to adhesive. Use the opening tool to gently pry the cable little by little and eventually it will come up. The adhesive pad is the same size and position as the foam pad so concentrate your efforts there
Heads up that the ribbon cable slides into the connector on the board like a little tiny SD card.
-
-
-
Remove the single 3.1 mm T5 Torx screw securing the SSD to the logic board.
When I got to this step I realized the screw was stripped. I'm unsure if it was stripped by my efforts -- I used the prescribed P5 screwdriver that was also used for the other screws, and the screwdriver still works when putting the lid back on.
So to extract the stripped screw in Step 5 I've ordered iFixit's Precision Screw Extractor Set.
Now I'm wondering if I also need to find a replacement screw since I probably won't be able to use the stripped one again after it's been extracted? The screw is called: 3.1 mm T5 Torx screw as per this guide .. the best I can find on eBay are screws called: 1,4 X 3,1 mm Torx T5 or 1,5 X 3,1 mm Torx T5 ... will one of these work? Would I be able to just go to a hardware store and find the proper screw or is it a specialty item?
I'm sure you've long since figured it out, but for the benefit of anyone else reading this, a P5 is not a T5. It's a different screwdriver. The driver for the screws on the outside of the case will not work on the screw holding the SSD. I'm not sure why they left it off in the list of tools at the top.
The screws on the outside of the case are Pentalobe.
The screw for the SSD is Torx.
Both drivers are (now) on the list of required tools.
(However, my devices both have a T6 head, not T5. May have been after-market.)
For the Macbook Pro Retina 15" Late 2013 models, I've heard the SSD is soldered to the logic board. This guide is for that model, but it doesn't address the soldering issue. Have I just been misinformed on this issue? Has anyone tried it with the late 2013 model yet?
The SSD is not soldered to the board. You maybe thinking of the RAM which is soldered. (thank you apple) *dripping sarcasm*
I was needing to send my mid 2014 15" MacBook Pro in for a keyboard repair, and my company IT department shipped me a loaner of the same model except that it had a smaller SSD in it than mine, and said I should swap the SSDs between the two and then send mine back with the smaller drive in it to get fixed. I've been unable to swap the drives because neither mine nor the loaner (which are both the same model) appear to have a T5 screw holding the SSD in place. Both of them appear to have a T4, not a T5 (whatever it is is smaller than a T5 anyway, so I'm guessing it's a T4). So now I'm on hold until I can find a T4 screwdriver.
OK, got the new tool set, and yes, it really is actually a T5 screw, you just need a really sharp driver. My existing T5 driver was getting a little dull on the tip. So make sure you have a really new/precision T5 driver/bit to use (and again I'll point out that ifixit failed to list this tool in the list of needed tools at the top).
Both of my A1398 computers (Mid-2012 Retina 15” and Late 2013 Retina 15”) have a screw that my T6 bit fits perfectly. If using a T5 screwdriver/bit makes your screw seem stripped, try the T6.
(The 2012 was purchased second-hand, and the 2013 was purchased from a dealer known for unauthorized upgrades; it is possible my screws were swapped.)
I’m pretty certain this screw is a tiny bit larger diameter than the others — I mixed it up and tried to use it elsewhere, and it wouldn’t fit, so IO swapped in another and set this one aside. Later when I got to this point, other screws were too small and wouldn’t grab. So I tried the one I had set aside earlier, and it fit perfectly. That might explain why this one seemed “stripped” to another commentator.
-
-
-
-
Slightly lift the rightmost side of the SSD and firmly slide it straight away out of its socket on the logic board.
where can I buy a 1 or 2 TB SSD? I think it isn’t possible using a SSD like I build in my MacBook Pro mid 2012?
You can get 1TB or 2TB SSD from OWC macsales.com
Hi,
I intent to purchase a 2 TB ssd for my late 2013 MBP. I read some comments, that the mac reaacted weirdly and was not 100 % compatible with the ssd (not waiking up properly, macstart sound sounded twice, sometimes freezing…). Can you confirm these issues, and are there any workaroundas for them?
Secondly I plan to restore the time machine from my broken late 2011 MBP. Since you recommended late os for the ssd upgrade I was wondering whether If I restore a time machine backup with an older os if my ssd will cause problems then because the drivers are suddenly missing?
Thanks and best regards
ramón
I did this first thing after disconnecting the battery and I'd suggest everyone to do the same! Save your data!
My battery was bulging and it is obviously quite dangerous. But anyways, any battery in seemingly good conditions can be dangerous as well.
So in order to prevent a massive data loss along a very long crying session, I opened the back, disconnected the batt as per the guide instructions and then took the SSD off.
So in case something had gone wrong and the battery started smoking forcing me to throw my laptop off the window, burying it in sand or the whole thing starting to burn, I would've already had a way to access my data by setting the SSD aside first thing.
It is actually no joke when working with batteries, specially when they're bulging like mine was. Check videos on youtube and see how volatile these things can be!
Kudos to the iFixit team, this is a great guide!
Ismael: That's a good idea, but it's also a good idea to back up the SSD before beginning the Macbook disassembly procedure. This way you'll have two copies of your data, and you can plug the backup into another Mac if you need access to it before you've got your Macbook reassembled, especially if something goes wrong during reassembly that prevents you from using your Macbook for a while.
-
-
-
Use the tip of a spudger to flip up the I/O board data cable lock and rotate it toward the battery side of the computer.
-
Use the flat end of a spudger to slide the I/O board data cable straight out of its socket on the logic board.
This is a difficult step. A few images for the removal of the cable would be good/better
Yes, a few more detailed pics here would help. Indeed, general pics explaining HOW ALL the plugs and sockets fit would be VERY handy :-)
Here is that guide!
I helped me to use the pliers both to get underneath the canble lock and then push on the wings of the cable.
Used fingers on the cable lock.
I found it easier to just use my finger nail to release the clamping lever. Then the spudger to ease it out.
billbonney - 답글
-
-
-
Remove the two 3.1 mm T5 Torx screws securing the I/O board to the logic board.
-
On some models, also removing the silver 3.5 mm T5 Torx screw from the heatsink can aid in I/O board removal.
-
Carefully lift the I/O board and remove it from the lower case.
it actually has an extra screw that needs to be removed.
Thank you. Removing the screw by the heat sink really helped get this board removed.
It helped me to push the IO board further into the casing and then lifting.
i/o cable was much easier to remove after freeing the i/o board & slightly lifting it. SK
Yes, I replace motherboard without touch IO Board
On a 2014.5 design, these instructions should be revised on this process. The heat pipe needs to be removed first if one were to remove the I/O CCA, Reason being, the CCA is installed first into the case and then the heat pipe contact tab lays atop the CCA under the plastic injection molded part. This injection molded piece part secures the tab to the CCA to ensure optimal contact thus, ensuring heat is wicked away from the CCA.
So when I see comments regarding how it is easier to install than remove, that is an indicator that the user was unaware of how to correctly assemble this component thus, the CCA top side substrate is sitting below the heat pipe tab vs. the other way around.
This will induce a thermal issue on the I/O CCA and also, possibly short out the board when the conformal coating and painted surface of the heat pipe wears off due to vibration when cables are connected.
While I like these instructions, I would overhaul them and revise them.
Yes, removing the screw near the heat sink really did make it come out easily!
David Choy - 답글
Notice that the silver 3.5 mm T5 Torx screw is the same one you’re going the be asked to remove on step 29.
As per comments above, I found it mandatory to remove the extra silver screw near the heat sink, which locked the logic board.
Hence, the instructions for this step were very relevant:
"On some models, also removing the silver 3.5 mm T5 Torx screw from the heatsink can aid in I/O board removal."
Tim Telcik - 답글
If you have a Transcend JetDrive installed, it needs to be removed. It was just so familiar and form-fitting that I forgot it was in there. Removing it made the I/O board suddenly so easy to remove...
-
-
-
Use the flat end of a spudger to pry the headphone jack connector up from its socket on the logic board.
After connect the cable aux is not working
Mine is not working as well after reconnecting, what to do now?
Strange, I'm working on the same model, and it doesn't have a flex here. It's soldered.
Same as Ross. No cable to pry. It’s soldered. But looks like I can continue on anyway
Mine not soldered.
-
-
-
Use the flat end of a spudger to pry the left speaker connector up and out of its socket on the logic board.
-
Use the tip of a spudger to pry the right speaker connector up and out of its socket on the logic board
This step could use an image showing the cable lock in the "up" position, releasing the connector. It is hard to see how it works in the "down" position. I think this is the actual connector - there are images in the PDF linked here:
http://www.ddknet.co.jp/English/products...
My MBP has an intermittent connection in this keyboard cable. It would be good to know where to buy a replacement!
Pry the speaker connectors *up and out*. Doing it from the cable's sides, next to connectors, is easier.
Adhesive under the left cable made it hard for me to remove it. The right one came out very easy.
i broke off all the connectors to the logic board any fix for this ?
Steven Rai - 답글
Key here is to go EXTREMELY slow and gentle. The speaker connector in left photo has no release lever(in case you were wondering) I used a tweezer to hold very outside edge down while massaging cable side from underneath with spooner. Gentle rocking and it finally came out properly!
These instructions are completely inadequate. For anyone who hasn’t done this before, there has to be some image of whatever it is that releases the cables. “Pry the left speaker connector up” without showing the release is just telling me how to turn my computer into junk. . . Which I just did. It’s twelve years old and fully backed up, so I was prepared for this, but I am very disappointed in these instructions. They’ve been bad from the start.
Es wäre besser, wenn man den Ausbau des rechten Lautsprecherkabels besser heraushebt! Ich habe das leider überlesen und den Connector zerstört. Aber ich habe es doch irgendwie geschafft, das der Lautsprecher funktioniert!
Pay attention that there are 2 connectors of speakers! Otherwise, you will realise in step 32 (like I did) that you forgot one of them ;).
Despite being extremely careful, both of these connectors broke off from their position on the logic board. It seems like they were soldered on rather than being just a push fit.
following these instructions exactly removed the entire socket from the board. This needs much more detailed instructions and pictures on how to accomplish this and how the connector is put together. the wide view here is grossly inadequate. This needs a much bigger warning to slide the cable away from the connector as any prying will destroy it. The socket came up and took the pads with it, so there's no soldering it back on. guess I'll just have to go without one audio channel in the onboard speakers
On minute 15:04, in this video, this step is better explained: https://youtu.be/ykqJenHhZJs
-
-
-
Peel back any tape covering the keyboard ribbon cable connector.
On Re-assembly, I found this to be the hardest part. I resorted to using the provided tweezers and taking turns left and right, working it back into its ZIF socket. If someone knows a better way, please share.
I just got done with this and my plus/equal, tilde/apostraphe, brackets/braces and volume up keys are not working. Wondering is this isn't seated correctly or if i damaged something. :-(
sturmjonny - 답글
This is one of the fussier flex cables to reconnect. I'd say it's worth opening it back up and reseating it. Only takes a few minutes—just disconnect the battery and then come straight to this step. Make sure the cable contacts are clean (wipe them with a little isopropyl alcohol and a lint-free cloth), and that the connector is clear of any dirt/debris (give it a good blast or two with some compressed air). Make sure the cable is inserted perfectly flat and straight into the connector (this is the hardest part, just takes patience and a little dexterity). Good luck!
After replacing the battery I also ended up with keys that don't work (ESC, 0, -, p, ;, ', ENTER). Tried reseating the connector, but without any luck. What is weird is that the keys sometimes work, sometimes they don't. Usually they don't in the first 10 minutes or so after I turn on the mac. If the room temperature is lower (if it's cold), the keys are not functional for a longer period of time...
Advice for other people who are changing their macbook battery: take extra care with this connector!
Use the retaining flap to pull the ribbon cable back into the socket.
This keyboard ribbon is so thin. It is like thinner than X-ray film. I was afraid to remove the ribbon from the socket. So, I skipped this step and follow other steps till ‘Step 30’. I didn't remove the logic board as shown in Step 31 and 32. Instead, I removed DC board screws and then DC board from the hole. The cable from the DC board connected at bottom corner of the logic board. I hold the MacBook Pro vertically and lift the logic board slightly and removed the DC board ‘plug’ from the socket. Next, I plugged in the new DC board and followed this procedure in reverse order ( from Step 30 to Step 1). Everything went fine. Important Note: When lifting logic board, please do it carefully and very slowly. Don’t be hurry and don’t break anything. Use magnifying glass and Magnifier in your iPhone to see the tiny parts big and clearly, before removing them.
-
-
-
Use the flat end of a spudger to flip up the retaining flap on the keyboard ribbon cable ZIF socket.
-
Use the flat end of a spudger to gently back the keyboard ribbon cable out of its socket by pushing first at one side, then the other.
What is the connector to the right of the keyboard (shown in the above diagram i.e with battery at the bottom)?
There doesn’t seem to be anything attached to this connector on my system.
The trackpad connector looks quite similar to the leftof thekeyboard connector.
I was having trouble seating the keyboard connection back in. In actuality the issue was the real electronic connector was hidden under logic board after reinstalling the PCB! i was trying to insert the Tape cover instead! Had to re-loosen Logic board and retrieve connector (should see metal traces on the connection strip (that is an easy way to confirm! I had used some scotch tape to hold the cover tape back and this caused me to miss the actual wire harness! I advise anyone doing this process to have a magnifyer with a light so it is easier to see the small parts.
Rather than pushing with the Spudger, I found it much easier to use the tape to pull directly back on the connector.
-
-
-
Use the tip of a spudger or your fingernail to flip up the retaining flap on the microphone ribbon cable ZIF socket.
-
Pull the microphone ribbon cable out of its socket.
Meaning, pull the ribbon cable out horizontally. And be aware that the copper wiring is on the underside of the cable and the topside is just black plastic, so don’t freak out and think you ripped something pulling it out.
This cable is quite stiff and felt very resistant to being pulled out - I gently shaped a small bread tag piece of plastic in to a hook that would gently and evenly pull the cable back without tilting it to one side or the other. It is also a pain getting it back in when replacing the logic board - very stiff. Be patient.
I just used tweezers.
Looks like it had a sticky patch fixing it near the edge of the board - this would make it unwilling to come out of the socket. The patch looks to be the width of the cable and square, so probably pushing a thin something (plastic) under the cable up to the edge of the board would unstick it.
-
-
-
Use the tip of a spudger to pry the display data cable lock and rotate it toward the DC-In side of the computer.
-
Pull the display data cable straight out of its socket on the logic board.
I'd recommend using the pliers.
conflicting... correct is 'Pull the cable parallel to the face of the logic board.'
-
-
-
Remove the following six screws securing the logic board to to the upper case:
-
One 2.6 mm T5 Torx screw
-
Two 5.8 mm T5 Torx screws
-
One 3.8 mm T5 Torx screw
-
One 5.2 mm Raised Head T5 Torx screw
-
One 3.5 mm Silver T5 Torx screw
anthony: Unplugging the right speaker connector was done in step 23.
No, you are mistaken . Step 23 was for the LEFT speaker. Anthony is correct stating that right speaker disconnect is missing from this guide. NOW is the time to disconnect the right speaker from the LB!
when following on the contrary, its good to check all the ribbons and cables to make sure some are not stuck under board prior to screwing down.
green indicator: raised head screw is the one you removed the rubber cap from in prior step. (I removed – and then replaced — a different screw in this step. Revisited it with more daylight and saw my error.)
auntialias - 답글
-
-
-
Lifting from the side nearest the battery, rotate the logic board toward the top of the MacBook Pro.
-
Using the flat end of a spudger, carefully push the MagSafe 2 connector out of its socket on the bottom of the logic board.
-
Clockwise from top: keyboard, trackpad, battery, right speaker, keyboard backlight, display, microphone, headphone jack, left speaker.
In bullet #1 I lifted logic board from left side (nearest battery), tilted toward right side (port side) and pulled to to the left a bit to get ports out of chassis cutouts.
Then I followed bullet #2.
Going revese order, remember about mic connector and backlit connector. Those nasty small tails are easy to omit. Then you will have to repeat disassembly to get them from under mainboard.
@radioerewan @talarohk - I think that's a good idea. I went ahead and added a photo showing all the cable locations to check—hopefully it will save someone some trouble! Thanks for your comments.
This was the single most important pic of the reassembly.
Yes, be very careful before screwing things down. I also forgot the backlight and the display cables. Had the cover for the display cable out, but not the actual cable. I was able to use tweezers to fish the cables out after removing the screws but without removing the whole board.
I had to go back cause I couldn’t figure out where the logic board connector into (under the board). Funny enough i assembled it and it worked though the night and didn’t come on again. Had to go through the whole process b4 i figured it out. Definitely a good idea to at least breeze through all the images
In link MacBook Pro 15" Retina Display Mid 2015 Logic Board Replacement step 34 the second picture exit the procedure install ZIP
reassembly: so far the hardest step. After getting all the connectors above board, I still couldn’t quite line up the screw holes. It finally turned out that the board was being prevented from being in its full leftward position because the edge of a flange at the top of the USB port was directly positioned against the edge of a flange on the case. I used my thumbnail to press down on the port’s flange so that it slid under the case flange, allowing the board to shift left another half-millimeter and make everything finally line up.
I Just removed the whole power connector with the main board, seemed a little easier. But that’s just me. Good manual thou.
Had a lot of trouble getting the power cable out. Would definitly recomend this.
100% take the power connector out. This guide is amazing but that is something I would change in it. Also I would do step 35 before attempting to remove the logic board. Unsure if there are other implications of this approach.
Am I completely stupid? ...! When I wanted to remove the mainboard, it was still connected to a plug. I searched, but found no indication about this plug. So I had to try to figure out how this plug works. I started trying, which finally tore the console off the board: -o ...: .- ( It is a small plug to the right of the power supply - Pic. #3 top right!!. Comes below the battery. Note, this must be pushed backwards, but may have a lock. What can I do now? If someone has a tip that I do not have to change my motherboard, I am very, very grateful!
I had the same issue where that cable was still connected. I noticed that it was the same type as another one where it needed to be lifted vertically so I did that using the tweesers.
Same problem here, so concerned I might break it I've been working on it for more than an hour! Frustrating to be stuck this late in the process. Anyone know how we missed it in the guide and what it's called?
Definitely unscrew and remove the two screws that hold the MagSafe 2 connector then remove the connector with the board.
The connector that’s not mentioned in the dissasembly manual is the right hand loudspeaker connector. It pulls up, just the same way as the left hand loudspeaker connector does. No locking tab.
Other than that it’s a brilliant dissasembly instruction manual, well done.
I took the logic board out, re-soldered U8900 (well known issue with these boards) and put it back together following the manual in reveres. All works fine now.
One thing that I did which helped. I printed the manual off, then stuck the screws in every case to the page next to where each screw was described using cellotape. So every screw went back exactly where it came from.
It is mentioned in step 23, but I agree it was not very clear (I also realised in this step).
For me, this step was the most hard part when reassemble. Because it is easy to forget or hard to reconnect MagSafe 2 connector properly. I had to give in to professionals just to find out i couldn’t plug this MagSafe 2 connector properly. because of it’s limited angle and i only have 2 hands to do the job while board is lifted.
Instead of disconnecting the magsafe socket, I unscrewed the two screws holding it to the case. Then, when the logic board is removed, the connector will slide out with the logic board. Also useful to if theres a bunch of magnetic junk stuck to the adapter as it becomes easy to clean.
Unscrewing the 2 magsafe screws should be put as a step in the manual. I had a hard time disconnecting the cable and a hard time trying to connect it back when reassembling because there is not enough room to do it and i couldn’t figure out that there is a small clip that holds the connector back in place safely. I had to repeat the role proccess of assemble/disassemble twice in order to fix the magsafe not charging issue. I thought i had lost the connector or damaged the board.
Agreed. I found it necessary to unscrew the magsafe power socket from the main board during disassembly to help unplug the ribbon cable from the main board, then screw in the magsafe power socket before the main board during reassembly. The magsafe power socket plug is too short to try and reattach when the magsafe power socket remain attached to the chasis.
It is not necessary to remove the logic board for this. I did this process without removing the logic board and the 30 steps required to disconnect, remove and reconnect it. It was much easier. Not sure why iFixit insists on removing the logic board: its presence does not block removal of the battery.
Same question here. What’s the reason behind removing entire logic board?
From what i gather, logic board removal facilitates de-adhering the ex-battery units, as the solvent can damage the speakers.
AKin Adams - 답글
-
-
-
Remove the following three screws securing the left speaker to the upper case:
-
One 5.6 mm T5 Torx screw
-
One 6.9 mm T5 Torx screw
-
One 2.6 mm T5 Torx screw
-
Lift the left speaker out of the upper case and set it aside.
On my MBP there was an adhesive holding the speakers down. So, "lifting" was not exactly accurate.
I have A1398 15 inch , need to replace or fixed left speaker but i can’t find One 2.6 mm T5 Torx screw(yellow one), any idea what to do here?
Same question as Biswajit, I can’t find the 2.6 mm T5 Torx screw (yellow one) on my mid 2012 MBP...
can you get too the speaker without taking the logic board first
How it possible to get speaker out if system without taking the logic board first?
I only removed the 10 screws and the back panel, the 5 speaker’s screws (without removing the speakers), and the two battery screws, and managed to remove the battery package without undoing anything else. I used a member card (credit card type) to loosen the adhesives under the batteries.
To remove the rest of the glue, I soaked it with something called Label Off from Biltema (Nordic). Finally, I used methylated spirit (rødsprit) to clean it all up and let it dry for 5 minutes before assembling the new battery pack.
Yeah, it seems that all this complexity is just about protecting the speakers from the acetone… a different solvent might have saved me a LOT of work, and damage to my speaker connection.
The speakers may stick so be prepared to gently force any adhesive free.
-
-
-
Remove the following three screws securing the right speaker to the upper case:
-
One 5.6 mm T5 Torx screw
-
One 6.9 mm T5 Torx screw
-
One 2.6 mm T5 Torx screw
-
Remove the right speaker from the MacBook Pro.
My speaker wire was wedged under the edge of the battery. I proceeded to step 35 and removed the two battery screws. This freed up the cable.
Mine was stuck too, and I did what Fred did and waited to step 35 to try and remove the cable. It turned out not to be wedged under anything, but just glued in place.
My left Speaker makes ugly noise. do I really have to do all the steps or is it possible to just remove the speaker… I guess, it’s necessary.
The speaker has quite a lot of plastic that goes under the board at the top end. There is no option but to remove the covering parts. The notes show which steps can be skipped.
I forgot to run the speaker wire the motherboard. Can it create interference and make the speakers croate?
-
-
-
Remove the two 3.9 mm T5 Torx screws securing the battery board.
When rebuilding, be sure not to pin the square trackpad ribbon cable connector under the wide keyboard ribbon cable. It should be over the keyboard ribbon.
can i start at step 36 for the battery or do i have to do everything before it?
HENRY HALL - 답글
-
-
-
To protect your display, place a sheet of aluminum foil between the display and keyboard and leave it there while you work.
I was wondering how it could leak. I suppose you could spill it, or flood the battery space with it and it leaks through the trackpad.
You’re correct. On most models, it’s unlikely to leak unless you use way too much. The foil is a “better-safe-than-sorry” precaution.
At this point removing the screen is a matter of minutes so to be safe I just removed the display assembly all together.
Agreed, might as well just remove it to be safe, you’ve removed everything else and it’s just 6 more screws and 5 minutes time.
It”s 8 more screws. Ie the 6 T8 screws and the two small T5 that hold to retaining brackets. But easy, and i recommend for your first battery swap.
In my case it leaked through the trackpad…. I had a transparent film (instead of aluminium) and it did not damage the screen.
Je confirme...
Sans protection, le dissolvant affecte bien le revêtement anti-reflet au niveau du trackpad. Le dissolvant "se faufile" de l'autre côté au niveau du trackpad.
Ca va me faire une réparation supplémentaire : changer la vitre du MacBook Pro, ainsi que le cauotchouc qui entoure cette même vitre.
Je ne vois hélas pas de tutoriel sur iFixIt pour changer la vitre sur ce modèle...
On en a un pour l'écran complet, si ca peut vous aider: https://fr.ifixit.com/Tutoriel/Remplacem...
-
-
-
Now that your MacBook Pro is fully prepped, it's time to prep yourself.
-
Wear eye protection when handling and applying the adhesive remover. (Eye protection is included in your kit.)
-
Do not wear contact lenses without eye protection.
-
Protective gloves are also included in your kit. If you are concerned about possible skin irritation, put your gloves on now.
-
-
-
Pull off the black rubber stopper from your bottle of adhesive remover.
-
Use scissors to cut off the sealed tip of the applicator.
For all those who acquired the battery from another vendor who did not supply you with above mentionned glue-remover or similar: Acetone or Silicone Remover work well too, as many other also commented through various steps of this turorial. I tried using petrol (or gasonline for our american readers - not to mix up with petroleum, which is something completely different), which worked well for me for iPad repairs before but I cannot recommend it in this special case. Thinner might work as well, but be very careful, for it dissolves plastic and might damage the battery covering in which the lithium is shrink-wrapped in. Also take good care not to damage any cables with thinner if you decide to use it. A well ventilated room goes without saying for all mentionned dissolvents.
-
-
-
Apply a few drops of adhesive remover evenly along the elevated edge of the outer right battery cell.
-
Wait 2-3 minutes for the liquid adhesive remover to penetrate underneath the battery cell before you proceed to the next step.
I found I needed to use a lot of the adhesive remover to assist with a stubborn battery pack that had been in place for 10 years.
Tim Telcik - 답글
-
-
-
Slide one corner of a plastic card under the outer edge of the battery cell.
-
Slide the card farther underneath the battery cell to separate it from the adhesive securing it to the MacBook Pro's upper case.
-
-
-
Apply a few drops of adhesive remover evenly along the elevated edge of the next battery cell.
-
Wait 2-3 minutes for the liquid adhesive remover to penetrate underneath the battery cell before you proceed to the next step.
-
-
-
Slide one corner of your plastic card underneath the second battery cell.
-
Push the card underneath the second battery cell, and slide it side to side to separate the adhesive underneath.
-
Leave the plastic card underneath both battery cells (or flip them over) to prevent them from re-adhering as you proceed to the next step.
-
-
-
It's time to switch sides. Remove your book or foam block and place it under the opposite side of your MacBook Pro.
-
Repeat the procedure from the prior steps to separate the two battery cells on this side:
-
Apply your adhesive remover to the elevated edge of the outer battery cell, and wait 2-3 minutes for it to penetrate.
-
Work one corner of a plastic card underneath the battery cell, and slide the card fully underneath the battery cell to separate it.
-
Do the same for the adjacent cell.
-
Leave your plastic card in place or flip the battery cells over to prevent them from re-adhering during the following steps.
-
-
-
While lifting the plastic battery frame out of the way, apply a few drops of adhesive remover underneath the top edge of each of the two remaining battery cells.
-
Wait 2-3 minutes for the adhesive remover to penetrate before you continue.
Instead of this, I just went and got safety wire I have, cut about 2ft, and then tucked it under a batter cell and went back and forth, about 5 times, and it cut through the adhesive. Did that for each cell and battery came right out. I didn’t bother removing the old adhesive, no point imo and saved from any liquids in the computer.
Rick Hulun - 답글
I put the laptop at about 45º on its edge so the solvent could flow down, and then when doing the separation it was much easier to get the card between the metal plate and the batteries with the laptop case completely vertical. The double sided mounting tape on the battery is really aggressive and the rubberised compound quite annoying to remove the last traces off the metal plate. You will need a generous amount of solvent on a cleaning cloth or paper to remove the last of the adhesive.
One thng that I have never seen mentioned is that when you remove the two cenre cells it is quite easy to lift the metal plate that sits between the trackpad and the battery. My plate ame right off and was attached to the battery. Luckily I didn’t bend it very much but it would have been nice to know that this was a distinct possibility. The adhesive between this trackpad cover plate (thin stainless steeland the battery is a !&&* of a lot stronger that the adhesive between the plate and the body of the Macbook. It amazes me that I have never seen this mentioned in any written or video guide so be careful
Well, it actually is mentioned in the next step…
this won’t damage the trackpad right? i’m worried about that….
AppleTopic - 답글
-
-
-
While lifting the plastic frame out of the way, push one corner of your plastic card underneath the outside edge of the first center battery cell.
-
Slide your card all the way under the battery cell, and leave it to prevent the battery cell from re-adhering.
Pulled off the thin metal plate. Should I try to put it back in (bent up a bit) or leave it out upon replacing the battery?
cameronjpu - 답글
-
-
-
Repeat the above procedure to separate the last remaining battery cell from the MacBook Pro's upper case.
-
-
-
Lift the battery with the plastic frame and slide it back toward the MacBook Pro’s hinge until it clears the screw posts holding it to the upper case.
Ich habe am Sonntag den Akku gewechselt . Alles nach der Anleitung .
Ich habe mich an die Anleitung gehalten , beim aus sowie beim Einbau. es verlief alles tadellos auch für mich als Einsteiger . es war zwar vieles etwas kniffelig mit der Elektronik und den keinen Schrauben . 1 bis 2 Stunden , nun ja , das hat leider nicht gereicht . 2 Einhalb bis 3 Stunden , den die meiste Zeit habe ich damit verbracht den Kleber des Akkus zu entfernen , der beigelegte kleberentferner nun ja , war nicht besonders oder ich hatte zu wenig Geduld . Alles in allem bin ich aber trotz allem sehr zufrieden .
-
-
-
Lift and remove the battery.
-
With a little luck, you can slowly pull out each strip of adhesive with your fingers.
-
Otherwise, soak each strip of adhesive with a bit of adhesive remover for 2-3 minutes, and then scrape it out with a plastic tool. This can take quite a bit of work, so be patient.
-
Mop up any remaining adhesive remover and give your MacBook Pro a few minutes to air dry.
-
Calibrate your newly installed battery: charge it to 100%, and keep charging it for at least 2 more hours. Unplug and use it normally to drain the battery. When you see the low battery warning, save your work, and keep your laptop on until it goes to sleep due to low battery. Wait at least 5 hours, then charge your laptop uninterrupted to 100%.
Tip: when testing the battery's fit, once you have it in place and the screw holes are lined up, I made two little marks with a pen right where it tucks under the screw posts. Then once you have the adhesive backs removed, just hold the battery upright and line up with your markings, then tilt it down and tuck it under.
I'll arrange to send another bottle of the Adhesive Remover Solution your way. :)
For anyone who's wondering, you can use the solvent quite sparingly—there's more than enough for one, possibly two battery jobs in there. But it can be tough to tell how much is enough if you're doing it for the first time. Stick with about 1 ml per cell, and add a second ml if needed.
I just replaced the battery in a 2011 15 inch MacBook pro last week. It took maybe 5 minutes and cost around $100. Now the life is over 100% because the new battery I got was actually a higher capacity than the stock battery.
I find it actually almost criminal that Apple has progressively tried to make it harder and harder to do DIY maintenance and improvements. At this point I refuse to buy a new Mac. I have 15 apple products in my house….but they are not going to get any newer. I prefer to buy a good used mac and put new RAM or an SSD drive in it. Maybe the graphics is not quite up to par but they are good solid machines. People (maybe a smaller subset) want choice and options and preventing any DIY work is a bad move in my mind! Typing on a 2012 MacBook pro 13 inch…which is a great size. I was able to add a 1 TB SSD to it, but it has 8 GB or RAM and that is not enough….Chrome freezes constantly and you can only have a few apps open. Come on Apple! listen to your customers, not your shareholders.
hi, after replacing the battery, all seems to work properly except the headphones jack. I can hear the sound from the internal speakers but when I plug the headphones jack sound is not output and it stills come from internal speakers. I checked again the headphone jack cable and it is properly fit on the board. I also tried resetting the SMC but problem persists. Could you please advise ? Sherif.
I want to remove the 2 center cells to get at the track pad, but it seems that plastic frame forces you to remove all the cells. Am I right? That makes the job much harder.
joigaloid9 - 답글
After replacing the battery I can’t charge the battery to 100%. Maximum charging is 91%, the led at the power cable does not get green even after hours of charging.
Even a SMC reset did not help….. Any ideas?
Got the same problem as hefe_killer. I reset the SMC, yet sometimes my MacBook just shuts off and when I charge it it says 1% even though it had maybe 50% or so left when it shut off. Also when it runs out of battery it immediately shuts off instead of falling asleep.
Me too :( Kevin
I think that in “Mop up any remaining adhesive remover and give your MacBook Pro a few minutes to air dry.” - the “mop up part is a major understatament.
This is by FAR the most laborious, messy, and time consuming step in the whole affair.. Of course it does not have to be done perfect but..
I recently replaced the battery on my MBP mid 2012 and it was working fine. I did the calibration and it seemed the battery was doing great. I was using my laptop until it hit 10% and the laptop suddenly shut down. I have tried to turn it back on using the power button but it is unresponsive. I have performed an SMC reset but it still will not turn on. How would I know if the battery is defective?
@justinhong93 Easiest way to check is to plug the old battery back into the board and see if that makes any difference. It’s a little tricky because obviously you don’t want to pry the old battery out until you’re sure whether it’s bad. But IIRC you can carefully set the old battery on top of the new one and plug it in. Secure it with some masking tape and carefully flip it over and turn it on. If that resolves the problem, it was probably a defective battery. Good luck!
Is it really necessary to remove everything or does it just give you more room to remove the battery and the adhesive?? This seems like such a daunting task when removing the battery seems so simple.
No, you are absolutely right !
I just installed the battery, it wasn’t as bad as i thought. Im anxious to make sure everything is working, can I use the laptop while its charging in its calibration state? The instructions say to charge fully and then an additional 2 hours, so does this mean (A) we can have it charging while we use it or (B) leave it powered off and charging until full, then an additional 2 hours, then we use? im confused
@joshrivera Answer (A). It’s okay to use while it’s charging.
So after double checking everything, and resetting the smc, I notice my battery status was not showing up on the menu bar. I check system preferences and the batter is at 0%. Seems like it’s not being recognized at all.
did you ever resolve this?
ammovirk -
hi there. I replaced the battery and it did charge, but the LED on the plug did not durn orange. but now it dose not charge at all anymore. after i did the reset of the SMC but now nothing happens anymore. can anyone help?
I too am having the same problem.
Roman, I was able to get my mine to boot. I pressed the left Shift-Control-Option and Power buttons for the 10+ seconds then released only the Shift-Control-Option buttons, continuing to hold the power button. Fans came on then the start-up tone. I can use it this way, but the mag-Safe does not show the LED and there is no battery monitor in the header.
I tried the SMC reset many times but it does nothing.
hopefully I’ll hear something back here or on Apple’s site.
Hi guys, I have just replaced the battery on macbook pro retina A1398 with a 1417 battery, I have orange light on magsafe however the battery information shows not charging and to replace battery now. Can anyone one enlighten some information on to what to do next?
I have also tried reset SMC several times I have noticed the right side IO board is not working properly.
Thanks
TIP: bevore putting in the new batterie, check that the batterie connector is centered, and alingned with the main board. Else you cannot nicley plug in the connector and the battery cannot be screwed in any more.
Thank you for putting this together. I’m back again with my notebook. It took me 4 hours, and I skipped steps 5 to 34.
ARE YOU SURE YOUR SMC RESET ACTUALLY HAPPENED?? HOW TO KNOW: I installed iFixit kit new battery 3mo ago into my mid-2012 MBP Retina with success except for a very abnormal battery discharge pattern (dropped to 77% in 1h, then to 28% in next 15min, then to auto-shutdown in next 45m). After multiple recalibrations, and after multiple attempts to reset SMC using the iFixit link to Apple instructions, nothing changed.
This week I discovered that the Apple instructions are correct but incomplete. Here’s what finally worked for me and gives confirmation that SMC reset occurred and for me restored normal battery discharge behavior: With battery down to about 10%, shut down Mac with lid still open; connect the charging cord; do the Apple-prescribed left-side SHIFT-CONTROL-OPTION , plus POWER key; hold for ≥10 sec; release all 4 together AND WATCH THE MAG-SAFE LED CONFIRM SMC RESET BY BRIEFLY TURNING GREEN AND THEN BACK TO RED. (Not sure if 10% state of charge is needed — might just need the red charging LED.)
Make sure you leave ok space for the speakers when you align the side elements of the battery!
Is it really necessary to remove everything or does it just give you more room to remove the battery and the adhesive?? This seems like such a daunting task when removing the battery seems so simple.
Para limpiar los adhesivos laterales que deja la batería en el unibody es mucho mas efectivo usar alcohol etílico 70 % para ablandar y raspar con un Black Stick las tipas de pega y el residuo final limpiarlo con un paño de microfibra con alcohol, así quedara impecable, no es tan efectivo en la plancha protectora del trackpad.
Thank you for the great tutorial, the iFixit battery and tools worked wonderfully.
I risked it and removed the battery without removing any of the components. I did remove the SSD, just in case. I can report great success although you have to be careful and not poor the glue remover like a maniac, I'm not liable if you fubar your MBP.
I ended up using about 20% of the remover liquid, 85% of which was used after the battery was removed, to remove the $&#@ glue… I used a sharp and flexible knife for the leftover glue.
I recommend pouring a few drops on the plastic card while you have it tucked under the battery, it will slowly melt the glue by capillarity. A few extra drops (3-5) and continue to push the plastic card slowly in a right to left motion.
Since I didn't remove any components, the whole job took about 30 minutes. The battery has to be calibrated, I recommend changing the power settings so it won't go to sleep during the calibration and use all the power it can use until dying…
Good luck
I did the same. I was worried about removing SO MANY components. When I read through it looked like you could just remove the battery, so I just went for that. I imagine the battery removal is easier with the rest out of the way, but this wasn’t too bad at all, and I didn’t have to re-install everything; and I had the peace of mind knowing I wasn’t messing up the rest of my machine.
It appears my new battery needs more adhesive as the battery is a little loose in the case (I can hear it moving when I carry the laptop). What adhesive can I add to the battery to secure it down better?
Hi Jorge
I recommend using a double sided adhesive acrylic foam tape. When you removed the original battery, you might have noticed it was taped with a thin acrylic foam tape, so I’d suggest something similar. They come in all widths and various thickness, though I’d recommend somthing with very little thickness due to small factory tolerances in Apple products.
Best of luck
pleas help….
I’m very worried, will I need to replace the trackpad after this? will the trackpad get broken after all the adhesive remover and the prying?
AppleTopic - 답글
After the battery fully drained I was unable to start up the machine again. Pressing the power button or simply plugging in the charger would result in the fans quickly cycling between on and off but nothing else happening. Luckily this was resolved by unplugging the battery connector from the logic board for a few seconds. Hope this helps someone.
Hi! I need some help with a problem.
I replaced the battery and turned the MacBook back ON plugged to the power chord and everything worked fine. “About this Mac / System Report” shows “Normal Status”, “1 cycle” and “Installed Battery”.
The problem is that the moment I unplug the Macbook, it turns off automatically.
I tried resetting the SMC but it doesn’t work
Any ideas?
I am also disappointed that i read to late that I can skip steps 5-35 ? I wod expect an info in the text (not in the comments) that is possible to skip the steps and why I should go on to do all the steps. If I read this info at beginning I would also opt in to skip this steps because the risk to destroy some connectors is very high
:/
I hope I can resemble now all parts without demage
This whole experience was nightmarish, the sent me the wrong part for the audio jack. After I installed the battery I booted up. The left speaker sounded like it was blown out and the right speaker was barely audible. I decided to shut it down and reset the SMC. Now it won’t boot up at all. The mag safe is orange so I know it’s charging. Anybody have any advice?
mikeywelch - 답글
I have one of these macs with a dying battery. Two years ago I removed the glued in battery of a 13” macbook pro 2013/2014? without using solvent at all but instead using one of ifixit’s microwave heated heat bags applied to the keyboard side of the bottom case. Worked absolutely fine. I am also wondering if the motherboard removal is really necessary except as a precaution against solvent damage? So no solvent no need to remove? It would be useful to have ifixit’s ‘official’ view on this, there may be other reasons I am not aware of. The other concern is that in the case of the 13” the new battery began to fail after about 18 months so the repair was of rather marginal quality.
IsidoreM
Hallo
Ich habe die Akkus ohne den Klebstoffentferner mit einem scharfen dünnen Spachtel abgelöst. Es erfordert entsprechendes Fingerspitzengefühl. Nach 5 Min waren alle Akkus aus dem Gehäuse entfernt. Kein Klebstoffentferner und keine langen Wartezeiten. Die Entfernung vom Restklebstoff auf dem Gehäuse habe ich mit Fingernagellack durchgeführt.
You don't really need all the steps and remove all the parts. I found youtube videos with instructions how to just unplug the battery and remove 2 screws and then use a dental floss to carefully remove the batteries without the liquid solution. I tested the new battery before I glued it in and it worked. After I screwed back everything and put the macbook to charge I noticed after few hours that the light indicator is still orange. Checking the battery status I noticed it is at 0% and unplugging the charger resulted in laptop turning off immediately. It looks like that charging the battery actually emptied it completely or something. Any ideas from anyone?
This glue cleanup process requires a ridiculous amount of time. I made better progress with scraping away the old glue tape using the ifixix "opener tool" which has essentially a "finger nail" on the end, which can be used to scrape with vigour without damaging the aluminium chasis. A lot of glue remover was also required, plus isopropyl acohol. This is the least fun part of the battery replacement process, but necessary to ensure the new battery can be secured using the new glue tape on the battery pack.
Tim Telcik - 답글
Hello,
I managed to go through all the steps and install the new battery. It seems to work perfectly but my computer got extremely slow and seems to have loads of issues such as trackpad failure, extremely long keyboard response, and overall abnormally slow functioning… a bit as if there were no RAM anymore. I tried to open it again and checked all the connectors but nothing seems to be unplugged. I also tried the SMC resetting and all sorts of shortcuts but I can’t even access to either disk utility or Apple diagnosis as the whole system is too slow. Does anyone have any idea of what could be the cause of all of this and how could I fix it ? Thanks very much for help !
I think WD-40 is best to remove the adhesive after the battery is out. Some people said they use it instead of the solvent. Also I saw on a youtube video that its best to use a syringe and measure the adhesive remover (2.5 ml per battery section or 5.0 ml max per section if you apply more than once). If that makes sense. That helped a lot to measure the application of the adhesive remover
An even better way is to use an "Xacto" knife with a #11 blade. It's a flat blade, perpendicular to the handle, and makes clean, short work of removing the remnants of the tape!
jiclark -
-


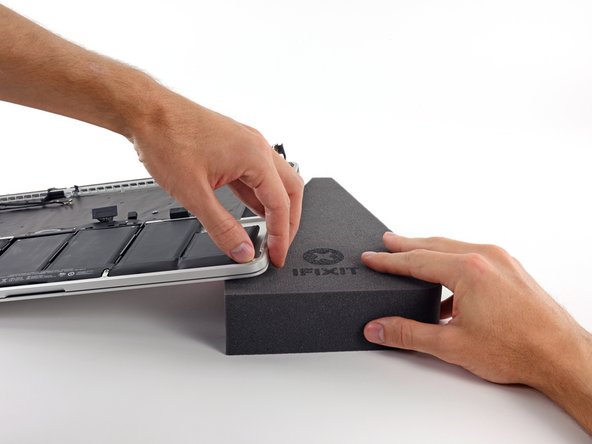


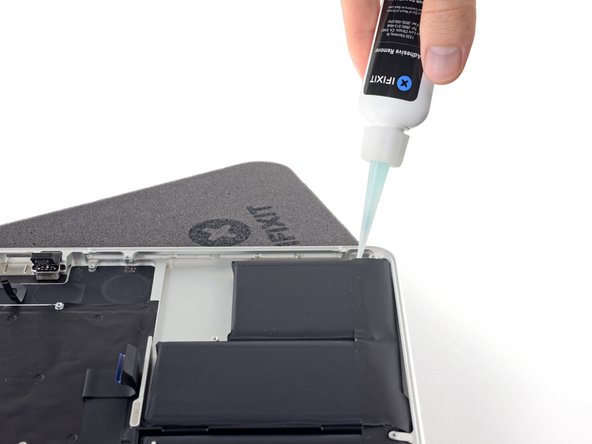


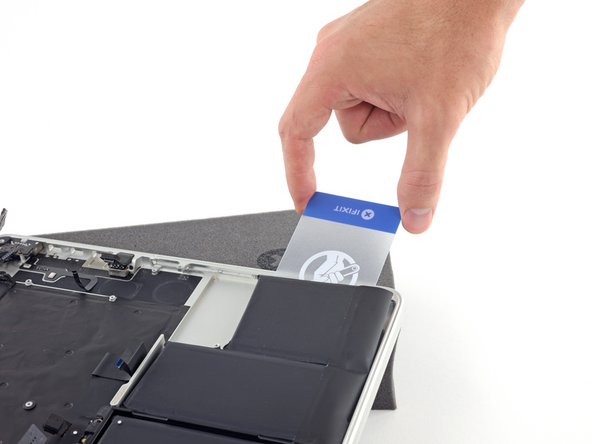


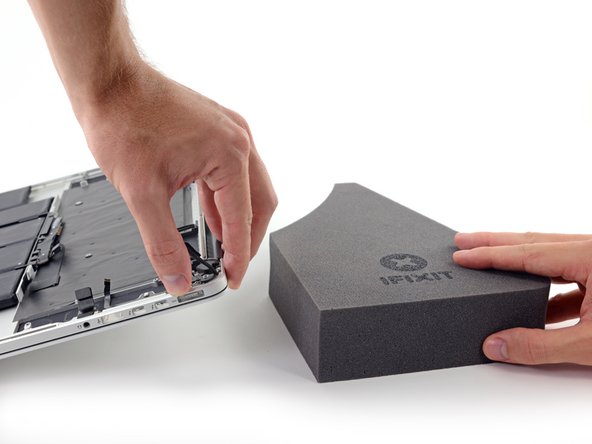


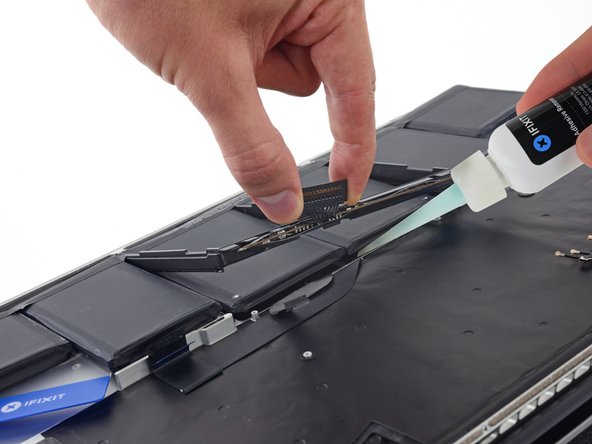


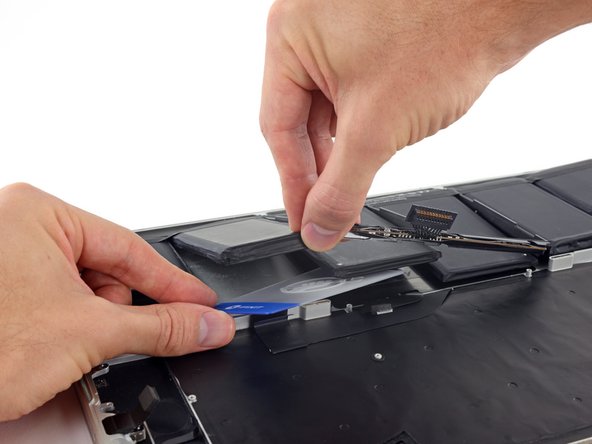


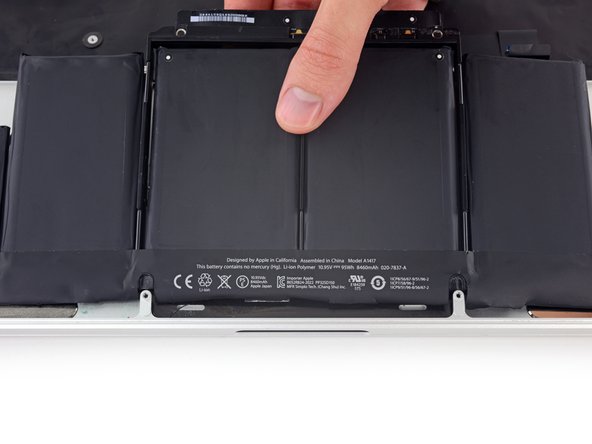


To reassemble your device, follow these instructions in reverse order.
To reassemble your device, follow these instructions in reverse order.
다른 404명이 해당 안내서를 완성하였습니다.


댓글 172개
finally something more complicated than replacing the fan in a ps4. Great guide but I'm not going to attempt this even with lots of experience taking MacBook pro's apart to replace the disc drives with second hard drives.
I went ahead and did changed the battery to only find out the battery I bought was defected : (
Hi there, Edward. Sorry to hear about the battery trouble. I've reached out to you via email to see how I can help!
Thanks for the guide! I used a light duty heat gun to soften the battery adhesive. Use great caution if you try this method, you can easily damage anything plastic so I used the MBP bottom to shield the keyboard bits. I heated one cell at a time until it was slightly uncomfortable to the touch, then waited a few moments until the heat softened the adhesive underneath, then carefully use a plastic card to slide under and pry free. It took about an hour to remove the battery and all remaining adhesive. For the remaining adhesive I used "GooGone", being very careful.
You can also set your battery on fire, which can have pretty catastrophic consequences. I'm glad it worked out for you, but I would urge everyone to avoid using a heat gun on or near any lithium-ion battery.
Brian, kudos to you for bravery. But I think I would agree with Jeff: for most of us, normal people, who don’t enjoy climbing on building walls,, walking tight rope between skyscrapers or jumping in wing suit from the top of the mountain - keep that heat gun holstered!!! :)
I've replaced a few of these without removing anything except the battery itself.. Just be cautious and patient!!
Hi, do you happen to have instructions on how to replace the battery without removing the rest?
Thanks!
After going through this process and seeing how messy the adhesive got for me (was unable to purchase the ifixit adhesive remove because it cant be shipped to Canada so I had to use Isopropyl Alcohol). I would recommend taking everything out. That in addition to if there are any sort of accidents at least you logic board etc are protected.
Same as duston, I changed the battery without removing the logic board. Why do you advise to remove everything ?
You can go straight for the battery—but as stated in the introduction, some of the more effective solvents (including the one we currently use) react badly with certain plastics. I've seen MacBook Pro speakers come out looking like something from a Salvador Dali painting after this procedure. Because of the tight clearances it's very tough to control where every drop of solvent goes, so the approach shown here is to remove the speakers before applying the solvent. (And unfortunately the speakers themselves are trapped under the logic board, so removing them means removing just about everything else first.) Removing the speakers is the cautious approach, but if you know the risks and prefer to do it another way, go for it ;)
Wow, this totally took the fear out of replacing my battery. I bought the iFixit kit with the tools and solution and replaced the battery in less than 1 hour. If you're comfortable with computers, you don't actually have to tear down the whole thing before replacing the battery as long as you are VERY careful about the angle when using the solution and are careful not to touch the logic board. The iFixit replacement battery dropped right into place. I'm actually writing this on the Mac that I fixed.
I took a serious shortcut and saved a ton of time and effort on this repair. Found some heavy duty mono-filament in the studio, tied the ends to some 1/2" square dowel rod sections, and taped the handles for comfort with some gaffers. I didn't remove the fans, motherboard, or anything other than unplugging the old battery and taking off the two battery terminal screws.
I just tucked used the mono-filament behind the top corners of each battery cell, then held down the computer and slowly cut through the adhesive like a mafia hitman. I found pulling one side while holding tension on the other was more effective than trying to pull both at once. About half a dozen strokes and the cell popped up, and I used a card to snap the last bit of adhesive at the bottom. Repeated for all 6 cells, being especially careful around the one with the track-pad cable. It took about 10 minutes to remove the old battery.
Removing glue residue took a good portion of an hour, a little at a time, using the spudger worked best.
I did pretty much all of what you did after reading your reply. I used an old E-string from my guitar. I tried taping batteries to it to use as handles, but they kept slipping so I found using heavy duty work gloves and wrapping the string around my hands worked best.
I found placing the string underneath the top part of each cell and then pulling down with force worked best, cut through the glue like butter after a bit of pressure. Be very careful not to go too fast; I got a bit ahead of myself on the last cell (too confident I guess) and cut into the cell, causing a short and a mini-flame. Thankfully it died down immediately. I placed the leaked battery inside a box with sand and placed it outdoors until I can dispose of it in the proper way.
Other than that, it was a matter of applying a lot of alcohol on the residue and then scraping it off using a metal spatula with rounded corners to avoid scratches. While process took about 1hour (including the incident). So, doable but be very careful!
Markus -
Bought all the stuff, took about 2 hours. I removed the fans, motherboard, etc per instructions. It did make battery easier to take off. If you got stuff on your display, it's because you didn't tilt your laptop and it probably leaked out through the trackpad.
I didn't have to use a heat gun or anything. The adhesive remover (blue stuff) they give you is extremely powerful and after about 1-2 minutes, glue starts falling apart and you can gently pry out the battery cells.
One thing to note, WRITE DOWN WHERE THE SCREWS GO. There is about 8 different types.
All in all, cycle count 0, so far so good!
Please update the batteries products descriptions in the EU store if applicable.
They are currently stating "Please note: this battery is difficult to replace and there is currently no guide. " :)
Just noticed that the "Adhesive Remover Solution" is not available :/
Did it without removing the logic board myself too.. It was no big deal, as long as you keep the case tilted AWAY from everything else, especially the speakers.
ajanjigian - 답글
I was able to replace the battery in my 2012 mbp retina. The guide worked perfectly the whole way through. I agree with other comments about the screws - I ended up with 1 screw left-over and I have no idea where it went. Thankfully, everything is held in place with multiple screws and the screws have locktight or some other kind of thread locking glue.
This guide should be read by every apple hardware engineer to make them think twice about designing their laptops like this. I won't be buying another apple laptop due to the extreme steps to repair something so simple as a battery. Breaking the down almost the entire laptop for a stupid battery swap is not worth the reduction in thickness of the laptop.
I did it! I just replaced the battery pack on my MacBook Pro (Retina, Mid 2012) 15" and I looked at Youtube for help... One guy was using canned air (Dust-Off) with the can upside down so the cold liquid would get underneath the battery -- making the adhesive brittle, and then snap! The battery releases. http://www.youtube.com/watch?v=DPqrmt-Ic... Also another trick is instead of using the iFixit adhesive remover which I believe is acetone I used tried and true "Carpel-O-Peel" adhesive remover -- far less noxious. and worked even better at removing the residue AFTER I had removed the battery pack with a small narrow spatula/cake knife/putty knife. I also used the string method on a couple of batteries -- that works too especially with the cold dust-off liquid. Instead of string I found that edge trimmer cord (RYOBI 0.80" twisted bulk line from Home Depot AC04138 and AC04139) was even stronger but I had to get the battery started with a spatula to fit the monofilament underneath and around the battery.
To be clear about my comments above I went STRAIGHT FOR THE BATTERY. Just removed the bottom plate on the laptop and that's it. The only screws removed inside the laptop were the two battery screws and the only thing I unplugged was the battery connection in the center
More links: "Carpel-O-Peel" adhesive remover -- http://www.carpelvideoonline.com/carpel-...
I bought a gallon jug about 25 years ago -- still using it. Also saw it on Amazon
I used Carpel O Peel with the spudger to remove the old adhesive after battery removal.
Tilt the laptop so any adhesive remover flows to the bottom metal lip.
Using cold liquid from Dust-Off to make the battery adhesive brittle: http://www.youtube.com/watch?v=DPqrmt-Ic...
Using "String" or "Thread" to cut under the adhesive: (Two Parts)
I used monofilament -- very strong edge trimmer (Weed Wacker) cord. And wear gloves to make it easier on your hands.
If I were to do it again I would make a wire tool with piano wire/guitar string/picture hanging wire and I like the idea of cutting down two dowels to make comfortable handles for pulling.. Or wear gloves. If you can get your hands comfortable it's not that hard. The only advantage of the plastic edge trimmer cord is that it is slippery nylon and non-conductive like wire. The glue is not nearly as bad as everyone said -- it is double-sided sticky tape on the Later 2012 model. - Also my laptop battery has 750 cycles and was 77-83% health. It was unpredictable when it got low on charge and I wanted a replaced battery for when I decide to sell my computer on eBay.. Now I have cycle count 0 and Battery Health 2 app version 1.4 shows 101% health and 8536 mAh maximum charge capable. This is a great replacement battery! The iFixIt battery was 59% charged after sitting in the box for 5 weeks after being delivered. I'm 99% sure these are unused OEM Apple batts removed from the top case part. Great deal!!!
I did it without disassembling any other components besides battery and without using adhesive remover. I just used several spudgers and a pieve of aluminum to pry and work through the adhesive. Slow and required some strong forces but it worked without bending, scratching or starting a fire. Admittedly risky though.
Both speaker connectors snapped off the motherboard under almost no resistance. Camera mount on motherboard also instant snapped off.
If I had to do it again I would not disassemble the whole computer because of fear of solvent destroying the speakers, the connectors on the motherboard are too fragile.
jimjwalker - 답글
My left fan is not working as well and my track pad is barely working. I made my MBP worse than it was. Cannot recommend even for seasoned computer builders.
jimjwalker - 답글
Thank you Jeff Suovanen for the instructions and I successfully replaced my battery without any trouble. The only thing is I noticed I'm getting 7510 mAh now at full charge capacity. The ifixit.com Europe Store said I would get "Capacity: 7610-8460 mAh."
Got a battery from iFixit and used the aerosol trick mentioned by @wtzouris. Watched the YouTube video, and used plenty of aerosol to freeze the adhesive, worked a treat. I even bought a flat cake icing spatula (similar to the video) which I used to pry off the battery cells. Had some leftover foamy sticker stuff from the adhesive which I scraped off with a sharp knife. Any minor actual adhesive residue I removed with nail polish and cotton wool pads. Very easy, no need to remove all the parts, only the actual battery.
Installation of new battery took about 1 minute. Battery Health 2 says ‘0 Cycles’, ‘Current Max 8658 mAh’ and ‘Original Max 8460mAh’. Very pleased with the outcome!
so instead of using the provided adhesive removal solution you you use aerosol to freeze and then remove safely everything?
Bert0ld0 -
Just successfully changed my battery with your help. Didn’t have the adhesive remover though so I just warmed up the adhesive (cloth full of rice heated in the microwave, seems to cause some moisture though so maybe be careful).
I followed the advice from Stan regarding the use of monofilament wire (fishing line). I used 14 lb test (0.3 mm). Even though I got the kit, I didn’t use the solvent, and instead extracted the battery directly without dissembling the main board. I used the kit’s tweezers to place the wire under each corner of a battery module, and pulled in a sawing motion towards the bottom. Mechanic’s gloves are really handy here. I broke a few lengths of wire, but in the end it worked pretty well. Got all 6 battery modules off in about 20 minutes. I went with Goo Gone Gel to remove the remaining adhesive. It’s not as potent as the kit’s solvent, so I had to let it sit for 10-15 minutes. However, the kit’s blue spludger tool made short work of it after that. Wiped it up with a paper towel, and cleaned up with isopropyl alcohol. Even though the gel does a good job of staying put, I’d still recommend putting a barrier between the display and the touch pad (e.g. aluminum foil).
Just want to emphasize I also went STRAIGHT FOR THE BATTERY. :-)
bobmhac -
I also didn’t remove the logic board and speakers—just be very VERY careful with the injection of acetone under the battery. The syringe, when placed up against the metal back, will accelerate the squirt and catch the tip of the speakers. Just be really careful, and you don’t have to worry about removing the whole assembly. Also be careful to not puncture the battery :)
All done. Especially the removal of the old battery and cleaning of the glue residue makes it well worth taking all these sensitive bits out.
Works a dream again. Thanks to Jeff and team iFixit.
Hi y’all!
Thank you iFixit for the great battery and instructions! This was by far the most complicated fix I ever did, but it was well worth it!
Just like some people in the comments above, I did not remove the motherboard and all the other parts. After I tried a few (very unsuccessful) other methods, the best working method I found was to use a regular hair blower to warm up the battery for about 20 seconds, after the battery was just a bit warm I used dental floss to cut/saw through the adhesive. When I got stuck again I warmed the battery up again. (I live in the Netherlands and its winter, in warmer areas you might not even need to warm the battery up!) This worked like a charm and after 30-40 minutes all the cells were loose.
The installation of the new battery was a breeze and was done in just a few minutes!
Kind regards, and good luck to those who’re replacing the battery now! :)
Ruben
the Netherlands
Ps. to the iFixit team: If you have another MacBook Pro that needs a new battery, I would strongly recommend to try this technique out and document it if it’s successful. It is a lot easier and less risky compared to removing all the sensitive guts of the MacBook and using a strong adhesive, especially for newbies like me. :D
Ruben -
@carbonvane Thanks for your comments. Applying heat to the battery can definitely work, but heat and lithium-ion batteries are a potentially explosive combination, especially if they aren’t discharged properly before you start. Overheating due to lack of care or experience could destroy your laptop at best, and cause serious fire or injury at worst. So, we try to avoid instructing people to do it that way when possible. Congrats on a successful repair!
@jeffsu I understand that totally, I was pretty worried when I first tried this method as well. But the batteries don’t have to be hot, a temperature increase of just a few degrees (my room was about 17C) was already enough. The batteries will get hotter under normal use, so I don’t think it will be very dangerous.
But, yeah, you need to make sure you don’t apply the heat for too long a period, otherwise will indeed get pretty risky! ;)
Ruben -
This was my first battery replacement and everything went well. Thank you.
Does anyone know if replacing the battery improves the MacBook’s performance? I don’t mean battery performance. I’m curious if there’s any noticeable difference in the MacBook handling computational/graphically intensive tasks like video editing, rendering, gaming, etc. As I’m sure we’re all aware from the recent publicity in the news, iOS throttles power usage and reduces speed on system wide functions as a device’s battery ages. I’m thinking macOS may do something similar? Has anyone done a performance test before and after replacing a battery in a MacBook? Short of that, does anyone have any anecdotal evidence of their machine performing better after replacing the battery? Again, I’m interested in processing performance, not battery performance.
Jeff Rizza - 답글
They’ve throttled Macs for similar reasons in the past, so I wouldn’t be at all surprised if the answer is yes. But, it shouldn’t really matter—if your battery is degraded to below 80% capacity, it’s time to swap it out regardless.
Jeff, thanks for the response and the info. That’s an interesting article. I agree it’s definitely possible they’re still doing this. I’m down to about 71% capacity, so yes, definitely time to swap. A little frustrating since I only have 668 cycles on the current battery. I thought they were suppose to be rated for about 1,000 before dropping to about 80% capacity. Anyway, thanks again. I’ll be ordering a battery replacement kit from you guys soon.
I’m at 1,003 cycles and my battery health is at 61%. I’m gonna change it asap.
In Denmark, the cheapest Apple authorized repair shop charge you almost $600 to change the battery - definitely NOT paying them $500 for an hours’ work :-P
My first battery replacement. Everything went well. I used the thin plates that came with the battery fix kit on the outer batteries. Pushed it in from the side, then from the corner. I also used some plastic tool like this, see picture: (http://images.biltema.com/PAXToImageServ...). These helped me a lot. Specially on the middle and center batteries. Mostly used the tool to the left, and just used raw force and pushed it all the way under the battery until it came lose. The old battery not get damaged, except a little bit bend.
I have MBR Mid 2012. I followed all the instructions and was able to successfully remove the battery and replace with iFixIt’s OEM battery, took me about 2 hours. A couple of issues I ran into that I think might help few people here.
1. Fan Cables - at the other end of the fan cable, there is a small latch you have to lift from the board for safe release. Same goes for most of the flat styled cables on this entire motherboard. Also make sure to re-seat it with precision. My computer once booted reported at Hardware Check that one of my fan was at faulty and indeed noticed my right side of fan wasn’t running. I had to reinstall the cable a few times to just get it right so it would start spinning.
2. Battery Calibration - If your Macbook is shutting down below 20% or so and SMC/NVRAM reset didn’t do the trick, try this old method designed for older generation of Macbooks. Unplug the Battery cable, hold down the power button for 10 seconds, re-seat the cable and boot. Charge too 100% and let it drain.
I did it without removing the Logic Board :), Battery out and Battery in :D … Thanks for the guide.
John Grace - 답글
As others have mentioned, I did this repair without removing the logic board, fans, and speakers. Keep in mind that iFixit isn’t condoning this and if you damage some part of your MacBook by going this route it’s because you took a shortcut. That said, I decided the risk of damaging the connectors or other fragile components involved in the full disassembly described above was higher than the risk of damaging my speakers with the adhesive remover. Here are some things I did to (successfully) minimize the chance of destroying the speakers:
1) Fold small pieces of paper towel and jam them into the spaces between the battery cells and the speakers. This created a barrier in case some of the adhesive remover got near the speakers.
2) Use a hairdryer/heat gun to loosen the adhesive on the two outermost cells (the two smallest cells). Be VERY careful doing this. You want to use a relatively low temp if you’re using a heat gun and don’t stick the gun too close.
Jeff Rizza - 답글
As iFixit has mentioned above, you’re running a risk using a heat gun near lithium batteries. If you’re going to go this route it’s essential that you fully drain your battery first.
3) Use the supplied plastic cards as ramps to direct adhesive remover towards the edges of the cells. This helps to block the adhesive remover liquid from splashing or running over towards the speakers. By doing this in combination with using the paper towel barriers I didn’t have any issues with adhesive remover getting on my speakers.
4) Cover the logic board, speakers, and fans with a few layers of paper towel or some other covering (just not anything metal) before you begin working on the battery cells. This helps prevent any drips/splashes of adhesive remover from getting on critical components. It also helps to keep them protected from other types of damage, such as the plastic shard that went flying when I broke a plastic card prying out one of the battery cells :)
Good luck with your repair!
Jeff Rizza - 답글
Why is so much adhesive tape on the replacement battery? Wouldn’t this make it as hard to replace as the original battery? I mean we are “boo-ing” apple for this, just to make the same mistake ifixit? I would put less adhesive (like 60% less) and in thinner bands to make it service friendly. After all the battery don’t need THAT much tape, since the bottom cover will hold it there anyway. (I plan to actually remove much of the tape from the replacement before puting it in).
This is a great question, and I think the answer is that it’s part of the design. Because of the dangers they present, lithium-ion batteries need to be firmly secured. In the absence of any screws or brackets to mount the battery, you need to use enough glue to make sure the battery’s not going to come loose across a broad range of user behaviors and environmental conditions over a long period of time, plus a margin for safety. Bottom line, if it’s designed to use glue, then that’s what we’re stuck with.
Fantastic guide. Did it in a couple more hours than the guide said. Im a newbie though and used extreme caution. Works very well. A good advice is to also read the comments before completing/starting the steps.
I didn’t have any trouble installing my new battery and my computer worked well immediately following — all battery specs seemed as good as new. I recently ran the battery all the way down and am currently trying to recharge it. The charger has a red light indicating that it’s charging, hooked up porperly, etc. but the computer has been non-responsive for over two hours now. The fans are pulsing lightly on and off but that’s the only activity that I’ve gotten. I’m relatively experienced with this kind of thing and I went slowly and didn’t feel like I made any mistakes. Let me know if any of you have an idea of what’s going on here.
Did you reset SMC as instructed in the final step?
I'm very happy with the fix kit, it is of very good quality for the price, but the thread method (you can search on YouTube) is SO much easier, faster and safer, you only need to remove the battery and no glue remover is needed.
Score another successful replacement using monofilament to remove the outer 4 battery cells without dismantling the Mac making this a fairly easy fix.
The warning about needing to be careful about the keyboard ribbon cable on the center two cells led me to be more cautious when removing them as there are no pictures showing the Mac without the batteries to more clearly identify the risk. As they are far from the speakers I used the acetone+cards inserted from the sides to weaken the adhesive & remove them. Now that I’ve performed the replacement I see that there was no danger in using the monofilament to remove the middle two cells either.
It took me longer to clean up the remaining adhesive strips and then the remaining glue than every other step. I found that for the glue traces, rubbing alcohol worked better on the aluminum & acetone was better on the bottom of the trackpad.
Hat super funktioniert! Hatte bei der ersten Bestellung des Akkus Mängel geltend gemacht, da dieser beschädigt war. Der iFixit Deutschland Support hat mir sofort geholfen - zweiter Akku her, dieser einwandfrei. Danke an die Gummibärchen im Retourenpaket, grüße an dieser Stelle an Christoph der sehr kompetent mit meiner Reklamation umgegangen ist :P
Der neue Akku war nach ca. 2 Stunden verbaut. Am schwersten ist tatsächlich die Entfernung der Klebereste, aber auch das geht. (Tipp an alle: Ich habe die Reste sehr gut mit dem Metallspatel aus dem Pro Tec Toolkit entfernen können).
I successfully changed out the battery without removing the logic board .. I figured the danger of damaging some of the very breakable connectors was one I didn’t want to risk. I search YouTube https://www.youtube.com/watch?v=fupkPz55... .. great tutorial to allow removal of battery in a few minutes. I used shoe laces .. it worked really well.
Thank you ifixit - the battery is 100% of design capacity, and although I didn’t use the guide above - the comments gave me what i needed. And the OEM battery is gold.
This was actually remarkably straightforward using shoe laces.
Ant Carter - 답글
(the ‘round’ type of shoe laces .. )
I took the back cover off, then skipped down to step #50. I used the provided plastic card, sliding/wiggling it though the adhesive that attached the battery to the case. It took about 10 minutes to remove the old battery in this manner.You do have to be very careful not to pry too much on the two center cells, as they attach to the back of the trackpad cover, which is bendy.
Before installing the new battery, I removed the old adhesive, trial fitted the new battery, lining up the holes of the connector bracket, then marking the case where the battery aligned correctly, using a sharpie to do this.
After reassembling, I hit the power button—nothing. Worried, I figured that the battery was not charged, so I connected the power adapter, and after a few minutes started up normally. Battery showed a charge of 96%. so I’m guessing the startup procedure saw there was a new battery and wouldn’t go. All seems normal now, took a few minutes to charge to 100%, and now will drain it a few times.
Thanks, iFixit!
I skipped steps 5-34. and removed the battery without problems. Be careful with the liquid. It really needs very little as described.
I replaced the battery by only unscrewing the lower case assembly back cover and detaching the battery cable. I did not disassemble anything else. I then unscrewed all four speaker cover screws—two on each side— and propped up the speaker cover plastic “wings” using two iFixit cards wedged between them and the bottom case, to bend them up off the case slightly. Open the computer and turn it around so the clamshell is face down. Carefully squeeze solvent at the top and sides of each battery section and slowly work the plastic card, then plastic spudger, underneath each. Be especially careful not to get any solvent on the trackpad cable at the top of the battery, which snakes underneath the metal trackpad plate. Also be careful not to bend the trackpad plate when you unstick the two big middle battery sections—the battery is glued to it, and using too much force will bend it. If you are patient and gentle, you can unstick the battery without taking anything else apart.
I got the kit to change the battery of my Macbook Pro Retina 2012. I should have done this 2 years ago !! I did follow the guide to make sure I don’t break anything using the adhesive remover. I also took the time to remove dust from all the parts since everything was out of the computer. It took me a bit over 3h to do everything, I guess it can go much faster if you are familiar with Mac repairs.
The only negative point is that I got 2x P5 bit instead of 1x P5 and 1x T5… must have been a packaging error.
Got the old kit (?) with solvent and syringe, which worked very well. I jumped straight to removing the batteries. The mentioned risk of destroying the speakers may be avoided with careful application of the solvent in tenths of milliliters, instead of milliliters as described. A light lift with the spudger made access for the solvent much easier. No I have a well functioning mbp with a well performing battery. Big thanks to ifixit-team for providing this kit!
I just replace my battery (mid 2012 retina A1398) and like many readers I decidedinstead of disassembling pretty much the entire computer went straight of the battery. I used a 20g solid copper wire to pull under the battery elements with minimum application of the solvent, the computer slightly titled away from the logic board. 10 minutes to remove the old battery complete;y and than another two hours to clean out the adhesive residue ! (the latter part would have been the same even if I did a complete disassembly as suggested by the guide). I think that disassembling a MacbookPro as suggested by this guide has a high potential of damaging gentle connectors and in general getting things wrong, loosing screws etc.. - and some of the comments confirm it. So my advice - don’t follow the guide beyond the opening the bottom cover and disconnecting the battery. Just go directly for the battery removal - it is faster, easier, and has less potential for damaging your computer.
Well, I did it! gave myself about a 70% chance of everything coming out alright in the end and so far so good! Kept most of the screws in place with painters tape to hold them on or near their respective spots. Definitely that and making sure all the connectors are free as you replace the board(I did have to wiggle the backlight cable free after a preliminary attempt to secure the logic board.)
I think I’d rather attempt just the battery replacement as others have mentioned without pulling the logic board up next time though. It’s all quite doable with the guide and taking time to work through things.
One note was really being careful about the connectors that have to be “flipped” up on their hinge - e.g. the keyboard connecter which I just yanked out….
Makes me feel much better about the possibility of doing some other repair although I can imagine this is getting harder and harder with newer models.
Brian Lamb - 답글
picture hanging wire with crc / wd40 on the wire for lube, works a treat- make sure you disconnect the battery first. Then gentle hair dryer easy. No need for chemicals just the wire and plastic scraper to clean up. Thanks for the comments saving me from possible disaster and hours. Done in 1.5 hrs (extra 30 mins to pull out the fans and clean them).
Great step by step!!! I just changed my battery and everything is working like a charm. Just a little advice: Be patience with the adhesive scrapping process; it’s by far the most annoying and time consuming part of the process.
Changed the battery without taking out the logic board- was just VERY careful about where the adhesive remover went. For getting rid of the adhesive residue on the case, I used ronsonoil instead of the adhesive remover- MUCH quicker and more effective. Wiped it all down with alcohol afterwards, everything back together and working great.
Used the string method under batteries instead of solvent and that worked awesome. Heated batteries with a microwave heated rice pouch before hand and adhesive came of very easy. Left residues in place and just placed new battery on top of that - I don't get why anyone would waste time on removing all of the old adhesive first. Layer was 1 or 2mm at max. Anyway, new battery works so far and I have to say the level of iFixits professionality (kit quality, website quality etc) leaves me in awe. And also this community in the comments sections is mpressive and very helpful. Thanks everone.
Malte Malm - 답글
I replaced the battery in my mbp mid 2012 laptop as per your instructions and it seemed to go just fine except that the new battery does not charge. I have tried numerous online “fixes” but nothing works. A screenshot from coconut battery seems to be saying that my battery condition is poor. Is it possible that you sent me a bad battery?
Any luck finding a solution?
Hi I am having the same trouble as Brian Martinson, I just installed my new battery in a mid 2012 MacBook pro Retina. As soon as i plugged the power cable, the laptop turned on. I notice it is at 0% and when checking it says Replace Now. Battery Is Not Charging. I then followed the instructions for SMC reset by shutting down the computer, pressing Shift + Control + Option + Power buttons or 10 seconds. releasing and pressing power again to turn the laptop on again. Is there anything else i can do for this? Thank you
Plug the old battery in and see if it behaves the same or if it works normally. If normal, there may be a defect in the new battery and you should get it exchanged. If they’re both behaving badly, check to make sure nothing was damaged during the repair.
Hey Jeff, I have tried the old battery and it functions normally. I ran th coconut battery app and it says battery condition poor and battery failure. 0 charge cycles. Soo it was dead on arrival. Waiting to hear from customer support for 2 days so far. Thanks for the suggestion
Successfully replaced the battery! This was my first iFixit repair and first MacBook repair. I purchased the full fix kit. After reading the comments here and watching several videos, I skipped straight to the battery after removing the case (step 35). I used twine to saw away the original adhesive as well as the provided plastic card. After I completely removed the original battery, I used the adhesive remover and plastic scraper to remove the remaining original adhesive. Installing the new battery with adhesive can be somewhat tricky as the battery needs to slide horizontally underneath the bottom screw mounts before being fully pressed down. I recommend testing the fit and alignment with the battery screw holes and the battery cable before removing the adhesive pads and securing the new battery. After fully discharging, charging, discharging, and then resetting the SMC, the new battery is showing 8614 mAh max capacity in Apple’s system report.
Thank you to iFixit, Jeff Suovanen, and all other contributors!
Ich hab den Akku ausgetauscht, aber er wird nicht erkannt. Kann es sein, dass der gelieferte Akku defekt ist? Alles andere Funktioniert nämlich.
I did this step by step with no problem. I turned on my MacBook and everything was working like new. Then once the battery got to 30% it turned off and isn’t turning back on again. The only time I get any response is when I plug in the charger. Nothing happens on the screen but I can hear the fans running softly. What do I do to get my Mac working like it just was?
If you haven’t yet, reset the SMC as instructed. You can find some additional troubleshooting steps in this thread.
Por fin, batería nueva! La he cambiado con el kit de ifixit pero solo removiendo la batería con mucho cuidado y todo funciona a la perfección. Gracias!
I followed all the steps and replaced the battery without too much trouble, but now , from the very first time running down the battery to about 3 charge cycles in, my macbook dies at 25% with the new battery every time. Is this a faulty battery? Or is there a setting I can change to allow the battery to drain down to 0%. I don’t want to accidentally condition the battery to only work from 100% to 25%.
Reset SMC and calibrate the battery as described in the last step. If you’ve done that and you still have problems, it’s most likely a faulty battery.
Excellent guide, thanks! Extra pro tip: don’t place the screws back in the holes when you’re removing the given part, rather put them aside. Picked up the I/O board, but forgot about the screws and almost lost them as they fell on the floor.
I don’t understand why one should dismantle almost all the parts since the battery is right there, not underneath the motherboard.
I did replace my wifi card in my MBPr 2012 (to have the unlock by apple watch, IT WORKS!) and also just half of the steps were necessary to get the wifi board out and the new in.
Same when I upgraded my hdd in my Mini.
So it is not an isolated case.
It may be that ifixit just reuses the same web page and pictures but still is not OK to put anyone thru this hassle .
Ifixit, thank you for teaching us repairs, but don’t add extra steps, because increases of chances to brake stuff, so it defeats the purpose.
There’s a fair bit of discussion about this in the comments above if you’re curious. Bottom line, there’s a good reason for removing everything, but a shorter procedure can also work well if you’re mindful of the risk. We’ve also reformulated our solvent so it’s safer (though still not 100% safe) for the speaker plastics.
TIP:
On the new battery don’t use the whole area of the adhesive strip, instead just put some thin pvc foil or other thin plastic film on most tof the adhesive and leave just some small area exposed here and there (ex. at the corners like 5x5mm squares) to grip the chassis. This way you can remove again the new battery much easily in the future.
Or better leave most of the original protective film on and remove it just here and there at the corners (peal up the corners and cut it like a triangle) so the battery is still glued (to prevent rattle) but not to the point it is yet again a nightmare to remove it. I believe the battery will stay in place anyway because everything is really cramped inside, no place to rattle :).
I broke the flat cable keyboard connector that is mounted on the board. The guide was not clear enough on how to remove that cable out of the connector and I had a lot of trouble with that and it is so fragile!!! And then I read in the comments that IT NOT WAS necessary to remove the board!!! Now that is not good! Is it possible to buy that connector it seems that it is just pushed in to the boardmounted metalconnectors.
I DID IT ! ! !
From step 35 down, taking everything out is just unnecessary. I use a thin string of nylon to cut thru the adhesive, totally safe since there is absolutely 0 force on the battery (Youtube : How to replace 15" MacBook Pro Retina Glued Battery with a Thread - Part 1).
TIP:
I put my new battery with the protective film still on the adhesive, so not glued back to my mac to trial the new battery in case the new one is defective (call me paranoid, but I heard stories). It rattles a bit but once I give it some more cycles to make sure it is OK, I will reopen and glued the new battery for good.
My old battery was at 62% (5212 mAh) capacity, 806 cycles (a decrease in capacity of ~10%/year from 2014).
The new battery is made by Simplo (known manufacturer I guess since is a common name in Mac batteries), too bad I didn’t look at my old one :).
It was made in 04.2018.
I followed the advice of the commenters that stated to just pry out the batteries with a string and it worked perfectly. Takes effort but is really easy this way.
Scott Rowe - 답글
I just finished replacing my Mac Book Pro Retina Mid 2012 battery after reading through these instructions and comments. I ended up using the string technique described and shown in a YouTube Video. I was able to removed the batteries in about 30 minutes taking my time and being super careful not to damage anything else. I then used a roll on Tea Tree oil to dissolve the remaining adhesive and clean up the battery container area. It worked well but took me another 45 minutes. New battery installed in less than 5 minutes once all that was clean and dry.
kirkfuller - 답글
They have great repair vids, but their products are not up to par.
I bought this battery back in in 2017, it came defected. So they sent be a replacement that worked for 4 months, until they had to send me another replacement. Everything was good until last month (8 months later) where the 3rd replacement I got died.
Note: Keep in mind they do not renew the one year warranty with a replacement. Your warranty is based on the original purchased date.
So I went else where (Amazon) to get ANOTHER battery replacement. But again, great repair vids!
Geschafft!
Zunächst wurde der Akku nicht erkannt. Ich musste den Akkustecker dreimal neu aufsetzen.
Aber jetzt funktioniert alles perfekt!
Zur Anleitung:
Ich würde es vorziehen, wenn es eine Anleitung gäbe, die ohne den Ausbau der Ventilatoren und des Motherboards auskäme.
Generell hätte ich mir gewünscht, das die Verbindungen in den Fotos größer dargestellt werden und die Zugrichtung präzisier angegeben wird. Eventuell auch durch einen roten Pfeil im Foto direkt.
Die für mich schwierigsten Punkte waren im Einzelnen:
5. Schritt: Airport-/Camerakabel (Sehr tricky. Man weiß nicht recht, wo ansetzen und was die Verbindung aushält).
24. Schritt: Displayfolien"stecker" (Sowohl das Herausziehen und besonders das wieder einstecken ist sehr schwierig. Ich habe die Folie mit der beigelegten Pinzette gepackt und letztlich hineingestossen. Immer mit der Angst, die feinen Kontakte zu beschädigen. Ist zum Glück gut gegangen).
Danke, trotzdem, für die Anleitung. Ohne hätte ich das gar nicht bewältigt.
Hi guys.
I did this without removing anything besides the rear cover
No heat gun too. All is needed is fishing line(i used 40lb braided line) and two screwdrivers to use as a handle. Use it in a saw movement. Then use something to pry the remaining glue off in each battery cell. About 15-20min and you're done
Thank you very much for the how-to! The difficulty mostly comes from the time required to change the battery. The actual steps are all easy except for the glue-related parts. Softening the glue took some time and I had to trust myself to use a bit of force when removing the battery. The most annoying part was removing the residual glue from the aluminium case. Otherwise a very simple process, just be sure to take breaks just before starting the degluing process!
I bought the battery and tools got it in 5 days. I used to work in PC service so I thought I’d try fixing this my self instead. I was rushing a bit as I was filming the whole process.
I am not sure if the whole board and parts were necessary to remove, but I guess it gives you more space to work with removing the battery.
Took me 45 min to remove the battery 15 min to clean the adhesive. I putted new battery, decided not to stick it to the case, in case of future replacement. I assembled everything and it works fine. Now waiting for battery calibration.
My recommendation, clear the space before you start working. Make sure to run through all steps before proceeding.
As someone with experience in laptop repair, I think Apple has pretty bad connectors. They are easy to break, some at least. I managed to broke one of fan connectors peaces in board, but it still works. Battery part was frustrating even for me. I don't understand why to glue the battery to case. Instead of putting it in one piece, easy to remove.
Can skip from step 3 to step 36. This is what I did and it worked fine. The additional steps feel like a precaution, so that when acetone is used to free the battery adhesive, it doesn’t go everywhere. But if you’re careful, it’s possible to apply acetone and remove the battery without taking everything out of the machine, which has risks of its own, like the machine may not boot properly later.
Note that acetone will turn the black speaker housing white. Don’t ask how I know this.
I did skip all them steps… No problem…. well so far…
and i didnt use solvent..
tex-fx -
“like the machine may not boot properly later.
-having this very problem… any adive? The booting loads 3/4 of the bar, then the display shuts off… pc still kinda boots sometimes, since ì can play music sometimes, but black (also no backlight) display…
Simone -
really nice howto. Thanks to the ifixit team! only the power supply on the logic board was a bit tricky. At the first try the battery was not charged.
Thanks for this excellent guide, Jeff! I was a little nervous due to the difficulty rating, as, besides swapping out the battery on my iPhone 6 (also used iFixit’s guide as well as YouTube), this was the first electronics repair I’d ever done. But it came off without a hitch! For anyone considering this procedure, my recommendation would be to:
1. Read the entire guide.
2. Read all of these comments.
3. Read all of the comments under each step.
4. Take your time, stay organized, and consult YouTube if needed.
The guide itself is great and thorough, but there are a few different ways to remove the battery, so read them all and do what makes sense to you. I ended up skipping steps 5–41 and removed it with only one of the plastic cards supplied in iFixit’s repair kit. Slow going and if I were to do it again, I’d look into the other methods others have supplied here. Good luck!
Count me as another person who decided that I didn’t want to have to take the entire guts of the machine out to replace the battery, not to mention that I had no interest in using solvents to dissolve the glue holding the battery in. (I didn’t buy it either). I was able to use a stiff plastic card to cut through the adhesive, and replace the battery with no issues. In fact, I’m going to buy a thin piece of stainless steel, attach a wood ‘handle’ to it, and use that in the future.
I can totally understand why some folks would want to go this route, but it seemed way more complicated to me. And as I said, I hadn’t bought the iFixit solvent, so there was that issue too…
I’m so glad we have iFixit! Kudos all ‘round, and let us know what we can do to help keep this site going!
@macdoktor Just think of us when you need to buy a part or a toolkit, that’s what keeps the lights on around here and makes the free guides possible. ;) Glad your repair worked out!
… mir war diese Anleitung viel zu kompliziert und eigentlich will ich nur den Akku tauschen. Hier meine Schritte:
1. Den Akku komplett leer machen (bis der Mac ausschaltet), dann ist zwar noch immer genug Leistung drinnen um die Akkus bei einem Kurzschluss zur Explosion zu bringen.
2. Schritt 1
3. Schritt 2
4. Schritt 3
5. Schritt 4
6. Schritt 35
7. Am Akku Anschluss 2 Klemmen suchen die eine 12V Halogenlampe zum leuchten bringt und warten bis die Lampe ausgeht
8. Bei jedem Akku Element die 2 Anschlüsse suchen und die 12V Halogenlampe Lampe wieder anschliessen und den Strom messen bis dieser unter 100mA sinkt Das ist für jedes Element zu machen!
9. Die Elemente kurzschliessen … wenn nur noch so wenig Energie drinnen ist geht das.
10. nun können die Akkus aufgeschnitten werden und ganz einfach herausgelöst werden. Bitte Handschuhe verwenden.
11. neuer Akku einsetzen
Habe so erfolgreich meinen MachBook Retina mit einem iFixIT Akku ausgerüstet, Da der alte Akku eh kaputt war, eine perfekte Lösung ohne den MacBook zerlegen.
Martin Lob - 답글
Very thorough guide. Appreciate the comments below specific steps. Also the multiple pictures for some steps was nice as well. Getting the old battery glue out took way longer than I thought, but the clean space for the new battery was nice. If you were careful with the glue remover, I don’t see the point in removing everything else. Although it does give you a chance to check all connections, and make sure everything is good and clean.
I just finished changing the battery on my mid 2012 MacBook Pro retina with the latest I fix it kit. Followed the instructions and the computer turns on , but it takes forever to load up and the fans run always at full speed. The trackpad doesn’t work. I tired the SMC reset a few times but nothing changed. Help!!!
Terence, did you get your issue resolved? I had a very similar issue with mine. Turned out the Magsafe2 DC-in board wasn’t fully seated in the logic board. Once I seated it fully, everything worked as it was supposed to. the new battery was charging and all other issues disappeared.
Great tutorial! Thanks! My first time doing something like this. I advise to have patience and care and to read the comments, they really help and give valuable advice and insights. My first time fixing a Mac and worked just fine. I used the ‘Dust-Off’ technique and worked well. Feels great when it's done and the Mac turns on. Hahaha
Hello, I completed the guide, step by step.
The computer is dead, won’t boot up. The orange charging lamp have been charging for an hour but stil no sign of booting up.
Any thoughts what the problem can be? I have tried the RESET instructions. Is there any known and specific cable that can cause the computer to be dead like a brick?
Any guidance would be helpful.
Thank you — Daniel
Great guide!
Took me 5 hrs but I took it very slow. Also on my 2012 MBP retina the battery extraction and cleanup took almost 2 hrs.
Please add the bit about unscrewing the magsafe part. Way easier to take the board out and put it back together w/ the magsafe!
Worth the time just to see that “Cycle count: 1” at the battery details screen!
Nice guide and also very helpful comments! I took the route via steps 1-4, 35, and 42-53 which involved fully draining the battery first, then unscrewing the back cover, lifting the battery connector, and removing the two screws holding the battery pack. I was then able to loosen the battery compartments one after the other, starting from one of the outer cells, by shoving an old transparent geometry triangle under the cells and moving it (more or less) gently back and forth. A little extra care is needed with the two cells in the middle; don’t pull too heavily on these because they aren’t glued to the body but to some kind of trackpad cover instead which might come off together with the middle cells. Mine is a tiny little bit dented now… ;-) (but the trackpad still works like a charm). I then used cleaning petrol to remove the remains of the adhesive; that worked quite well! coconutBattery showed > 9000 mAh after fully charging for the first time, and now after calibration it says 8842 mAh . Great!
Hello, i replaced the battery recently, calibrated it, everything seemed to work fine, then sometimes i would start charging the computer, and even plugged in i would have to wait until it would charge a bit before using it otherise it would shut down. Then today all of a sudden, there’s no light at all on the mag safe plug… try to change plugs, mag safe cable, nothing… could it be the battery or the magsafe board?
Thank you for the helpful guide. I read about options like heat gun, using a string to floss the battery out, etc. In the end, a few drops of acetone and the credit card style plastic glides allow removal of the cells in about a minute or so per cell. Not bad at all.
I chose to get the magnetic mat which was great for organizing screws as I disassembled. A very do-able repair for the do-it-yourselfer. It took about 90 minutes all in. I am pretty sure I could do a second one in 45 minutes or less not that I’ve done one.
Worked flawlessly ! Thank you very much for the guide and the repair set. This saved a lot of money and prolongs the lifetime of my still capable 2012 MacBook Pro. Excellent
Hi all,
I replaced the battery in my Mid 2012 MB Pro retina (model A1398). The process was without incident.
I started the computer back up, plugged in the power cord and proceeded with the battery calibration. Once charged, I let it run until it shut down yesterday afternoon. I let it sit overnight and plugged it back in this morning.
When I pressed the Power button, I would get the battery image with the small red area and the lighting bolt indicating it was charging but it wouldn’t power on.
I tried the SMC reset and that did not work, actually have tried it now several times.
The way I got the machine to boot up was accidental. I was attempting the SMC reset and released the Shift, Control and Option buttons but held the power button. the fans kicked on and then I heard the boot tone. It will boot up and works fine, however, fans are running. Also the LED indicator on the magsafe adapter is not lit.
Any thoughts?
I solved the problem. I thought maybe the Magsafe2 DC-In board was bad and ordered a new one. when I disassembled the computer to install the new board, it appeared the original board wasn’t fully seated in the socket. I seated it fully and the LED lit up. I put everything back together and it all works as it should. Now to return the replacement DC-in board.
Hi Guys,
I changed the battery and assembled the Macbook. After 1 week, the adhesive has detached from the new battery and no longer holds the battery in position.
What can I do?
Thanks
Have you tried just using double sided tape? It’s not too hard to get back in there and you don’t have to disassemble the speakers to get to the battery.
Stephen -
Thanks for the guide! 2020 and the 8 yo machine seems to be working after replacing the battery with a “Simple” manufactured battery (iFixit did not have one in stock at the time). I was able to pry the old battery with a plastic pry tool and about an hour to clean off all the old adhesive with acetone. Took a while but the adhesive gives way with gentle but firm pressure.
Why all those initial steps to disconnect/remove all those other things? Why now disconnect the battery, use the solvent, then remove and replace?
I don’t own a single bit of Apple product but the photos make me wonder whether you couldn’t remove the battery separately, and leave everything else in place? Besides the speaker housings that cover a small part of the outermost batteries, is there anything else on top of them?
Or is this gutting the entire base just a matter of caution to ensure the adhesive remover does not damage anything on its way?
JoeMuc2014 - 답글
OOPS, sorry, just found that this question was asked quite a few times before (missed to expand the comments), and the way Kay-Kay does it in the YouTube video is just that. So case closed ;o)
Thanks for the useful guide! The hardest part was disassembling, putting it together was much easier and faster. With enough patience and a clear head this was less hard then I expected.
Para limpiar los adhesivos laterales que deja la batería en el unibody es mucho mas efectivo usar alcohol etílico 70 % para ablandar y raspar con un Black Stick las tipas de pega y el residuo final limpiarlo con un paño de microfibra con alcohol, así quedara impecable, no es tan efectivo en la plancha protectora del trackpad.
Revived my almost 8 year old Macbook with it. I thought it would end up in the trash because of the high repair costs. With a little experience and caution, it works without disassembling the logic board. But if you have no experience, you should do it strictly according to the instructions.
Thank god, it can run now for some more years. Thanks iFixit!
Done! Did SSD at same time. Awesome.
First and foremost changing the battery is pretty easy. Having stated that its not because of the guide, although it is complete most is unnecessary. After pulling everything apart and wasting 1.5 hours I realized that all you really had to do is steps: 36-52. There is no need to take all the fans out, logic board disconnects and so on. Also if you want to be a caveman you can actually pry the battery off . It worked for me but I was slow and have some automotive tools to make it easier but a flat head screwdriver would work. Granted mine was about to blow so maybe the sticky tape was compromised but worked nonetheless. The only bummer thing after I put it together I forgot to connect the laptop light and I cant get to it now without taking it apart. Lucky I use it connected to a keyboard and external monitors. Please understand just because I could have done it without taking it apart doesn’t mean you should circumvent the guide but it’s just what from what I experienced. thanks
Merci pour le tuto, mais à mon avis il y a plus simple
1) enlever le socle du mac book pro
2) déconnecter la batterie, démonter les hauts parleurs en les repliant vers le haut
3) décoller les modules batteries 1 à 1, en glissant une ficelle dessous et une carte fourni avec le kit batterie
c’est un peu long, mais cela évite de démonter moulte connecteurs difficile à replacer
4) nettoyer les reste de bandes collantes avec l’acétone (attention à ne pas toucher l’électronique)
5) remonter à 4 mains la nouvelle batterie
6) présenter et plier les câbles du connecteur batterie avec la connexion.
7) remonter le capot
8) suivre les consignes pour charger la batterie
Super tuto !
J’ai réussi à changer ma batterie, c’était la première fois que je le faisais.
Tout est très bien expliqué. J’ai pris le la batterie avec le kit d’outils, ils sont carrément indispensables.
Fini ! Merci beaucoup pour ce tutoriel !! J’ai suivi les instructions à la lettre et mon MacBookPro 15 mi-2012 refonctionne comme au premier jour (il y a presque 10 ans maintenant). La batterie ne tenait plus la charge, obligé de le brancher en permanence. Maintenant tout refonctionne c’est top ! Pour le tutoriel il faut vraiment être patient et méthodique. J’ai mis les vis dans une petite boite séparée pour chaque étape en les positionnant visuellement de manière à les remettre à la bonne place. Pour la colle j’ai utilisé la moitié de la bouteille de disolvant pour enlever la batterie et l’autre moitié pour bien enlever les résidus de colle en grattant puis avec un chiffon. C’est la partie la plus longue. Le remontage est hyper rapide puisqu’on a déjà bien ses marques si on a été patient et méticuleux au démontage.
It took a lot of time but went fine with that guide.
However, what a nightmare to remove all the stickers under the old battery. Just to clean every thing, more that 1 hour after having removed the battery
Thanks a lot for this guide! I used it yesterday to replace the battery i bought here last week. And with succes. Keep up the good work! :)
Just a thank you. Especially to people posting their own variations on this theme.
In my case I stayed away from the aceton and went straight for the battery using dental floss to fairly easily
cut behind the batteries and then prying them loose from behind using a plastic spatula.
Very happy with getting this done as I finally dared to take this leap;)
Many thanks again!
Bought the kit from iFixit and just completed this! Keeping track of all the screws was tough (I used an old ice tray to keep track).
But other than that the process of removing the old battery was the most difficult. The instructions call out the plate behind the battery protecting the mousepad, but a picture or some sort of diagram would have been helpful. Bent him slightly, but nothing majorly damaged.
The only other super difficult part was cleaning/scrapping off the old adhesive. I literally got a razor blade to help me scrape off the old adhesive, finger nails still sore from this part!
definetly not
My case is warped! No easy fix for that eh?
Tom Austin - 답글
Fantastic guide and so specific that I managed to do it first time without issues. The tough points were the Logic Board removal and replacement due to getting all the cables in the correct place. Battery adhesive removal was the bit that took the longest and you need to spend the time trying to remove the previous battery’s sticker to get a good seal on the new battery.
First time attempt doing a repair and it took me 5 hours but so pleased to have the return of my Mac.
agh it attempting this in about 3 days when the battery arrives I’m very nervous altho this guide looks awsome I also think I find it useful to each a video on how to do it since I can see exactly the movements and stuff on how to do this, I’m more of a visual person so yeah. but the guide is amazing!
AppleTopic - 답글
Great guide! I’ve only added RAM before, but by following this guide I could save my old mid-2012 Retina 15” MacBook Pro with completely dead battery. Thank you, Jeff! The replaced battery is charging as is and everything seems to be working. I hope after calibration the battery works. Anyway, beats the dead battery.
Only thing I was puzzled about was the amount of different T5 screws. Since never done anything like this before I wasn’t prepared to distinguish all of them as carefully as I should have. Lucky the guide was very thorough on this as well. I think the trickiest part was trying to take out the old battery… why is it designed that way that it almost feels it cannot be replaced?
Thank you so much iFixit for your guide, your new battery & the tools.
I could give a brand new life to my 9 years old MacBook Pro!
Danke für diesen schönen Guide…Habe die Teile bei IFixIt bestellt und waren innerhalb von 3 Tagen da.
Habe den Batteriewechsel zusammen mit einem Freund durchgeführt und nach reichlich Aufwand es geschafft den Akku auszuwechseln. Ich hatte davor absolut keine Erfahrung und der Helfer hat das Innere eines PCs auch erst zum zweiten Mal gesehen, also grundsätzlich waren wir absolute Anfänger. Insgesamt haben wir deswegen auch ca. 4 Stunden statt den 1-2 Stunden gebraucht, wir haben aber auch einige Fehler gemacht und teilweise Anschlüsse nicht richtig wieder angeschlossen und mussten dann teilweise relativ viele Schritte wieder zurück gehen. In Nachhinein, stellt sich für mich allerdings die Frage, ob der Akkuaustausch nicht deutlich schneller möglich gewesen wäre, heißt ohne herausnehmen des Mainboards und den gesamten Schritten davor. Außerdem wäre bei manchen Anschlüssen eine genauere Beschreibung, wie man den Anschluss ab- und wieder dran macht hilfreich gewesen. Alles in allem hat aber alles gut geklappt.
Seems like a lot of work to replace a battery. No wonder Apple charges $199 to do it.
Any way battery can be removed without the need to remove all the internal (motherboard, speakers, fans)?
It’s 2021 year now. Not sure if Apple officially still replaces/manufactures batteries for such an old (2012 year model), but very capable computers.
Thank you.
Thank you for the easy-to-follow guide. No issues at all - just one spare screw …
The instructions need to be more detailed - i’m not stupid, but I do hate when the photos and the instructions are dealing with re-orientating the laptop but haven’t mentioned that fact … makes it very difficult to identify what is what and where it is. Other than that the instructions make the process possible.
This guide is incorrect and almost all of the steps are unnecessary all you need to do is start at step 36 once the case is open. The guide should be as per MacBook Air mid 2012. I have just replaced a battery on my Mid 2012 MacBook Pro 15” Retina starting at step 36 (all previous steps I did not do)
Okay it took me about 3 hours plus (first time taking a computer apart) But it seems to have worked…. Thank you for the instructions and comments !
I just replaced the battery in one of these……….. disconnect battery, remove 2 screws. Carefully remove battery.
No need to remove or disconnect anything else………. Total time approx 30 min
Alan Sears - 답글
The guide was easy to follow and everything worked perfectly and the MacBook started up first time with no issues. Thank you for a very clear guide and great fitting kit.
Wow, long comment thread!
In response to the last comment, I think it’s important to summarize:
1) The reason iFixIt recommends the elaborate tear-down and solvent technique is that Lithium Ion batteries are highly flammable if punctured/damaged, pure and simple.
2) Many of us, including myself, choose to use one of the techniques that doesn’t involve removing so many components and using solvent, and instead use one of the many tools mentioned above to separate the battery from its adhesive. In doing so, we recognize the risk, and are extremely careful to minimize that risk. And if it’s not obvious, it’s *much* safer to use a plastic tool for this approach than a metal one!
3) Whichever method you choose when tackling this job, you need to make sure you’re completely familiar with the *entire* process before you begin, and use abundant precautions with either method, as they both carry risks.
I hope this helps newcomers assess the two methods, and approach the job adequately prepared.
Calibrating battery now.
9.5 year old macbook pro.
Hopefully I get another 10 years and the software doesn't become redundant.
I have that same hope. Battery is doing great... at 100% for over 15 minutes compared to my 10 year old battery that went to 50% after 10 minutes with only a browser running.
I'm so unhappy with the results of my transplant. I followed the instructions, the battery seems to be working fine... but the computer is now unusably slow and the fans run hot. From poking around online, the most likely problem is that I reconnected one of the wires not quite right. But which one? Apple removed the Diagnostics tool from the OS; I loaded TG Pro but the computer won't boot it; the Diagnostics tool in Activity Monitor produces a ream of impenetrable reports. I wish I had just gone to the Apple Store. The savings from doing it myself are not worth the struggles I've had to try to get my computer to work -- and I haven't even gotten there yet.
Honestly not mentioning the trackpad connector that is right under the battery is really the most significant forget out of all of this tutorial almost feels like they wanted us to fail.
I was very satisfied with it in the end but that honestly is like leaving out a key part of the puzzle at the most crucial part of a surgery.
I highly recommend anyway attempting this to forget about it and simply get it done by a professional or just buy a new MAC
The frustration is not worth the savings... a great effort Ifixit but man that was extremely disappointing.
Great tutorial. If you're careful and take your time you can get the old battery out without disassembling the entire computer. That said, I didn't use the adhesive remover until AFTER I got the battery out. Then I cleaned up the leftover residual adhesive with a plastic card and qtips.
Thank you! Without the adhesive remover, the batteries were very very stuck. I would say like many others I had tried to remove the batteries first hoping it would work without a hitch however when I realized the angles I was going to have to work at and ripping open a lithium battery by accident was not what I wanted to do. This guide was thorough and very helpful especially the color coordination of the screws!
Completed earlier today, great guide. Completed easily with battery from iFixit store and brought a device back to life.
I think it would be helpful to rewrite this article to incorporate many of the feedback comments, given some of the steps require other steps to be actioned out of sequence. If the article remains in the current sequence, then perhaps add a disclaimer at the top of the article recommending readers to read all step feedback comments before proceeding, as there are very helpful comments that could prevent damage.
Tim Telcik - 답글
PLEASE READ THIS!!!! You do not have to remove the logic board! Just use a fine piece of string (I used dental floss) and work the string behind a cell with a plastic spudger. Have someone hold the MacBook and saw the adhesive away by pulling towards you. Don’t pull up. Do this for every cell. Remove all the old adhesive. Then install your new battery. Don’t forget to calibrate! Hope this helps anyone!
BMWman1029 - 답글
Ce tutorial est très bien fait, les photos complètent parfaitement les explications.
La manip est longue et il faut être minutieux, mais rien de réellement compliqué dans tout ça.
Mon Mac retrouve sa jeunesse !
Merci !
Just did my second Battery Replacement and I am super impressed with this guide. By following each step your also able to clean all the components and make the computer look brand new again (Y)
this worked great! I will love my new Mac that can boot into GNU GRUB! Man, i want to use Arch…… but it’s hard. Btw, i hate systemd
Macbook Pro Retina 15 mid 2012 battery replacement.
From more important to less.
1: Removing the main board was unnecessary to replace the battery. Just disconnect the power supply socket and two screws, then peel the battery cells out.
2: Be aware of flexicable from the trackpad on removing the cells. I did not care much about this and as a result I cut some lines on the cable.
3: Two cells on the centre are sticked onto the metal plate which covers the trackpad. That metal plate may be bent upon peeling the cell out. So be gentle.
4: There is one more connector beside the power supply socket. Pull that up when you really want to take the main board out.
I replaced the battery and found that the main board could not find the keyboard and trackpad, and the machine was extremely slowed down since "karnel task" used the cpu 1000% (not 100 but over 1000 on ActivityMonit). I'm not sure if I can fix it by replacing the trackpad. Anyway, I can not recommend yo to remove the main board when that is not really necessary.
To remove the back panel there are two different pentalobe screws 2.3mm and 3mm however on the tools list there is only one screwdriver. Will I be able to remove both screws with the same screwdriver?
lantzero - 답글
The 2.0 and 2.3 mm measurements are screw lengths, the screw heads are the same sized P5 pentalobe heads. We include the screw lengths so you don't put the wrong screws in the wrong places and end up with screw heads poking out of your device. Hope that clears up some confusion =)
Sam Goldheart -
Yes the same screwdriver will remove both screws, the difference in screws I believe is the length and width but the head is the same.
Mike -
Just be careful to store the 2 shorter screws in a seperate space then the other 3mm screws.
The first time I opened up my Macbook, I put the screws in the wrong order.
Shahzad Arif -
Woohoo, much easier than I thought... Just got confused with the bottom case screw driver but after figure out it was P5 then everything went smooth.... One thing I wanted to upgrade was the wifi to ac and got one on ebay!
didierma - 답글
If you have 54 Bit Driver kit, please use Star 5 driver to remove screw for rMBP 2012 Late
iyeori - 답글
It took about 40 minutes due to an extreme measure of caution but I did it! The only real difficulty was reattaching the screen to the base (yes you have to pry the hinges open) and re-connecting the camera wires. After a few tries the camera wires finally came together. I'm hating Apple for all it's frailty and magical screws but I love ifixit!
floyd - 답글
Simple guide, but it solved my problem. Was wondering why the top two screws weren't going all the way down. Hadn't realized they were 0.7mm shorter.
Emilio Mejia - 답글
I have BootCamp running Win7 on my MBPwRetina15" 2013'Late. I run Visual Studio to build and run my Company's Application which is very CPU & NVidia (specific) intensive. So much so that during a build & run of app I was averaging about 85~95+Celcius!!! And every so often would reach 100Celcius!!! I could not take it anymore so I decided to delve into and re-apply Thermal Paste on the CPU/GPU. I ended up going with CooLaboratory Liquid Pro instead of the traditonal AS5. The original Thermal Paste was pure garbage,,, part of the CPU seemed like it was missing TP. I was scared to do this but it turned out easier than I had imagined. I am currently building the same application and can already observe that the temps average about 75~85 and once in a while will reach 90Celcius. So I am seeing about a 10~15 degree drop in Temps and that makes me very happy!
Alvaro Suarez - 답글
Nice to hear that, i was looking for that kind of information. I have a MBPwRetina 15 Mid 2012 and looking to obtain the best performance!
Jose David Valle -
Woa! Thanks dude! And you follow some guides here for the thermal paste? My mac 15’’ early 2013 heats up a lot but I’m a bit worried about touching anything
Bert0ld0 -
Much easier than expected. Sounds like several people had trouble with the backlight. It is possible that they damaged something by not first making sure to power down the computer completely with the “Shut Down” command. This should be step 1 before removing the back cover screws. Also as noted all the back cover screws are Apple Pentelope #5 bit, but 2 of the screws are shorter than the others. This bit is is hard to find in most stores. Buy it on line along with the Tork #5 and #8. 11/21/2017
Walt Goede - 답글
Not sure if this has been listed.
PRO TIPS from a non-pro:
1 - Keep screws separated and labeled by step # and size.
2 - Be very careful to get screws in properly threaded, its VERY easy to strip the ccrew holes and screws. Especially the case. Not that it happened to me…
3 - It was impossible for me to get all the adhesive off the case from under battery, it left a lot on w/o issue (yet).
4 - Make sure you have Aluminium Foil before starting!
5 - Upgrade the SSD or HDD while your in there!
erin - 답글
Do we remove the logic board purely to get the speaker enclosures out and away from the acetone? Or does it physically block getting the batteries out? Ie. if I wanted to risk the damage to the speakers, could I jump straight to step 34?
Obviously I don’t want to melt the speakers, but I’m kinda weighing that risk against losing a screw or breaking a connector…
Michael Ferenduros - 답글
So I did take the risk and swapped out the battery without doing the logic-board + speaker removal.
Before applying the acetone I put tape on the exposed sides of the speaker-enclosures as best I could - I wrapped the tape, sticky side out, around a card, slid it into the gap, and pressed it onto the speakers. And when applying the acetone, I squirted it as gently as possible onto the side of the battery and let it run down the side, which seemed to help avoid getting too much on the speakers.
The speaker’s plastic turned white in the spots where the acetone touched it, but it looked like surface damage only. Otherwise it was a nice and smooth procedure.
Your milage may vary, obviously.
Michael Ferenduros -
I changed the battery pack as well without removing the logic board etc. It helped, that the batteries already were swollen, thus access to the glue stripes was easier. It works, if you give a little tension, pulling a pack upwards, and then work with a small blade or knife, and cut the glue stripes. It may take a while, but much less time than dismantling the whole macbook. If you don’t hurry, and don’t apply too much force, you will not damage anything. Beside the 10 cover screws you only have to loose 2 screws for the battery connector. After removing the old pack I used Methanol to remove the glue. I prefer this solvent to Acetone, because it’s less or not harmful to plastic (however, no warranty, just my personal experience). I was able to finish the work in 40 minutes, although it was the first time I opened my Macbook. Well, I am an engineer, that helps, but with dismantling all boards it definitely would have taken double the time. And more risks to break a plug or make a mistake while reassembling.
Heinrich Jung -
Success. I needed to replace the right speaker. I thought I was ready at step 22 (you are able to replace the left speaker at this point… but but the right) To replace the right I continued thru step 29 but didn’t completely remove the motherboard. I just lifted it enough to remove and replace the right speaker cable.
Read all of the comments and solved many problems. Thanks to I-fixit, Walter Galen and all who posted comments.
Will Brecht - 03/02/2019
Will Brecht - 답글
1/2
If you're taking the shortcut (nylon, wire…and no adhesive for battery removal (you'll def need to remove the adhesive once the battery pack is removed) things to note:
1 The adhesive may still be pretty strong. Mine was and I broke several wires trying to do the cheese cutter move down the back of the middle two batteries
2 if you're cheese cutting through the adhesive, when you get to the base, don't go too far. I did and severed the battery cell connector… disconcerting puff of smoke.
Ruairi Kennedy - 답글
If you get a puff of smoke removing a bad battery which is going to be replaced it really doesn’t matter, its being replaced.
robert -
2/2
3 the you tube video dude was lucky not to have his two Central batteries adhered . Mine were stuck fast.
4 don't forget about the two small T 5 screws to the left and right of the battery head board, just below the main battery connector.
5 the Track Pad sits behind the two central batteries. The batteries are adhered to a flat plate that protects the Track Pad which is pretty resilient. You can do the cheese wire trick without cutting through anything you shouldn't. However be careful if you're using a spudger or other tool between the two centre batteries at the top of the T. This is where the Track Pad connector (its very flat and exposed) to the motherboard.
6 seems obvious when it's written , but you will need the adhesive remover if you are interested in removing the adhesive. It's a work out.
Ruairi Kennedy - 답글
I just completed this successfully. The guide was great, and I recommend reading each of the steps’ comments, too. It is possible to cut out a majority of the steps outlined here if you’d rather not dismantle most of your laptop. As I’m a novice and this was the first difficult fix I’d ever tried, the idea of taking so many things apart — including removing the logic board — was a little scary. Everyone calculates risk and reward differently, but for me, the risk of removing the logic board for the reward of being able to remove the battery packs with adhesive remover was too great, so I opted to only do steps 1–4, 42–53 and removed the battery with one of the cards from iFixit’s kit. If you go this route, expect it to be a little frustrating & slow going — it took me around 20–30 minutes of slowly chipping away at the adhesive with only the card. There are other techniques out there (wire, fishing line, etc.) and I’d advise looking into them. Keep track of screws: tape, draw out diagrams, label them, etc.
Jake Thornberry - 답글
I only removed the 10 screws and the back panel, the 5 speaker’s screws (without removing the speakers), and the two battery screws, and managed to remove the battery package without undoing anything else. I used a member card (credit card type) to loosen the adhesives under the batteries.
To remove the rest of the glue, I soaked it with something called Label Off from Biltema (Nordic). Finally, I used methylated spirit (rødsprit) to clean it all up and let it dry for 5 minutes before assembling the new battery pack.
Andreas H. Parlow - 답글
I have now replaced the battery and the dc-in board, and I still can’t get the battery to charge. I also bought a new magsafe power adapter. It appears all cables are connected, and the computer runs fine on the battery (until it runs out of juice, then I will be at a complete loss). No clue what to try next. Any suggestions? Thanks!
matt rogers - 답글
Why do you need to remove the entire logic board??? Seems like if you detach the appropriate cables, remove the speakers, that that should be enough. Removing the entire board doesn’t seem necessary - what am I missing?
Sandwah - 답글
What on earth are you talking about? This has nothing to do with the logic board.
Trevor Picard -
The speaker cables are routed under the logic board, or at least the right-side one is. I found that if you can undo the fastenings on one side of the logic board you MIGHT be able to lever it up and work the speaker wire out without taking the entire thing out.
bobthrollop.redirect -
MacBook Pro 15“ 2014:
if the keyboard is connected nothing works. I disconnected the keyboard and the MacBook was starting automatically. An external usb keyboard is not working either. Is something on the logic board defective or is this failure (usb keyboard not working) because of the disconnected keyboard and the system is confused?
any idea for this?
ps: the battery is loading
Pättes - 답글
MacBook Pro 15” Mid 2012
I had the exact same symptom upon initial completion. The keyboard ribbon is actually 2 pieces on mine. There is a plastic cover sheet (that I tried to use as the ribbon the first time) and then there is the actual ribbon sheet. The keyboard works perfectly now that I have the actual ribbon sheet inserted into the the ZIF connector.
It took entirely too long. I was being very careful. Recovery of the keyboard took me less than an hour. I don’t want to admit how long the original work took me.
I hope you already have yours working. I was very careful due to not having an alternate device for my son to use if the work had failed. The other likely point of failure for the keyboard is damage to the ribbon as it goes under the battery pack. I caught myself almost poking too hard on that spot.
EEM -
You should more clear explain that it is possible to skip the steps 5-35 in the beginning explanation text.
( I lost many time to remove parts and there is also more risk to destroy some connectors ?♂️)
Muescha - 답글
Like many others here, I completed the battery replacement by skipping steps 5-52 and instead removing the battery cells with the “cheese cutter” method. I made my cutter from 20# braided monofilament tied to two 4” wooden dowels (3/8” diameter). I carefully applied 97% isopropyl alcohol to the taut mono with a small artist’s brush. I took my sweet time cutting through the glue, but all in all not too difficult, just tedious. I was super careful and mindful of the fire and explosion hazard, and took necessary precautions. One thing to be careful of using the cheese cutter method is to be sure the mono is is really under the cell package and not just in front of it before sawing away. There are some tight spaces that make this tricky. Once the battery was out I used the iFixit acetone to clean up the glue leftover by carefully applying drops on the strips and letting capillary action take over. After waiting about five minutes, the glue strips could be picked up with the supplied tweezers.
Acme Nerd Games - 답글
Hallo Leute, hab das Akku eben erfolgreich bei meinem MacBook getauscht ohne alles vorher auszubauen. WICHTIG: kein ACETON zum Kleber lösen verwenden! Sonst gehen die Lautsprecher kaputt! Auch kein Orangenpower oder ähnliches! Man nehme sich ein dünnes hochzugfestes Nylonband (oder Zahnseide geht auch) und schneide damit die alten Klebepads sägebandmäßig los.
Also:
In der Hoffnung mich so klar wie möglich auszudrücken war das Folgende meine Vorgehensweise:
1. Deckel ab, Achtung die Schrauben mittig unterm Bildschirm sind kürzer!
2. Akkustecker trennen und vorsichtig umbiegen
3. die 2 Schrauben, die die Batterie in der Nähe des Steckers halten losschrauben
4. nun mit zugfestem Band die Akkus rausschneiden
die im Fix-Kit beigelegten Spatel können dabei unterstützen
die übrigbleibenden Klebereste können einfach mit einem der Plastikwerkzeuge abgemacht werden: erst ein bisschen mit einem Spatel vorarbeiten, sodass man es mit seinen Fingen greifen kann, dann langsam und Richtung weg vom Logikboard vorsichtig abziehen.
Jérôme Achilles - 답글
Was dann noch an Kleberesten übrigbleibt, kann wegen mir auch bleiben. Sonst mit 1-2 Tropfen Lösemittel auf ein Microfasertuch geduldig nach und nach wegwischen. Und Wirklich nur WENIGE TROPFEN verwenden! Sonst gehen die Lautsprecher wohlmöglich kaputt.
5. Mithilfe von Druckluft (2-3 bar! nur) nun sämtlichen Staub vorsichtig rausblasen. VORSICHT: Die Lüfter dürfen sich dabei nicht drehen! Die erzeugen sonst Spannung und grillen wohlmöglich das Logikboard!
6. Neues Akku (Folien dabei vom Akku entfernen) reinsetzen und gleich an die Schraubenlöcher ausrichten.
7. Die 2 Schrauben für die Batterie reinschrauben und mit Gefühl anziehen.
Die packs einzeln auf ihren richtigen Sitz hin prüfen
8. Wenn alles sauber ist und alles richtig sitzt, dann den Batteriestecker wieder auf das Logikboard stecken
9. Deckel drauf. Der Deckel muss von alleine, ohne Schrauben richtig in seiner Ausfräsung liegen. Steht irgendeine Ecke hoch, ist darunter was verkehrt.
Jérôme Achilles - 답글
10. Deckel festschrauben. ACHTUNG: 2 Schrauben sind kürzer auf der Seite des Bildschirms!
Missverständnisse kann ich nicht ausschließen. Darum folgt ihr dieser Anleitung bitte nur auf eigenes Risiko. Ich übernehme keine Haftung für Schäden! Viel Erfolg!
Jérôme Achilles - 답글
Hi guys, just successfully replaced the battery on my MacBook without removing everything first. IMPORTANT: do not use ACETON to loosen the glue! Otherwise, the speakers will be broken! Also no orange power or similar! Take a thin high-tensile nylon tape (or dental floss also works) and cut the old adhesive pads loose. Similarly as with a saw tape.
So:
Hoping to express myself as clearly as possible, the following was my procedure:
1. remove the lid, beware that the screws in the center under the screen are shorter!
2. disconnect the battery connector and carefully bend it over
3. unscrew the 2 screws that hold the battery near the plug
4. now cut out the batteries with tension-proof tape
the spatulas included in the fix-kit can help you to do this
the remaining glue can be easily removed with one of the plastic tools: first work a little bit with a spatula so that you can grip it with your fingers, then slowly and carefully pull it off in a direction away from the logic board.
Jérôme Achilles - 답글
Whatever glue remains can stay because of me. Otherwise, patiently wipe away little by little with 1-2 drops of solvent on a microfiber cloth. And really only use FEW DROPS! Otherwise, the speakers may break.
Now carefully blow out all dust with compressed air (2-3 bar! only). CAUTION: The fans must not rotate! Otherwise, they will generate voltage and possibly fry the logic board!
Insert the new battery ( thereby remove the foils from the battery) and align it to the screw holes. 7.
Screw in the 2 screws for the battery and tighten them with feeling.
Check the packs individually for proper fit
8. if everything is clean and everything fits correctly, put the battery connector back on the logic board.
9. put the lid on. The cover must lie correctly in its groove by itself, without screws. If any corner is sticking up, there is something wrong underneath.
Jérôme Achilles - 답글
10. screw the cover. ATTENTION: 2 screws are shorter on the side of the screen!
I cannot exclude misunderstandings. Therefore, please follow these instructions only at your own risk. I assume no liability for damages! Good luck!
Jérôme Achilles - 답글
Another vote for skipping step 34 after step 4. When I tried to reinstall the new battery, I couldn't get the two step 34 screw holes lined up and still be able to connect the battery cable, so I just left them out. Also, one of the bottom cover screws went AWOL.
I think that anyone with a badly swollen battery can skip to 34 because the battery has already done a lot of the work. I doubt that I used more than a dozen drops of remover, if that. A bit of patience and careful work with dental floss did the trick. Maybe 30-40 minutes to get the old battery out and another 10 to peel off the remaining adhesive.
schendel - 답글
Like most have suggested here, definitely read through all of these comments! I learned valuable tips from other commenters above that made this repair easy. Also like many others here, I opted to skips the majority of steps, and instead focused on steps 1-4, 36-53. When removing the small screws from the back plate, make sure to keep them organized and away from the computer. Because they are slightly magnetic, one of the tiny top middle screws magnetized to the MagSafe charger port my my Mac and I spent 20 minutes thinking it fell on the floor.
I had a nylon thread handy to get some of the packs started. Even with applying the adhesive remover, I found the plastic card iFixit provides was not always strong enough to get the pack started. Cheese cutter method was all it needed to get started!
Make sure to elevate your Mac when applying the remover in whatever direction you want the remover to run. Make sure to test new battery before committing to the new adhesive in case it is faulty!
Good luck!
Patrick King - 답글
At step 9, when reinstalling the io board cable, make sure it is the correct way round as in the photo, it fits the wrong way round as well, which results in the MacBook not starting at all. It took me hours to find my mistake...
Pierre Arnaud - 답글
This is just a suggestion or two to help those that might be doing this for the first time.
1. Separate your screws by the component they came from, i.e. cover screws altogether, fan screws altogether etc. I used PostIt notes turned upside down and put the screws head down to hold them in place and then marked what they were and where they came from.
2. If you have enough work space put the component next to the screws that were removed. Then you have everything located for an easy reinstall.
Steve Rowe - 답글
The photographs in this guide show two slightly different MacBook Pro 15" Retina machines being disassembled, probably because the guide has multiple authors, and there is a subtle but very important difference between them. Look at the photo in Step 55. This shows the old battery being lifted out of the machine, it has six cells, and the battery connector is located in the centre of the top edge of the battery between cells 3 and 4. Now look at the photo in Step 3. This shows a battery connector which is offset by about 3cm and is above cell 4, not between cells 3 and 4. I believe the offset battery connector is from a mid 2012-early 2013 MacBook and the central battery connector is from a late 2013-mid 2014 MacBook. This is important because if you have the wrong battery, it won't work because the connector won't reach the socket. I found this out to my cost when I bought a battery which the seller told me was the right one, it turned out to be the wrong one, and then I couldn't return it.
Peter Gray - 답글