소개
이 안내서를 사용하여 iPad 8 Wi-Fi에서 스크린 디지타이저를 교체하세요. 스크린 디지타이저에는 전면 유리와 디지타이저만 포함하며 LCD 패널은 포함되지 않습니다.
참고: 이 안내서는 Wi-Fi 버전 전용입니다. LTE 버전의 경우 여기를 클릭하세요.
홈 버튼의 Touch ID 센서는 로직 보드에 페어링되어 있습니다. Touch ID 기능을 유지하려면 원래 홈 버튼을 새 전면 패널 어셈블리로 옮기고 접착해야 합니다.
배터리 차단기를 사용하여 배터리를 분리할 때는 매우 주의하세요. 배터리 접점이 쉽게 구부러지거나 파손되어 돌이킬 수 없는 손상을 초래할 수 있습니다. 배터리를 분리하지 않고 안내서를 따르려면 나사를 풀 때처럼 꼭 필요한 경우를 제외하고는 금속 도구를 사용하지 않도록 하여 배터리 단락이나 민감한 회로 부품의 손상을 방지하세요.
이 안내서의 일부 사진은 다른 모델에서 촬영한 것으로 시각적으로 약간의 차이가 있을 수 있지만 안내 절차에는 영향을 미치지 않습니다.
필요한 것
-
이 단계에 사용된 도구:Clampy - Anti-Clamp$24.95
-
파란색 손잡이를 뒤로 당겨 안티-클램프의 팔을 잠금 해제하세요.
-
iPad 아래에 물건을 놓음으로써 iPad가 흡입 컵 사이에 수평이 되도록 하세요.
-
흡입 컵을 왼쪽 가장자리 중앙 근처에 위치하세요—하나는 위쪽에, 하나는 아래쪽에.
-
안티-클램프의 하단을 안정적으로 잡고 상단 컵을 꾹 눌러서 흡착하세요.
-
-
-
스크린이 만지기에 따뜻해지면 스크린의 왼쪽 가장자리에 흡착 핸들을 대고 최대한 가장자리에 가깝게 붙이세요.
-
흡착 손잡이로 스크린을 들어 올려 디지타이저와 프레임 사이에 작은 틈을 만드세요.
-
디지타이저와 프레임 사이의 틈에 여는 픽을 끼우세요.
I had a screen that was lightly cracked, and when I pulled up on the glass it cracked even further and made a mess of my removal. So, I would recommend taping cracks even if you can get suction so that you don’t induce even more cracks.
I actually had a really badly cracked digitizer. Using the suction cup did nothing but shatter the digitizer more. I intentionally drove a flat head screw driver into the digitizer to reveal the recess in the body where they are showing the opening-pick. Working around the edge, the glass shattered. You still need to be careful at all of spots noted in step 2.
Do not go under the digitizer more than the 1 mm along the sides or 3-4 mm at the corners as shown in step 29 using the flat grey ring around the edge for a reference. Direct all of your tool force into the body to prevent slipping into critical parts.
The antennas at either side of the home button were the trickiest part as they were thin and slightly attached to the digitizer. I would recommend using a plastic tool for these parts if you are having to 'scrape' the glass off of the tabs of the antenna.
-
-
-
방금 만든 틈새에 두 번째 여는 픽을 끼우세요.
-
픽을 기기의 왼쪽 하단 모서리 쪽으로 밀어 접착제를 분리하세요.
-
접착제가 다시 붙지 않도록 왼쪽 하단 모서리에 픽을 그대로 두세요.
-
-
-
iOpener를 가열하여 기기의 상단 가장자리에 2분 동안 대세요.
-
-
-
새 여는 픽을 끼우고 iPad의 오른쪽 가장자리 가운데로 밀어 넣으세요.
There are sensitive display/digitizer cables no less than five inches from the bottom edge of the iPad. Insert the pick further down than this, or deeper than 1mm beyond this point and you risk irreparably damaging these cables.
Three inches is much too far down this side of the iPad to use picks.
-
-
-
-
방금 만든 iPad 하단 가장자리 틈새에 새 여는 픽을 끼우세요.
-
픽을 안테나 위로 밀어 홈 버튼 바로 앞에서 멈추세요.
-
계속하기 전에 홈 버튼 왼쪽에 픽을 그대로 두세요.
-
-
-
모든 접착제가 분리되면 디지타이저를 책처럼 펼쳐서 iPad와 평행하게 놓으세요.
While reassembling, REALLY make sure the display cables and the home button cable won't be folded / bent while closing the digitizer. I'm not exactly sure what I did, but I broke the home button and touch ID since I bent the home button cable to the point that it broke. These ribbon cables are SUPER fragile.
-
-
이 단계에 사용된 도구:Magnetic Project Mat$19.95
-
십자 드라이버를 사용하여 LCD를 프레임에 고정하는 4.3mm 길이의 나사 4개를 풀어주세요.
-
LCD 나사를 가리고 있는 테이프를 떼어내세요.
I found that the oils from my skin got on the LCD and were hard to get off. Care and/or gloves might be recommended when handling the LCD screen.
-
-
-
스퍼저의 납작한 끝을 사용하여 손가락으로 잡을 수 있을 만큼만 LCD를 홈에서 들어 올리세요.
-
LCD를 책장을 넘기듯 카메라 가까이에서 들어 올려 프레임의 홈 버튼 끝으로 뒤집으세요.
-
디스플레이 케이블에 접근할 수 있도록 깨끗하고 보풀이 없는 부드러운 표면에 LCD를 놓으세요.
The screw holes on the 4 corners of the LCD may have some adhesive under them preventing you from easily lifting the LCD up without damaging it. I advise, one you have taken the screws out drop some IPA on each corner leave it for 2 minutes, then very gently and slowly whilst moving the LCD from side to side slightly and slowly raise each corner. The secret here is patience.
-
-
-
십자 드라이버를 사용하여 배터리 커넥터를 로직 보드에 고정하는 2.3mm 길이의 나사를 풀어주세요.
does anyone know where to get replacement screws? i accidentally lost this one, and there's some missing in my iphone 8 that i had repaired years ago (had to get a new screen again, replaced it myself this time but noticed like 5 or more screws missing)
-
-
-
스퍼저의 납작한 끝을 사용하여 LCD 케이블 프레스 커넥터를 들어 올려 연결 해제하세요.
-
-
이 단계에 사용된 도구:Tweezers$4.99
-
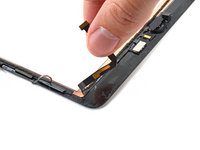
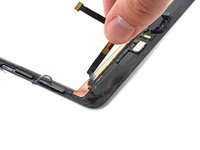
핀셋을 사용하여 홈 버튼 케이블 ZIF 커넥터를 덮고 있는 테이프를 벗겨내세요.
-
-
이 단계에 사용된 도구:Polyimide Tape$9.99
-
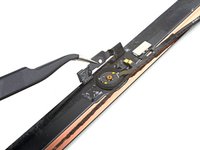
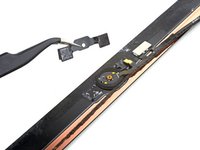
전면 패널 어셈블리를 분리하세요.
-
새 디스플레이에서 “고스트” 또는 “팬텀” 터치 입력 문제가 발생하는 경우 패널 뒷면의 강조 표시된 부분에 Kapton(폴리이미드) 테이프와 같은 매우 얇은 절연 테이프를 추가하면 이 문제를 해결할 수 있습니다. iFixit 교체용 디지타이저에는 적절한 절연 테이프가 함께 제공되므로 테이프를 추가할 필요가 없습니다.
-
-
-
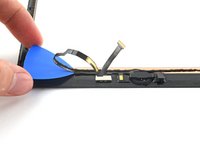
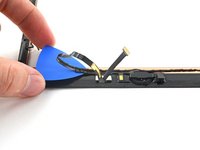
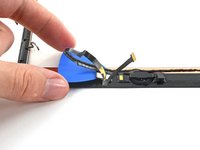
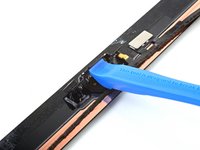
홈 버튼 케이블 아래에 있는 픽을 밀어 전면 패널에서 분리하세요.
-
홈 버튼 브래킷에 닿을 때까지 여는 픽을 계속 미세요.
When re-applying, there is a tiny metal pad on top of the home button cable on the left side of the bracket, it's not displayed anywhere here but belongs on top of the home button cable after the housing is re-attached. It's included in the ifixit digitizer kit but not clear where it belongs in these steps.
-
-
-
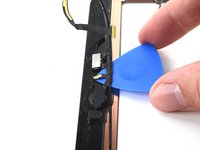
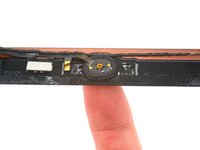
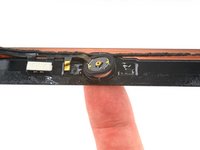
홈 버튼 어셈블리를 분리하세요.
While doing this, i ended up forgetting to take off the spacer ring as my new digitizer already had one so my home button would work but pressing around it would activate it, and it wouldn't click. readjusting the button and taking that off fixed the problem for me
-


기기를 재조립하려면 이 지침을 역순으로 따르세요.
전자 폐기물을 R2 또는 e-Stewards 인증 재활용업체로 가져가세요.
수리가 계획대로 진행되지 않았나요? 기본 문제 해결을 참조하거나 iPad 8 답변 커뮤니티에 도움을 요청하세요.
기기를 재조립하려면 이 지침을 역순으로 따르세요.
전자 폐기물을 R2 또는 e-Stewards 인증 재활용업체로 가져가세요.
수리가 계획대로 진행되지 않았나요? 기본 문제 해결을 참조하거나 iPad 8 답변 커뮤니티에 도움을 요청하세요.
다른 28명이 해당 안내서를 완성하였습니다.
다음 번역가들에게 특별히 감사 드립니다:
100%

Christian Kim님은 저희가 세상을 수리하는데 동참하신 분입니다! 기여하시겠습니까?
번역 시작하기 ›


댓글 4개
Followed the instructions but the new digitizer isn't responding to my inputs and the iPad is randomly entering numbers to unlock the screen. I'm up to 1 hour to wait until the next attempt.
that's what happened with mine as well, i just had to disconnect the cables and reattach them as they were tricky for me
My iPad does now freez and restart during using it, this every 10min.
It does not recognize charging enymore.
Any help?
Done this a few times, For some reason the home button worked for a bit but then stopped working. Reattached the cables, looked at the cable and didn't notice any tearing. Not sure if i need to get a new one or what.