소개
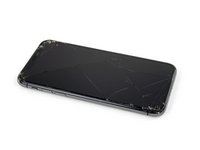
iPhone XS 스크린이 깨지고 터치에 반응하지 않거나 휴대폰의 전원이 켜졌는데도 화면이 안 나오는 경우 이 안내서를 사용하여 디스플레이 어셈블리 조립품 같은 새로운 스크린으로 iPhone을 복원하세요.
디스플레이 뒷면에 부착된 이어피스 스피커 결합체 + 센서 어셈블리는 개별 iPhone과 페어링되어 출고됩니다, 따라서 디스플레이를 교체할 때 원래 디스플레이에서 새 디스플레이로 옮겨야합니다. 이 어셈블리는 생체 인식 Face ID 보안 기능 중 하나 flood illuminator/플러드 일루미네이터를 포함하고 있습니다. 손상되었거나 교체된 경우 Face ID 작동이 중단됩니다 그러므로 이 과정에서 부품들이 손상되지 않도록 특별히 주의하십시오. 손상된 경우 Apple 만이 Face ID 기능을 복원할 수 있습니다.
참고: 정품 Apple 스크린을 사용하는 경우에도 True Tone 기능은 화면 교체 후 비활성화됩니다.
필요한 것
동영상 개요
-
-
분해를 시작하기 전에 iPhone 전원을 꺼주세요.
-
iPhone 하단 가장자리에 위치한 6.9mm-길이 pentalobe/펜타로브 나사 두 개를 빼주세요.
-
-
-
피크릐 끝에서 3mm를 측정하고 마커로 피크에 표시하세요.
Got to step 2 and realized the fix kit doesn't include an opening pick! Looks like a guitar pick, and I have those lying around. Is that expected? Looks like the pick is used in many steps below. There's a little blue crowbar that isn't mentioned in the instructions. Perhaps that replaces the opening pick?
Hi! I can't see which guide you were using when writing this comment. Can you reply here with which guide and fix kit you used?
I see you posted this in Meta. I hope it's resolved soon! In the meantime, a guitar pick may work well enough for your repair.
what fix kit?
My fix kit didn't include an opening pick either
My AliExpress refurbished screen came with a pick that has a coin-like circle that pops out, so no modification was necessary
It's not an Ifixit KIT if it doesn't include everything. You'll need to order the opening pic separately. Or head to Walmart like myself and look for guitar pics. Hopefully, this will work just as well.
No pick in mine as well. It’s really not clear that you have to order this separately when ordering an IPhone SE 202/2022 screen repair kit. Is this the case?
Frustrated, I ordered a compact package where everything was encapsulated. Useless suction tools could not separate the screen. If it is unable to decouple the screen, then why sucking suction tools you have provided.
For my kit the triangle pick was stuck inside the box with the screen not with the other tools maybe it's also there for you
Y’all are getting far, FAR too detailed with some of this stuff…. Measuring and marking the pick that you won’t actually use to open the device?!? lol that’s kinda funny. Just heat it up, grab a spudger, and the back just pops right off! The iFixit tech need to stick to the KISS method more often, you know KEEP IT SIMPLE STUPID!!! Like l, for reals, I’ve been doing this stuff for YEARS and using iFixit guides regularly and this is just ridiculous at this point!
Will the phone still work if the sensor assembly on the back of the screen is damaged?
-
-
-
iPhone 스크린 전체가 덮일 때까지 투명 포장 테이프를 겹쳐 붙이세요.
-
만약 다음 몇 과정에서 흡입 컵이 스크린에 잘 붙지 않으면, 강력 테이프(덕트 테이프 등)를 접어 손잡이 형태로 만들어 붙이고 들어 올리세요.
-
-
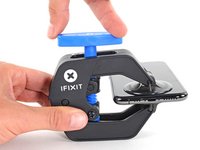
이 단계에 사용된 도구:Clampy - Anti-Clamp$24.95
-
파란색 손잡이를 뒤로 당겨 안티-클램프의 팔을 잠금 해제하세요.
-
팔을 휴대폰의 왼편 또는 오른편 가장자리 위로 밀어 주세요.
-
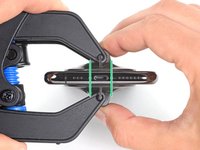
흡입 컵을 휴대폰의 하단 가장자리에 배치하세요—전면에 하나, 후면에 하나.
-
적절한 위치에 컵을 함께 꽉 쥐고 흡착하세요.
-
-
-
iOpener를 가열하여 안티-클램프의 팔에 끼워 넣습니다.
-
iPhone 하단 가장자리에 놓이도록 iOpener를 접으세요.
-
접착제가 풀려서 틈이 생길 때까지 1분 정도 기다리세요.
-
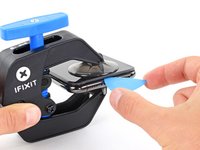
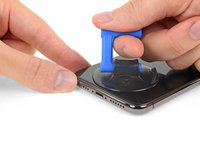
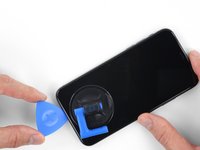
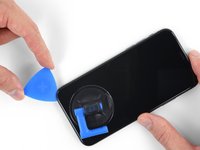
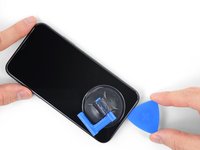
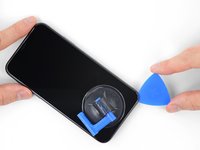
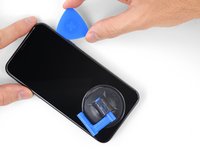
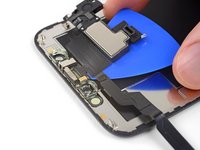
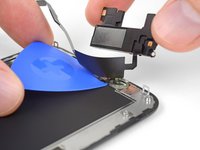
스크린 자체가 아닌 스크린과 플라스틱 베젤 밑의 틈에 여는 픽을 끼우세요.
-
다음 세 단계는 건너뛰세요.
-
-
-
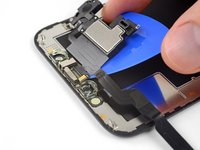
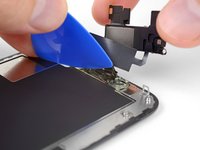
흡입 컵을 확실하고 일정한 압력으로 위로 당겨 전면 패널과 후면 케이스 사이에 약간의 틈을 만드세요.
-
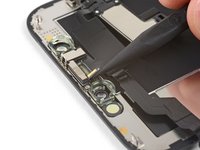
스크린 자체가 아닌 스크린과 플라스틱 베젤 밑에 여는 픽을 끼우세요.
It seems like I need a third hand to do this. To hold the phone; hold the suction cup; and push the pick in the space.
-
-
-
이 단계에 사용된 도구:Magnetic Project Mat$19.95
-
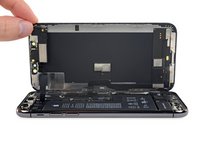
로직 보드 커넥터 브래킷을 고정하는 나사 다섯 개를 풀어주세요:
-
1.0mm Y000 나사 세 개
-
1.3mm Y000 나사 한 개
-
3.7mm Phillips/십자 나사 한 개
FYI: I used a tiny piece of scotch tape to hold those 1mm screws in place while aligning the magnetic screwdriver. Otherwise they are so tiny the magnetic bit pulls them right out the hole.
-
-
-
Spudger/스퍼저 또는 손톱을 사용하여 전면 패널 센서 어셈블리 커넥터를 들어 올려 분리하세요.
In my phone the connector made poor contact with the socket resulting in no sound audible through the phone receiver/headset. There was an overhang of insulation close to the socket which I believe may have prevented a good connection. So if you have these kinds of audio problems you might see if this is the problem.
-
-
-
Spudger/스퍼저 또는 손톱을 사용하여 소켓에서 디지타이저 케이블 커넥터를 들어 올려 분리하세요.
Reassembly: reconnecting the press connectors upon reassembly was so hard, even for the ones not seated in a recessed location !! It took me two days to get them reconnected. What helped me was to shine bright lights on all sides of the iPhone and then hold the iPhone vertically like a book and press it in that way. They are now all in, but the touchscreen functionality has disappeared :( so I will need to reconnect that one.
-
-
-
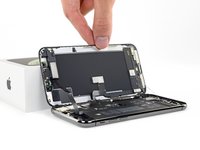
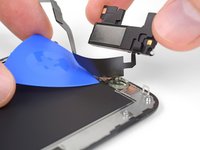
접착제가 분리될 때까지 케이블을 조심히 들어올리세요.
Will replacing camera and sensors fix damaged face I'd
No, FaceID will be disabled because the original sensors are paired with the logic board.
-
-
-
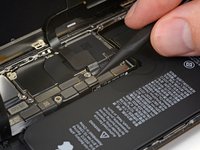
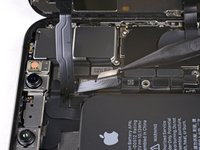
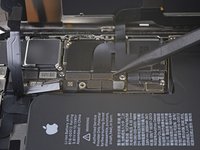
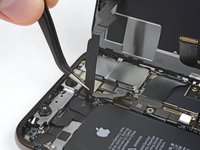
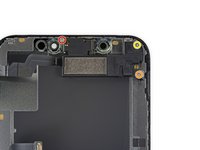
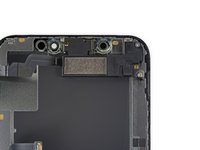
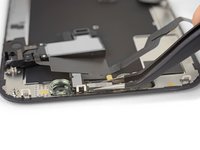
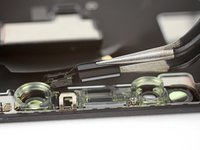
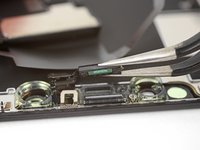
디스플레이 어셈블리 후면 스피커 하우징 오른편 하단 구석에서 숨겨진 나사를 덮고 있는 테이프를 벗겨 떼어내세요.
-
-
-
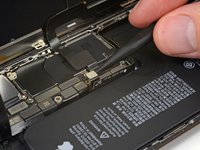
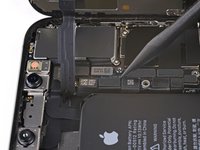
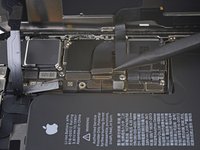
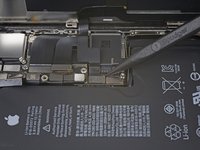
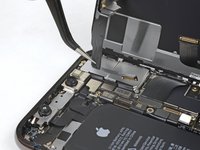
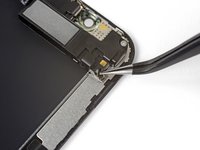
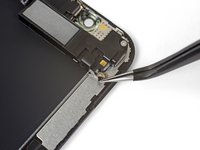
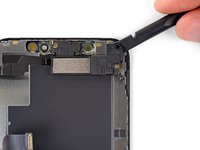
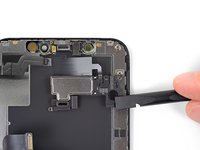
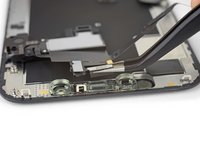
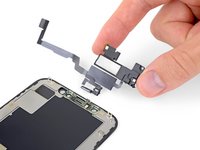
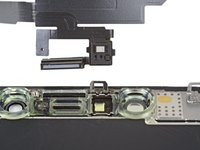
이어피스 스피커 및 전면 센서 어셈블리를 분리하세요.
-
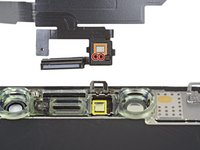
근접 센서
-
플러드 일루미네이터
-
이런 부품이 접착제에 막히지 않도록 모듈을 배치하여 주세요.
What is that hole that is on the opposite side of the proximity sensor? Is it necessary any adhesives or special filter to put it back on the bracket?
Hi Rafael! The hole is for the front-facing microphone. You should be able to reuse the existing adhesive on the screen. If you're transferring it, you can cut a square of double-sided tape such as Tesa tape, poke a generous hole in the center of the square, and apply it to the cable with the hole.
-


새 교체 부품을 원래 부품과 비교하세요—설치하기 전에 원래 부품에서 남은 부품을 옮기거나 새 부품에서 접착 뒷면을 제거해야 할 수도 있습니다.
기기를 다시 조립하려면 위의 단계를 역순으로 따르세요.
전자 폐기물을 R2 또는 e-Stewards 인증 재활용 업체로 가져 가세요.
수리가 계획대로 진행되지 않았습니까? 문제 해결 도움말은 Answers 커뮤니티를 확인하세요.
새 교체 부품을 원래 부품과 비교하세요—설치하기 전에 원래 부품에서 남은 부품을 옮기거나 새 부품에서 접착 뒷면을 제거해야 할 수도 있습니다.
기기를 다시 조립하려면 위의 단계를 역순으로 따르세요.
전자 폐기물을 R2 또는 e-Stewards 인증 재활용 업체로 가져 가세요.
수리가 계획대로 진행되지 않았습니까? 문제 해결 도움말은 Answers 커뮤니티를 확인하세요.
다른 239명이 해당 안내서를 완성하였습니다.
다음 번역가들에게 특별히 감사 드립니다:
100%

Christian Kim님은 저희가 세상을 수리하는데 동참하신 분입니다! 기여하시겠습니까?
번역 시작하기 ›


댓글 47개
It would be better if you provided some guidance on moving the iPhone XS Front Camera and Sensor Holder from the old display to the new one since the part you deliver does not include it. In order to remove it I ended up having to use my heat gun which warped the plastic and ultimately caused me to have to buy a replacement. Does it require adhesive? I still don’t know and it gets conveniently ignored in your guide and repair videos on YouTube. I’m quite frustrated.
Sorry about that! That’s no fun at all. iFixit’s replacement screens are meant to include that component; I’ll ask for someone to check and make sure it’s not left out in the future. However, it’s normally pretty easy to remove using mild heat and/or a few drops of isopropyl alcohol, with some gentle wiggling and prying. Then you carefully position it on your new screen. Adhesive is helpful, but once you screw down the earpiece speaker over the top, it should be perfectly secure regardless.
My phone screen feels a little loose after reassembly. Mostly in the top left area if I push it.. is this normal?
Short answer: Yes. Long answer: If you have adhesive on it that can hold the screen down. If you don’t it’s $5 and super easy to put on. It is kind of normal for the screen to be a little warped, I have done replacements on iPhones without reapplying adhesive and when applying heat it can warp it a tiny bit. The adhesive can help with this a lot. I strongly recommend you get it to hold your screen down.
Thanks a lot for this great instruction!
Sorry for a stupid question, is the digitizer and lcd screen one unit? Long story short, the screen is not cracked but the lcd somehow got damaged.
Hi Reggie,
The digitizer and OLED panel are pretty intricately attached to each other and are sold together as one unit. You may be able to replace the OLED panel without replacing the digitizer, but that would require specialty tools.
Bello, Después que tengas un buen ojo y buen pulso.
Se ve y se siente igual que el original.
Lo mega recomiendo!
Hi, I have one problem and I really hope to find somebody with answers. I need to replace an iPhone XS screen but…. My original screen doesnt have these metallic parts you use to clip it to the rest of the phone. The screen I have ordered had them and also was a tiny bit too long for my phone. This is all so very weird because I can't find any other types of screen online. Seems almost like my phone is a problem. Have you ever encountered such problem? You can reach me by email roza.francois@gmail.com
Hi. i also have the problem like fracois. Could you help me please?! You can reach me by email under dcs.privat@gmail.com
Greetings,
Daniel
Where are you guys ordering parts from? Try taking pictures of both your phone and the old/new screens and post your question in our Answers forum—you’re more likely to get help there.
It seems to me that the European models of the iPhone XS do not have the clips you mentioned (at least, I have mt9e2b/a and it has no clips). The display is much easier to replace since the earpiece speaker + sensor assembly is not fixed to the display; you can stop at around step 17 and reassemble. BUT you need the correct display module (without clips), or it won't go back together. So really the title of this guide should mention the specific iPhone XS models for which it's suitable.
Thanks for the replacement and instructions, since I replaced the screen of my previous iPhone 6 and iPhone 4 and several more for friends, it just took me around 10 minutes.
Luckily I bought the complete set with the tools, I did not know they used Y000 screws and would not have had a screwdriver for it if there wasn’t one included.
Hello, thank you for the guide and kit, everything was great but there was a problem: the space where the square part with the Proximity sensor and Flood illuminator go, originally on the original Iphone screen had a square little mirror like part (like in your tut pictures), in your Oled replacement screen set it is round and much bigger. Is this a problem?
I ask this cause now the auto-brightness is finnicky, the Iphone dims hard like (brightness auto drops), i don’t think i damaged the ambient light sensor , i was extremely slow and methodical, removed the glue carefully from the two near parts before, didn’t strain the cable, the ambient light sensor came out easily enough, slowly but steadily. Also i think if it would be broken, it would not work and dim the brightness. Could it be related to the fact that the sensor is not glued down like it was before? The screws were carefully put back in the exact order and no glue fell into/onto the sensors. Thank you
Hello. After replacing the display every many while I use it it turns black screen, then I have to lock and unlock it and it lights up again. Could you advise me something? Or is the display faulty? With the original it does not. Thanks.
The install went ok - 2 things should be mentioned….1. does the blue film on the replacement screen need to be removed Yes or No, 2. IF the touch sensor is not working mention trying a hard restart 1st it would have saved me a ton of time and frustration… I assembled, reinstalled the old screen since it was working before, since it didn’t work either, disassembled, and reassembled the replacement part several times to troubleshoot why it wasn’t working. Those screws are sooo small its a wonder I didn’t lose any. None the less, after a hard restart, the touch sensor is working great and the phone is operating as designed. I was going to replace the back glass & ordered the part but there’s no way I am going into that after doing this- its not my phone. I put packing tape over the glass and put it back into the cover. A few hours of time is way cheaper than purchasing a new phone :)
Thanks for the suggestion about the hard restart! If the blue film is lightly adhered to the replacement screen, it is a liner and should be removed.
The two screen connection modules with pins closest to the bottom are impossible to connect. They keep popping out making it impossible to put the cover on. Any tips?
The screen replacement went flawlessly. All the functions work perfectly. I have no problems with 3D Touch, nor with FaceID. The only thing that doesn’t work any more is True Tone. Thank you for the guide.
Just replaced a cracked screen. Took some time but finally managed to do it. Now have a beautiful screen and and a perfectly working device.
Paul L.
Great guide! Unfortunately I now have stripes across the screen (left-right). They are only visible on even grey backgrounds, so it’s not a big issue. Guess I bought a cheap screen, https://www.phone-parts.dk/iphone-xs-ska...
I replaced my screen yesterday and the guides were perfect. Unfortunately, when I went to bed and had my screen on its dimmest setting I noticed that the colors were massively distorted toward the red end of the spectrum. I’m worried that I received a faulty product. The screen otherwise functions perfectly and colors are all normal at any other brightness setting. Please help!
These are not authentic apple screen replacements. I’ve received two different replacement screens now and they’ve both had issues. The first worked mostly fine except when the screen brightness was on its lowest setting the screen would have a strong reddish hue and the resolution would get noisy. The replacement that was sent has different problems, and now I wish I had just kept the original. This one is over saturated, struggles to have even dimming at the lowest brightness setting, the glass itself is not perfectly smooth, and the screen is somehow strangely sensitive, which makes typing and general use of the phone more difficult. At this point I wish I just took it to a certified apple repair shop.
When i lift my screen up and off. all the top mounted components are left behind still attached to the phone ( front camera etc)
also there is some sort of metal protection border in the inside around the perimeter of the phone. blocking access to some screws at the bottom.
has anyone come across this. i cant remove the protection plate.
that is the display frame when you took the old display off you must have accidentally gone between the display and display frame. you will have to buy a new display because the display frame holds the display on the phone
It would be really good to have some (shared) instructions on how to turn off the iPhone when the display and/or digitizer is not working; after all that's why we're doing this! Most guides I've seen say that the instructions are for turning off the phone, but actually they tell you how to force it to restart.
For iPhones without buttons, the sequence seems to be: briefly press volume up, briefly press volume down, press and hold the RH side button. Continue to hold when the display turns off... Continue to hold when the Apple logo shows, then the display will turn off again. Now release the side button. (This is similar to the restart sequence you'll find elsewhere, but those instructions will tell you to release the button when the Apple logo shows.) Clearly the display may be so damaged that you can't see the Apple logo, but you may well be able to tell when the display turns off entirely for the second time. If you can't see any visible change, try holding for about 20s altogether.
Phil Atkin - 답글
TOP!!!!! did it!!!
Hello, My name is Michael and I am in search of some assistance. I recently broke my Iphone XS screen, and I am looking to buy a new one as soon as I can find the exact parts I need. If you sell these products, Please send me a message. If you don't sell these products, But you still know the answer then please message me with a link for a listing for the items that I need. Thanks in advance!!
Also, I am a decent problem solver, But I have never ever changed a Iphone screen. Does anyone know if this sounds like a bad idea? I have background experience with computers and and mobile devices. Id you know of a good tutorial Please DM me with the link. Thanks in advance!
Hi Michael!
You're at the right place! This page contains detailed step-by-step instructions on how to replace the screen for your iPhone XS. I'd suggest that you read through the guide to assess whether it's something you'd feel comfortable doing or not. You can also find the proper part to buy in the "what you need" section in that page. Best of luck!
I have just replaced the screen on my iPhone Xs following this guide for disassembling and the youtube for reassembling without any issues. Great, clear and detailed description. Thank you for saving me from another expensive purchase!
Great post! I repaired my phone in an hour, and you can't tell. I would be careful removing anything near the camera as any damage will cause Face ID to no longer work.
Perfect, thank you. Instructions were very clear.
Geweldig duidelijk foto's en uitleg. Super!!!!!
These instructions where spot-on! Thanks! I managed to fix a 'ghost touch' by replacing the display! This saved me hundreds of euro's! (Repairshop: € 250,-, screen from Amazon: € 21,-)
Hi, I just swapped the screens on my kids phones becasue my daughters wasn't working on the top row, and my son had a new phone now. I have changed screens & batteries many times. Once I swapped the screen over, the 1,2 & 3 do not work on the keypad to log in to the phone. It looks like the whole top of the screen isn't responding. The top of the screen does respond to a tap to wake the phone though?
I have hard reset, I have removed and reconnected the digitizer cable. Any other ideas?
Der Original Akku ist codiert. Egal, ob man einen zweiten Apple Original Akku oder einen neuen Fremdakku einbaut erscheint bereits in den Einstellungen eine "Wichtige Batterienachricht" mit einem roten Punkt. "Unbekanntes Bauteil" und die "Informationen zum Batteriezustand" sind nicht verfügbar. Diese Nachricht verbleibt immer und nervt auf Dauer immens.
Der Akku muss angelernt werden und dieses können von jetzt an nur authorisierte Apple Servicebetriebe und diesen ist es durch Apple verboten die notwendige Info weiterzugeben.
Dies ist nicht zu verwechseln mit der bereits bekannten Rekalibrierung seit iOS 14.5.
Seit dieser neuen Codierung kostet der Akkutausch bei Apple auch nicht mehr 75 € sondern aktuell 99 € (Stand Novmber 2023 in Deutschland).
Damit sind künftig alle nicht authorisierten Servicebetriebe raus - denn wer will schon dauernd diese Mitteilung auf dem Bildschirm haben?
Überlegt vorher, ob unter diesen Bedingungen ein eigener Akkutausch noch sinnvoll ist .....
Manfred Wachtel - 답글
Lieben Dank @manfredwachtel ! Mehr Infos dazu haben wir auch in unserem Blog zusammengefasst: https://de.ifixit.com/News/78890/teileko...
Sandra Hiller -