
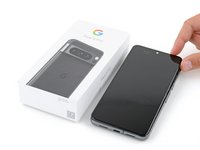
Google Pixel 8 Pro Screen Replacement

필요한 것
수리 키트
이 키트는 이 안내서를 완료하는데 필요한 모든 부품과 도구를 포함하고 있습니다.

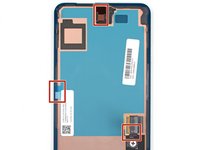
부품


도구


더보기...
-
-
Unplug all cables from your phone.
-
Completely power off your phone.
-
-
-
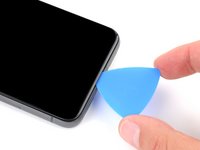
Measure 3 mm from the tip and mark the opening pick with a permanent marker.
-
-
-
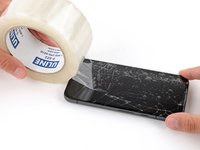
Apply overlapping strips of packing tape to the cracked glass until the whole screen is covered.
-
Wear safety glasses to protect your eyes from any glass shaken free during the repair.
-
-
-
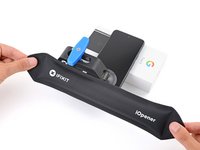
Heat an iOpener and lay it on the bottom edge of the screen for two minutes to soften the adhesive.
From my limited experience, iOpener is a really cool thing if nothing else is available, but if possible, hair dryer will do the job much, much better. Though, with iOpener is much harder to do something wrong...
-
-
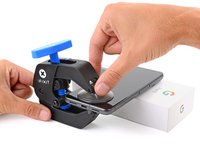
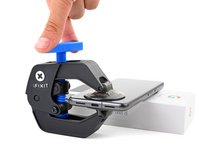
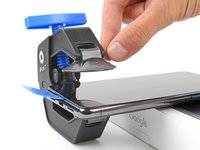
이 단계에 사용된 도구:Clampy - Anti-Clamp$24.95
-
Pull the blue handle backwards to unlock the Anti-Clamp's arms.
-
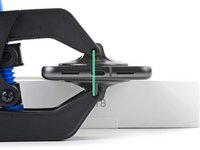
Place your phone screen side up on an object so it will rest level between the Anti-Clamp's arms—the bottom edge should be hanging off.
-
Slide the arms over the left edge of your phone, so you have access to the bottom edge.
-
Position the suction cups as close to the center of the bottom edge as possible.
-
Squeeze the cups together to create suction.
-
-
-
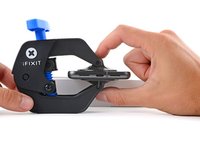
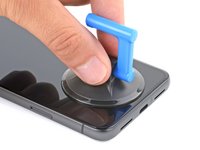
Pull the handle forward to lock the arms.
-
Turn the handle clockwise one full turn (360 degrees), or until the suction cups begin to stretch.
-
As the cups stretch, make sure they stay aligned with each other. If they keep slipping, remove the Anti-Clamp and apply tape for the cups to stick to.
-
-
-
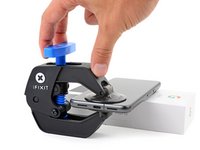
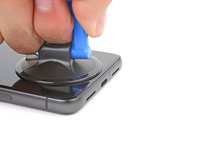
Wait one minute for a gap to form between the screen and frame.
-
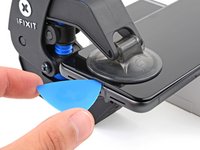
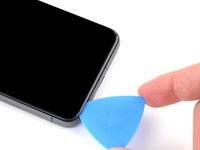
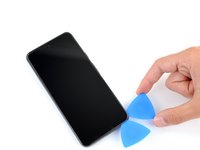
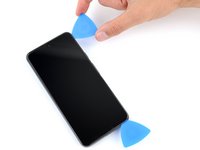
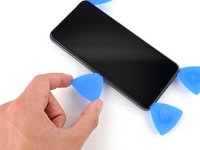
Insert an opening pick into the gap.
-
Pull the blue handle backwards to unlock the arms and remove the Anti-Clamp using the pull tabs on the suction cups.
-
Skip the next two steps.
-
-
-
-
Pull up on the suction handle with strong, steady force until a gap forms between the screen and frame.
-
Insert an opening pick into the gap.
-
-
-
The screen cable is a little less than halfway up the left edge of the phone. Be very careful here to avoid tearing the cable.
-
There are many spring contacts around the perimeter of the phone. Be very careful in these areas to avoid bending the contacts.
I'd like to point out that the glass might seperate from the frame. If this is your first time opening up this phone be aware that there is a plastic frame below the glass (unlike Samsung Fold Front Display glass only type) but it might not look like it. Be careful and go deeper then you might expect you need to. Deeper as in down, not horizontally.
-
-
-
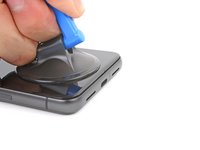
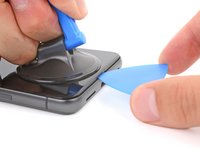
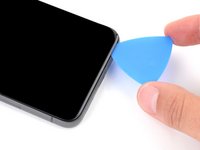
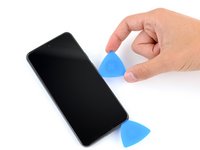
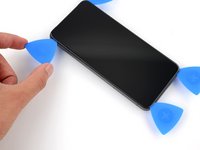
Slide the opening pick along the bottom edge to separate the adhesive securing it.
-
Leave the pick in the bottom right corner to prevent the adhesive from resealing.
-
-
-
Apply a heated iOpener to the right edge of the screen for two minutes.
-
-
-
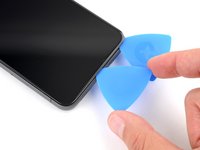
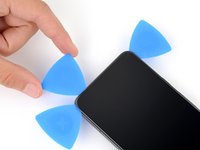
Insert a second opening pick under the bottom right corner of the screen.
-
Slide the new pick to the top right corner to separate the adhesive securing the screen's right edge.
-
Leave the pick in the top right corner to prevent the adhesive from resealing.
-
-
-
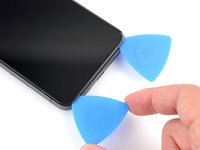
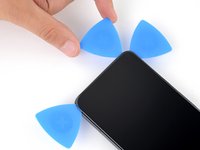
Insert a third opening pick under the bottom edge of the screen.
-
Slide the new pick to the bottom left corner.
-
Leave the pick in the bottom left corner to prevent the adhesive from resealing.
-
-
-
Apply a heated iOpener to the left edge of the screen for two minutes.
-
-
-
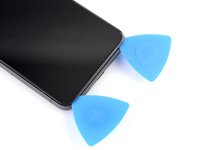
Insert a fourth opening pick under the bottom left corner of the screen.
-
Slide the new pick to the top left corner to separate the adhesive securing the screen's left edge.
-
Leave the pick in the top left corner to prevent the adhesive from resealing.
-
-
-
Apply a heated iOpener to the top edge of the screen for two minutes.
-
-
-
Insert a fifth opening pick under the top edge of the screen, near the left corner.
-
Slide the opening pick to the top right corner to separate the adhesive securing the screen's top edge.
-
-
-
Place a small box or stack of books to the left of your phone so you can prop up the screen while disconnecting its cable.
-
Swing up the right edge of the screen like the front cover of a book.
-
Prop up the screen so you can access the screen cable without straining it.
-
-
-
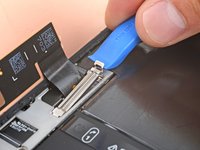
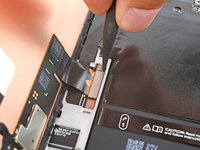
Use an opening tool to pry up the upper edge of the screen cable cover.
-
Remove the cover.
-
-
-
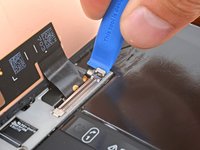
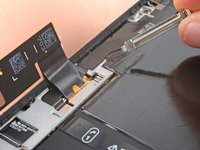
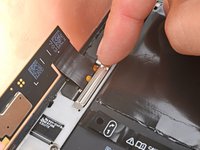
Insert the point of a spudger under the top right corner of the screen's press connector.
-
Gently pry up and disconnect the cable.
-
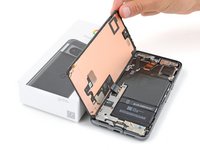
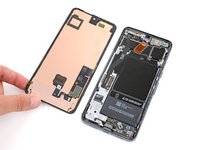
Remove the screen.
-
-
-
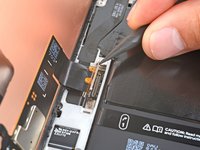
Thoroughly check the entire screen for any plastic liners or tape and use the pull tabs to remove all of them. Look carefully for a large piece of plastic covering the back of the screen, a small one near the front camera cutout, and adhesive liners around the perimeter.
-
Reconnect the screen cable and reinstall its cover.
-
This is a good point to test your phone before sealing it up. Temporarily power on your phone and make sure it works as expected. Power it down before continuing.
-
Firmly press the screen into place on the frame—you should feel the clips "pop" into place.
-
Press firmly around the perimeter of the screen to secure it with the new adhesive.
-
Follow this guide to calibrate the fingerprint sensor.
-


To reassemble your device, follow these instructions in reverse order.
To run a diagnostics test with the built-in Pixel Diagnostic tool, click here.
Take your e-waste to an R2 or e-Stewards certified recycler.
Repair didn’t go as planned? Try some basic troubleshooting, or ask our Answers community for help.
다른 16명이 해당 안내서를 완성하였습니다.


댓글 21개
So i tried the replacement but only my 4, 5, 6 buttons press... I reordered a new screen but is there something i did wrong or break?
before you apply the new screen, make sure the plastic housing also came off with the screen! the one that keeps the camera in place.
If you've done it correctly the camera should be kind of loose and not held in.
Same issue as the pixel 7 pro new screen does not fit!
The guide does not mention this and assumes that all of it will come off in one go. I've wasted an adhesive on this and a few hours spent scratching my head, if this isnt removed then your screen wont click in.
Hi Samuel, thank you for your comment! We'd like to update the guide to be more helpful, but just need some clarifying information. Is the housing you're talking about the small, square housing on the top of the screen, or the entire perimeter housing?
I have the same issue where the entire perimeter housing didnt come of
matteo -
Yes! I have just done this and also had the same issue. In step 19 you can see a black plastic trim stuck to the removed screen - this had detached from the (very shattered) glass and was left in the frame, which I did not realise until trying to put the new screen in place and wondering why it did not click into place. Once I removed that and spent 40 mins cleaning up the next layer of adhesive, the new screen popped in perfectly. The bit remaining was the 'entire perimeter housing' as mentioned in the comment
AaronM -
touch has delay when i placed new screen. and yes i did disable/enable the screen protector option. but my pixel 8 pro is not working fine.
Replaced screen today, almost applied double adhesive because the screen supplied came with adhesive applied to it already. I had to removed the included adhesive again after picking the first one out. frustrating to say the least.
I also removed the adhesive on the top of the front camera module since the instructions say to remove ALL adhesive around the frame but there was as far as I could see no replacement for it.
There was also a plastic sheet over the camera lens area on the new screen which I had to remove, was not in the instructions. Hopefully I did this right.
Thank you for the comment! We've updated the guide accordingly.
Here are my notes, I had to do it twice because missed step.
1) Severely damaged screens may need prying around the edges; suction cups might not help, didn't for me
Don’t worry if the screen breaks further during removal; it’s normal.
Cleaning Edge Adhesive:
Remove old adhesives carefully, especially near the front-facing camera, which should be loose. (it will move around)
Remove ALL 3 back tabs (I only removed 2 on mistake and had to redo)
Top Tab: Remove from the selfie camera. failure to remove will render a camera useless
Edge Tab: Remove around the entire edge, otherwise it will not fit and not stick.
Connector Tab: Remove this large tab near the connector to clear the proximity sensor. Failure to remove this will disable the sensor.
for me, only the top left had a small amount of green left.
a photo of screen without the 3 pull tabs would be useful
Extra Adhesive in Kit:
The kit’s extra adhesive isn't needed if installing a new screen. New screen adhesive already on new screen, I was confused by this for a while.
Shawn Oles - 답글
Hey folks, just wanted to leave my 2c, I just used this and I am about to run the fingerprint recalibration, but so far everything works great!
I replaced my screen because it was broken, it was so smashed around that the removal of the original screen was not as smooth as shown here or in videos. In short, here is a quick rundown
The screen part is actually composed of 2 layers, a glass layer and a copper/aluminum thin layer where the electronics are attached. If your screen is broken like mine, likehood is that the glass layer will detach first in many pieces, don't be afraid to remove it first and then do the copper layer. As others have pointed, the plastic frame that holds both layers as one part could possibly be too stuborn to be removed as easily. So I removed the copper layer from right to left (like a book as mentioned on the guide), disconnected the screen and then removed the plastic frame
At this time clean up the old adhesive and any dust there might be. Then continue with the guide. Thanks!
Just finished my screen replacement. I thought I'd removed the screen but I only removed the glass and the copper sheet was still fastened on my phone. I reheated the edges and managed to slowly remove the copper screen. I then realised the black plastic frame was still fastened in. It was useful to see the new screen to check exactly what needed to come off. I again heated the black plastic frame and removed that and then checked there was no glue bits left. I had lots of dust around the edges so I brushed and blew all that out before assembling the new screen.
Everything worked ok except my fingerprint sensor. Still trying to work out how to re-calibrate that.
changed the screen everything went smoothly as expected but only one problem, the front camera lens has a lot of dust inside, my front camera has so much dust now that i dont use it at all. any fixes?
Please do the instructions on video, so that would eliminate all misunderstanding and provide a better guidance, especially for people who are not familiar with nuance details.
Thank you.
Hi, I would to summarise the process for understanding better.
All I need to do is remove the screen and plug in the new screen?
Do I need to replace the fingerprint sensor? Or it comes with the new screen
Do I need to disconnect the battery in some point?
Thank you
I received a genuine Google part I bought from iFixit.
It came with more black tape that was not included in the pictured instructions. I failed to remove it and it blocked the proximity sensor.
Definitely a silly mistake on my part but I think the instructions should be up to date on the parts that iFixit sell.
That sounds very frustrating, I'm sorry that happened! I've updated the instructions to hopefully be clearer to check everywhere on the screen. Thanks for the comment!
Just completed my screen replacement. 1) The kit included two adhesives, one standalone and one attached to the new screen. I used them both, hopefully this isn't an issue. 2) spent about 45 minutes freaking out because my new screen didn't initially turn on. May need a hard reset by holding the power and volume down button for over a minute. I initially wasn't holding them long enough. But after some frustrated googling, I found the answer. Definitely beats buying a new phone. Thanks everyone!
I bought a screen display replacement without frame and I don't know how to install any ideas?
Mein Bildschirm ist schwarz - das Smartphone reagiert jedoch. Wie kann ich es ausschalten wenn ich kein Bild nicht sehe?
Ulises - 답글